2012 Kia Sedona LX

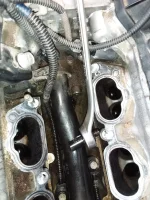
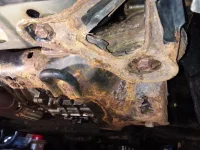
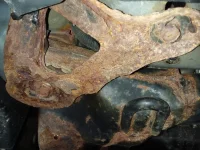
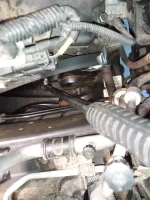
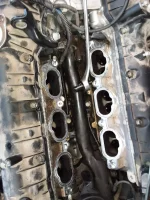
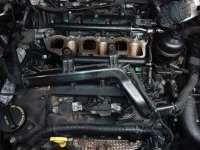
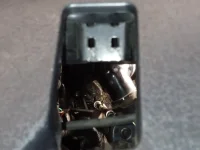
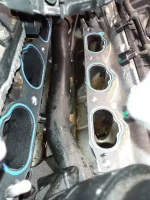
Just got the valve covers off, 3 things stood out, 2 from the intake manifold removal; getting the 14mm bolt at the rear bracket, not hard just use the thin ratchet with a short socket; the power steering bracket attaches with 2 - 10mm bolts that are easily accessed at the top, the wire harness being the last, just knowing how to get the connectors loose - some have a safety that must be released before the tab can be pushed; and the plastic hold downs are fairly easy to remove with a hooked pick, push in the one side, lift and push in the other side. Nothing was real difficult, though the valve covers were stuck down pretty good.
20210725_203332.jpg

20210725_203052.jpg

20210725_203228.jpg

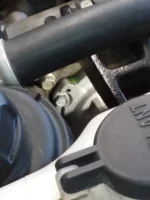
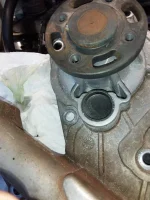
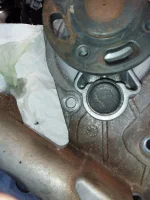
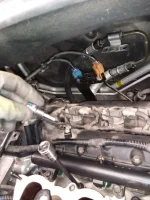
Last one is a close up of bank 1 and the exhaust VVT solenoid, I did get a new replacement, hoping I never have to remove the rear valve cover again. Just going to check the gap on the spark plugs and a light coat of anti-seize assuming the are fairly new NGK iridium's like the front bank. The coils are all Denso, I did have replacements for the rear, Rock Auto's Spectra Premium, Limited Lifetime guarantee, but I think it'll be fine with the Denso's. Also left the rear coils attached to that section of the wire harness. I really like the wire harness in that the different sections can be disconnected, most fairly easily.

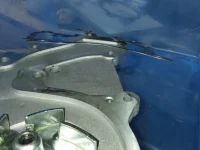
Next 2 days will be getting the timing cover off and cleaning up the gasket surfaces. Parts should be here Wednesday, which reminds me, I should get some Permatex Ultra Grey in the aerosol can too, so I have that option too. Drive belt and water pump next, unlike the video of the guy working on the Santa Fe, the Sedona looks like there is plenty of room on that end.
 
Tonight I removed the drive belt and the water pump. There was plenty of room to get the water pump out without removing the upper motor mount. Removed the thermostat to get coolant drained down some, probably could have skipped that, but the drain at the bottom of the radiator is a plastic Philips head that is worthless to use on mine, I couldn't get it to budge and the lower radiator hose is too obscured by splash guards.

The bolt sticking out at the bottom was removed as I wanted to make sure it wasn't a mounting bolt, I'm not sure why it was so close to the water pump. I also jacked up the driver's side to get a little more coolant to drain out.
20210726_211735.jpg


Water pump seems to have differences where that bolt hole is at the molded pipe, new one would need a longer bolt, it was a 6mm hex, used a key with small plumbing pipe for a breaker bar, it was fairly tight. Think I am going to get the Gates water pump at Rock Auto, it shows the same height. Gasket was different too, new one was not a flat gasket but more like one that goes in a channel, here's the difference as I tried to photo all for the return;
20210726_211710.jpg
 
The spark plug for the Korean made is a 12mm thread diameter, not the 14mm, so be clear of the difference especially if ordering online as I did.

Just to update the timing cover is back on, I only changed the timing chain tensioner for bank 1, had the guides but saw no reason to touch anything else, one of them if it works don't fix it moments. Went to Autozone to get 3 of the lesser priced iridium NGK plugs for the rear bank, ended up they only had 2 in stock so they gave me a discount on the upscale NGK iridiums, $10.49 each, so I opted to just get all 6. Had I just got the 3 I would have gotten the rest next Rock Auto order, which I am sure is soon and the front bank is easy enough to wait considering price and the minimize cost instinct.

Then the spark plug gap, Rock Auto has some listed smaller at .035, Denso 5356, and at .032, the Ruthenium NGK 94705 being examples, so after trying to figure out if the NGK listing at .044 is correct and finding nothing concrete, I got nothing else done today. The next 2 days will be the plug, valve cover gaskets, Bank1 exhaust VVT solenoid, motor mount, splash shield, check and change oil pressure sensor if necessary, new intake plenum gasket, and finish up with plugging in all the wire harness connections, which may seem like a lot but I really like that they are in the front of the engine after having worked on Sienna's where they at the rear, the 3.3 was tough and I didn't even try to change the valve cover on a 3.5 that I once owned, the wire harness was strapped so tight over the valve cover.
 
Found a chart for spark plug torque specs, reminder mine is a 12mm thread diameter, I went to 17 ft lbs, had set the torque wrench to 18, but as I got closer I decided to back down to 15, then 16, last 17 seemed as much as I would go. Checked the gap on NGK 9723 SILZKR7B11 installed and it was pretty uniformily .040 and so I didn't mess with that.
Torque Recommendations

Got the drive belt on, had to come back in and look up that routing that I was sure I'd remember...it's a super long belt, and I didn't get a new one yet, but did grab a spare from the junkyard with whatever else I got that day, I knew it would be cheap insurance. Motor mount was next so I could remove the jack supporting it and clean out the mess of coolant and oil as it always finds a way to foil my attempt to contain it.

Last I replaced the bank 1 exhaust VVT solenoid, everything looked clean enough and normal, I have previously tested it for resistance, around 10.7 ohms as I recall, and I put it to a 9 volt battery power and it clicked as expected, going to test that again tomorrow now that it is removed as well as have a closer look for any sticking issues that may be present from sludge/varnish and/or poor solenoid performance. New VVT solenoid is a Auto 7 brand from Rock Auto, is installed and even had the Hyundai/Kia marking on it like the old one.
 
Well it is certainly a pleasant transverse v6 set-up after being under the wiper cowl of Toyota 3.3 and 3.5, respectively. I am just about to start assembly after going down 1 more level on the intake manifold to replace the oil sending unit which was leaking, fairly common problem as I have heard. According to one YouTube posting that may have caused his rattle problem, music mix volume problem on that video so I won't subject anyone to that, one could find it easily if necessary.

I hope to report on that sometime tomorrow if no leaks when the coolant and oil are filled. Actually the leaking sending unit is the only problem I could identify, I'll have to elaborate on that later if I can figure out the chain tensioner or the VVT solenoid didn't contribute to the OBD codes P0016, P0017.

I fully intend this thread to be guidance to the next new owner of a similar Kia/Hyundai V6 that may need some DIY direction. Do the easy stuff first, as in I should have done all the other parts changing, intake and exhaust VVT solenoids and oil sending unit, before removing the timing cover, too late smart here.

Here's the same way I had to remove mine starting at 12:30 he gets the lower manifold off and has to flip the wrench to and fro to turn the oil sending unit a little at a time.


Mine with the 15/16 box end wrench; Couldn't see down there so I used a zip-tie to check for oil dripping and it was like pulling out a dipstick on full. I'll add the other image and the device I used to vacuum out the oil and crude, some had to be lifted out by long nose pliers. I used a plastic jug, clear plastic tube to the bottom and vacuum nozzle at the top, that did collapse but left enough volume to get the crude out and not allow it to contaminate the vacuum cleaner. All underneath that center coolant pipe is an uneven valley where the oil pools resided. That is the 2 knock sensors on either side half way down the pipe for those who may not have worked with them.

20210804_175743.jpg
 

Attachments

  • 20210804_175617.jpg
    20210804_175617.jpg
    204.3 KB · Views: 20
  • 20210804_175648.jpg
    20210804_175648.jpg
    164.2 KB · Views: 20
Timing cover assembled and road tested, still same OBD codes, P0016, P0017, bank 1 crank cam correlation sensor a + b, so at this point I am going to have to live with it, runs good and there are no leaks so far. Good learning experience and outside possibility all the oil/part changes may clear some sludge and do it some good. Timing marks were correct and the chain and guides didn't seem to have any difference when compared to the other bank. If no more issue then the codes, I am going to drive as is.

Water pump gasket leaked, it had a crease likely from shipping, a Gates with gasket from Rock Auto, I remember seeing the crease and thought it would conform when assembled, wrong assumption, but I got the Fel Pro 35935 from Advance Auto and finished assembly then took a short trip and then a longer trip up and down the highway a few times, hour later and I just checked for leaks again, nothing.

The first image is the drip forming at the top, and the second shows across the top of the gasket where the crease is.
 

Attachments

  • 20210808_112633.jpg
    20210808_112633.jpg
    68.6 KB · Views: 18
  • 20210808_120727.jpg
    20210808_120727.jpg
    96.1 KB · Views: 18
Last edited:
Water pump leak again, all the fasteners had come loose over the last 2 weeks and a drip started. I should have used some purple thread-lock to keep them in place, that'll be next, didn't think of that until I had everything tight and the belt back on. I had notice a few of the fastener weren't very tight when I first took off the timing cover so I'll likely go over everything and I got a new tube of purple to apply as necessary. Discussed torque vs hand tight with my buddy, but for me I don't have an accurate torque wrench and the thought of twisting off a fastener scares me enough I am going by feel, let the thread-locker do the rest.

And there's rust under the splash guard, glad I took it off and now I can hopefully slow the rusting, I had planned this to be a winter beater over the next 4 or 5 winters, best case scenario. Good thing I bought this during the summer so I could work out repairs and service while the weather is still agreeable. It's likely this vehicle was driven for a period with some front end damage. This is the sides where the radiator support meets the corner. The second one is the passenger side, there is a small round hole, where looking at the first image, the driver's side, it is a big rust hole. This vehicle is a one-owner from Wisconsin.
 

Attachments

  • 20210828_135321.jpg
    20210828_135321.jpg
    171.1 KB · Views: 33
  • 20210828_135356.jpg
    20210828_135356.jpg
    171.3 KB · Views: 33
I've seen worse, on my own SE-R nissan lol, but all things considered your Kia does not look terrible, minus the hole. What i did to "slow" it down and make it look better is used Rust-Oleum Rust Reformer https://www.rustoleum.com/product-c...o/removers-and-chemicals/rust-reformer-spray/
Its a band aid i guess but i believe it helped more then leaving it unprotected, and did slow the rust down alot. I also reapplied it in every spring after a thorough power wash and clean.
 
Yes, that's what I will do as today I cleaned out the hole and it got slightly bigger but seems like it should be sound if the rust can be slowed.

Also after getting the water pump bolts all secured with purple thread locker, I went ahead and went around the whole timing cover and secured all the fasteners there too, some where fine while others were showing signs of working loose as to be slightly more than finger tight. I also posted a thread on
Water Pump Weep Hole Initial Coolant Drip
as it probably is a concern to all who may have a newly installed water pump, there is also a method of using duct tape to keep the drive belt on the other pulleys as it has a routing that maybe challenging to remember and install, this way I should only have to get it back on the water pump pulley, here's the images of all that to review as necessary, the tape on the power steering pump pulley doesn't show well but it is there somewhere...;
 

Attachments

  • 20210830_135401.jpg
    20210830_135401.jpg
    160.1 KB · Views: 12
  • 20210830_135445.jpg
    20210830_135445.jpg
    155 KB · Views: 9
  • 20210830_135959.jpg
    20210830_135959.jpg
    148.1 KB · Views: 11
  • 20210830_140106.jpg
    20210830_140106.jpg
    146.4 KB · Views: 12
Update for the eBay Water pump, has been fine so far. The good part of learning about bad new parts, i.e. the water pump, I took off the front splash shield and found there was a corrosion issue that I need to be aware of and give it some immediate attention.

I hope to slow the rusting and give myself a year or two to decide on replace or weld in a repair. I took some extra photo's after cleaning the area. It then got the Permatex 81849 Rust treatment, 2 coats - had an old can I chose over Rustoleum Rust Reformer 215215, it seemed a better fit being I couldn't very well access the inside for cleaning.

I also looked up salvage yard engine cradles, plenty around here, likely similar issues, costing $75 to $225, and so far from looking at it and checking a YouTube poster's experience, I think I could take it on, but wouldn't start that till next summer, going to give it time too see how the rest holds up and it's going to start getting colder at night, I don't like getting into unknowns in snow seasons, though I have bundled up and done some stuff out in the cold, not my preference, nor the wind, need I specify the North-West wind...

Just wanted to get this posted before I got busy, lazy, forgot...first 2 are the left side, other is right. Yes I noticed how close that is to the control arm mount, seems solid for now and at least I know it's needs constant monitoring, still not happy with the quality, you'd think a 2012 might not be so bad, I had something to learn/experience for myself here.
 

Attachments

  • 20210906_125150.jpg
    20210906_125150.jpg
    168 KB · Views: 17
  • 20210906_125208.jpg
    20210906_125208.jpg
    188.7 KB · Views: 17
  • 20210906_125256.jpg
    20210906_125256.jpg
    139.4 KB · Views: 17
The new oil pressure sender switch seems to be leaking. Noticed the drips on the concrete and I threaded a long plastic tie down there and there's oil in the valley. This means the lower intake has to be removed, again. I should figure out a way to plumb the next one so it attaches to a more easily accessible location above the intake manifold so it won't have to be removed again. I was passing someone and the RPMs went to around 4k the day before, I guess that might have broke the diaphragm. Going to the dealer for OEM part and a back-up will come from Rock Auto, https://www.rockauto.com/en/moreinfo.php?pk=1319321&cc=1501656&pt=4588&jsn=13 as it promises;
In construction, they utilize high temperature, polyimide film diaphragms. These provide for exceptional cycle durability & resistance to rupture & oil leakage. Units are designed to handle rapid pressure pulsations, without component damage.

Otherwise it runs good, the 2nd water pump hasn't had any problems and I enjoy driving it. One potential issue in the control arms, they were both replaced in the recall but I'm thinking they put on the wrong ones as the tire wear was down to the threads on the inside of both front tires and I have a squeal as I round corners. The part number should be on them, might have even seen a tag but I'll look into that when doing the oil pressue switch. Still has a start-up rattle and the crank-cam correlation codes P0016, P0017 are still present, not going to do anything with that except keep diagnosing the electrical side, anything mechanical that involves taking the timing cover off isn't likely to happen before next spring and I don't think it to be mechanical anyhow. A couple of photo's of that oil pressure sender when I removed it;
 

Attachments

  • 20210804_175617.jpg
    20210804_175617.jpg
    204.2 KB · Views: 7
  • 20210804_175743.jpg
    20210804_175743.jpg
    175.5 KB · Views: 7
The new oil pressure sender switch seems to be leaking. Noticed the drips on the concrete and I threaded a long plastic tie down there and there's oil in the valley. This means the lower intake has to be removed, again. I should figure out a way to plumb the next one so it attaches to a more easily accessible location above the intake manifold so it won't have to be removed again. I was passing someone and the RPMs went to around 4k the day before, I guess that might have broke the diaphragm. Going to the dealer for OEM part and a back-up will come from Rock Auto, https://www.rockauto.com/en/moreinfo.php?pk=1319321&cc=1501656&pt=4588&jsn=13 as it promises;


Otherwise it runs good, the 2nd water pump hasn't had any problems and I enjoy driving it. One potential issue in the control arms, they were both replaced in the recall but I'm thinking they put on the wrong ones as the tire wear was down to the threads on the inside of both front tires and I have a squeal as I round corners. The part number should be on them, might have even seen a tag but I'll look into that when doing the oil pressue switch. Still has a start-up rattle and the crank-cam correlation codes P0016, P0017 are still present, not going to do anything with that except keep diagnosing the electrical side, anything mechanical that involves taking the timing cover off isn't likely to happen before next spring and I don't think it to be mechanical anyhow. A couple of photo's of that oil pressure sender when I removed it;
That oil pressure switch is in a terrible location and seems to only last a few years and starts leaking again. I am considering just taking it out and putting a plug in it the next time it leaks.
I believe that if the low pressure light comes on while driving the engine will be toast anyway, and I check oil regularly.
That might be a good idea. I got the OEM $13.46 at the dealer Part# 94750-37100. Stopped at O'Reilly to asked about oil pressure gage set-ups but they only had stuff for the Chevy 350 and similar, so next is Menard's to look at hardware fittings and/or eBay for aftermarket oil pressure gage hardware for Kia's. The eBay listings I looked at so far didn't have much for hardware. I started checking YouTube too, but the first few I've seen are for hardware that mounts through an extension on the oil filter. Probably not going to take it apart until I know what I am going to do and I've got the hardware.
 
Thought I was having the oil sending switch leak again but seems I didn't have the oil filter housing cap on tight, well short story is I replaced the sender with an OEM and now upon assembly I couldn't find torque specs for the lower intake manifold and can't remember where I found them previously. I tightened the oil filter cap too, just don't like tightening plastic caps into plastic housings...I'm sure that's why it was loose enough to develop a leak after a few weeks. Oil was in the valley and that's why I went for the sender, which seems I now have to get better diagnostic skills...

I torqued the lower intake to 140 inch pounds, brought it up to 120 in 2 steps, then 140 and it didn't seem wise to go any tighter. I had seen the 120 inch pounds in the comments of the video I referenced earlier in this thread for the sender leak.
Kia and Hyundai 3.5 oil leak diagnosis and repair

Took these torque specs from the 3.3 newer engine for the lower intake manifold. 2 step process is implied as that's not clearly defined; bring everything to lower torque so intake manifold seats even, then tighten to spec.
http://www.kisedona.com/specifications-736.html
Intake manifold bolts lb-ft [2.9 ~ 4.3] + [19.5 ~ 23.1] Intake manifold nuts lb-ft [2.9 ~ 4.3] + [13.74 ~ 17.36]
Found a video on a Hyundai, it also seems the lower intake is plastic on the newer motor, so I'm still not sure the torque spec is the same, at 18m there is the torque spec on this example;


I'll add photo's of the recent task and I'm thinking of trying to relocate the sending switch to a location that would be easier to change out but I don't have a lot of experience doing that, which should be like adding a oil pressure gauge. I did buy some 1/8 pipe connection that could work but I'm not doing it this time through as I wouldn't want to have to fix a leak during the winter if my idea didn't work. It was also suggested to get a flexible line to connect to as the motor vibration might be too much for the solid pipe, which I have the 5", it would be just enough but a 6" would have been better.
Also put some detail on this thread.
I left the fuel rail attached to the lower intake and just tuned it over toward the right to get underneath it for the oil sender.
The power steering connector, the green wire connection just to the left of the gray one was probably the most difficult as you can't see it when disconnecting, and the wire harness connections can be brittle so that's the part I disliked, the task went well this time.
 

Attachments

  • 20211007_183909.jpg
    20211007_183909.jpg
    159.4 KB · Views: 9
  • 20211007_190456.jpg
    20211007_190456.jpg
    183 KB · Views: 9
Last edited:
Last week changed the crankshaft position sensor and took a couple of photo's being the location was said to be tricky. The task was easy and I had one from Rock Auto. Still trying to change parts to rid myself of the crank-cam correlation codes, didn't work, but the check engine light went off for about 3 drive cycles but it's back on now.

The throttle body codes came on after not connecting it after changing the oil pressure switch. The strange occurrence is codes are still there after the check engine light cycled off and now is back on. Not sure why they would come back as the throttle body has since been connected and working fine, those codes should have cycled off and stayed off as I think I understand how that works. When disconnected the throttle body just idles the engine when the foot pedal was pressed. Might I have a computer issue, I might never know...

First photo is looking at crank position sensor with the socket next to it, and the next I found it easier to show looking through the cover over the radiator. View is just where motor and transmission meet under the front bank.
 

Attachments

  • 20211009_145023.jpg
    20211009_145023.jpg
    97.4 KB · Views: 8
  • 20211009_145045.jpg
    20211009_145045.jpg
    56 KB · Views: 8
  • 20211009_145053.jpg
    20211009_145053.jpg
    71.9 KB · Views: 8
Updating thread, seems the check engine codes for bank 1 cam/crank correlation are cycled out for now, when the weather got cold lite went out intermittently and now has been off for days, so as hoped still holds it's not a mechanical problem, and a wiring diagram may be the next step in diagnosing cause.

Last oil leak was from the poor job of replacing the filter canister, I hadn't noticed the O-ring shifted down, so I went through replacing the oil sending unit under the lower intake manifold to learn a lesson on oil leak diagnostics and sending units, which misdiagnosed, I had got an OEM from the dealer and that one did start leaking. This current oil leak was the new oil pressure switch, here is the current OEM before replacement also showing the oil pools in the valley of the V6. Used a zip tie to dip down there for initial diagnosis, it came out covered in oil.
20220116_171855.jpg


Here I show the difference in oil sending units, both boxes, part number WVE 1S6857 from Rock Auto, seems they got 2 different types, the first one I got was the steel/chrome one, Italy is stamped on it, the recent replacement is painted black and looks to be the same type as the OEM. I defered to the Italy Chrome one, as it never leaked and the Rock Auto listing says
Dual sealed to prevent leaks
but the new one looks more like the Rock Auto listing for the Facet brand. My guess was replace with the 1st Italy unit and I can only hope I guessed right. Purple thread lock was used for intake manifold upper/lower assembly as I otherwise found some of these smaller fasteners seem to loosen up in about 3 weeks time. Lower intake would have probably been fine, and a Feng Shui snug torque setting was the only tightening used, as I think I can avoid breaking off fasteners better. These are both WVE 1S6857 with the latest package, and the KIA OEM package being I still had that and the part number is there too;
20220116_161350.jpg


Next I show the long 6mm Hex for getting off the lower intake, short hex isn't a good fit being I didn't remove the fuel rail being I just turned the lower intake to the left side and didn't remove the fuel lines. In the background is the 2 brackets that attach to the upper intake plenum, the wire connectors bracket gets attached there too, and that's where you find the 14mm bolt, between them 2 connectors. The other line 2-10mm bolts, attaches from the top side under the wiper cowl.
20220116_183859.jpg


Next, I also recently, 3rd time...did the water pump again, the eBay replacement started to weep and being the original didn't have issue as I only replaced it when taking the timing cover off, I put the original, which was also OEM, back on. Shown here is the plastic lid I used under the water pump area, to better contain the coolant draining, as I would prefer to drain the radiator but never got the drain to open and the lower hose is under the splash shield. This lid contained the coolant good, as otherwise it runs up the sub-frame to the front splash shield and drips all across the front.
20211220_132534.jpg


To finish the update, test drive was good, no check engine lite. The winter performance has been good too, everyday, except seems snow tires exaggerate the torque steer so I must be careful to adjust, usually just let off the accelerator. The left CV shaft seems to have a click too, I bought a junk yard spare for now $30, hoping not to replace it until warmer weather and the roads clear up enough to not introduce more corrosive slush on the 2005 Camry. Snow tires are only on the front so far, but I did get a second set of rims with worn tires, so eventually I have both sets for summer and winter with a full size spare. The Sedona has 6 bolt rims, so getting a spare set took patience and luck at $100.
20211128_125830.jpg


Leaving a couple of extra photos here too, just in case there could be something helpful.
 

Attachments

  • 20220116_171948.jpg
    20220116_171948.jpg
    154.2 KB · Views: 4
  • 20220116_183917.jpg
    20220116_183917.jpg
    147.9 KB · Views: 4
  • 20211128_125810.jpg
    20211128_125810.jpg
    186.2 KB · Views: 5
I've been trying to find information on R&I the OCVs but most of the info that comes up is for the 2.4L 4 cyl; anything I find for the 3.3L Lambda glosses over how the OCVs are removed.

I had a shop inspecting my new to me 2016 Sedona and gave them a set of new intake OCVs to install, as they're needed, but the shop refused claiming they'd have to take apart the top half of the engine to swap them and claimed it takes 7 hours labour. Perhaps they had them confused with the exhaust solenoids?

From the sounds of this thread it seems one needs only remove the plenum for clearance, undo one screw per OCV, and extract them with pliers. Can anyone confirm?
 
Last edited:
I've been trying to find information on R&I the OCVs but most of the info that comes up is for the 2.4L 4 cyl; anything I find for the 3.3L Lambda glosses over how the OCVs are removed.

I had a shop inspecting my new to me 2016 Sedona and gave them a set of new intake OCVs to install, as they're needed, but the shop refused claiming they'd have to take apart the top half of the engine to swap them and claimed it takes 7 hours labour. Perhaps they had them confused with the exhaust solenoids?

From the sounds of this thread it seems one needs only remove the plenum for clearance, undo one screw per OCV, and extract them with pliers. Can anyone confirm?
On the older 3.5 I can see both intake Variable Valve Timing (VVT) Solenoid /Actuator 's with the engine cover off. Rock Auto Naming, just so we are talking about the same thing, and looking at the part numbers they seem to be the same for both motors. Looking at it, I probably changed that with only removing the engine cover, I can't quite remember but up-thread does indicate I did that had to move the wire harness, but I think at most that was really just a clip or 2 and probably a couple of connections at most. Both them photo's show the rear bank intake solenoid from where it is at the top, and the front is same set-up as I just went and looked at it to see if that would jar my memory...not happening...

Exhaust being under the valve cover was a little more involved as I did change the one for the rear bank, but there is nothing real difficult, so you might be right about the confusion.

The newer 3.3 probably has direct injection and I can only guess that some of that hardware could be in the way is the difference.

Just curious if you have any codes or something else you notice? If they are that hard to get at, I'd just recommend doing a couple short interval oil changes and see if that changes the performance.

One thing I did notice is the excessive humidity when taking the oil cap off over the winter. I mostly did short distance taveling about 12 minutes to work over the winter, so this Sedona is going to get it's oil changes in the spring with one due ASAP.
 
I can see them too - the main reason I'm thinking of removing the plenum is just for a little more space to work, especially on the front bank one which is offset slightly deeper into the valley by about 2cm.

I'm beginning to suspect they got the intake ones I wanted changed confused with the exhaust solenoids

I too got the replacement ones from Rock Auto. Even with international shipping their prices were competitive and their service has been great over the years in my experience.

I appreciate your reply BTW
 
Back
Top