Strut shaft spins when I try to remove the top nut (strut won't come out.)

Joined
Mar 2, 2011
Messages
205
Location
New YOrk
xa1Asa2.png

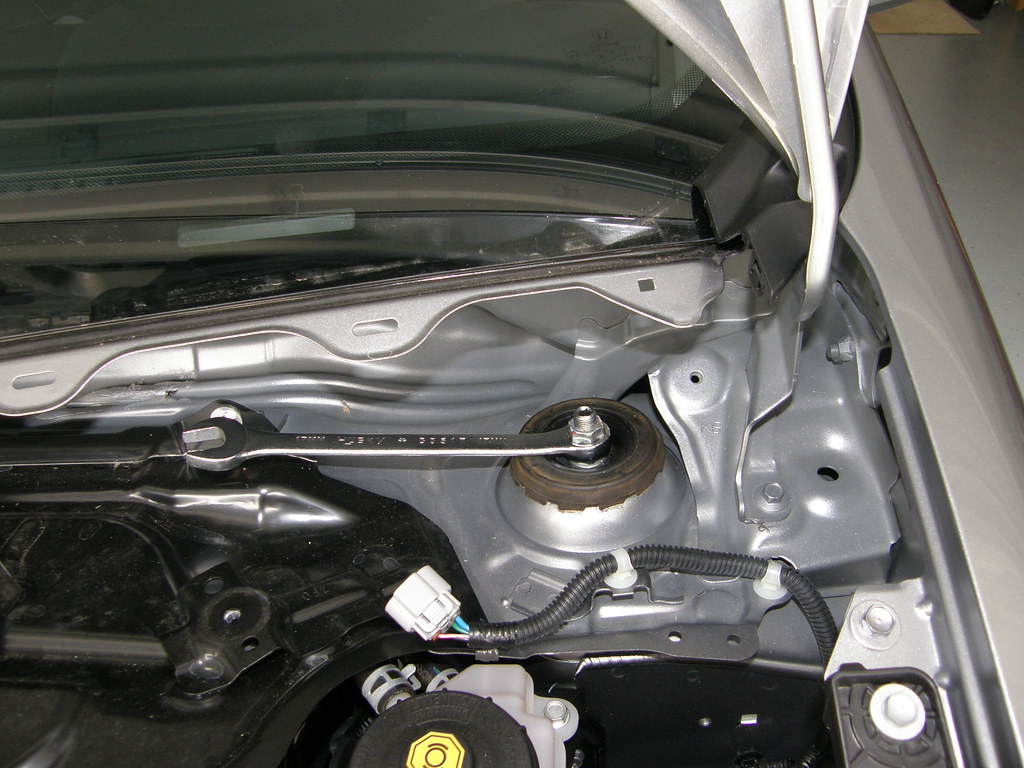
For the purpose of this discussion, I shall call these items a 'hex key' which goes into the 'hex hole.' I don't know what the proper terminology is for these parts, it's all a bit confusing. Let's keep it simple: hex key goes into hex hole. (update: I'm actually using a high quality hex bit, which is driven by 3/8" drive)

So, normally one holds the strut shaft with a hex bit (or hex key) while using a 17mm wrench to spin the top nut free. Unfortunately, the hex key has STRIPPED the hex hole on top of the strut shaft.
When I did the rear, it got stripped too (why????? salty air probably!) but I was able to hammer in a torx bit which held the rear damper strut shaft in place, while I spun the top nut free. This is NOT possible for the front, there is simply no clearance for hammering in anything. There is no clearance for drilling from the top, no clearance for anything except doing it the way it was intended in the factory manual, which is no longer possible because the hex hole is stripped.

So, the only way I can think of to hold the strut shaft in place is to cut the strut boot (we're throwing away all old struts dampers and springs anyway) and possibly drill through the strut shaft creating a hole large enough to stab a philips screwdriver through and using that to hold the strut shaft in place, while I spin the top nut free. Is this likely to work? Googling the issue, some people suggest using a vise grip, or a pipe wrench, but I don't think this can work because the amount of force needed to bite into the shaft and deform it to hold it in place cannot be generated with these tools. I would need some tool to bite into the strut shaft to hold it in place, I can't think of a tool that can generate enough force to deform strut shaft steel.

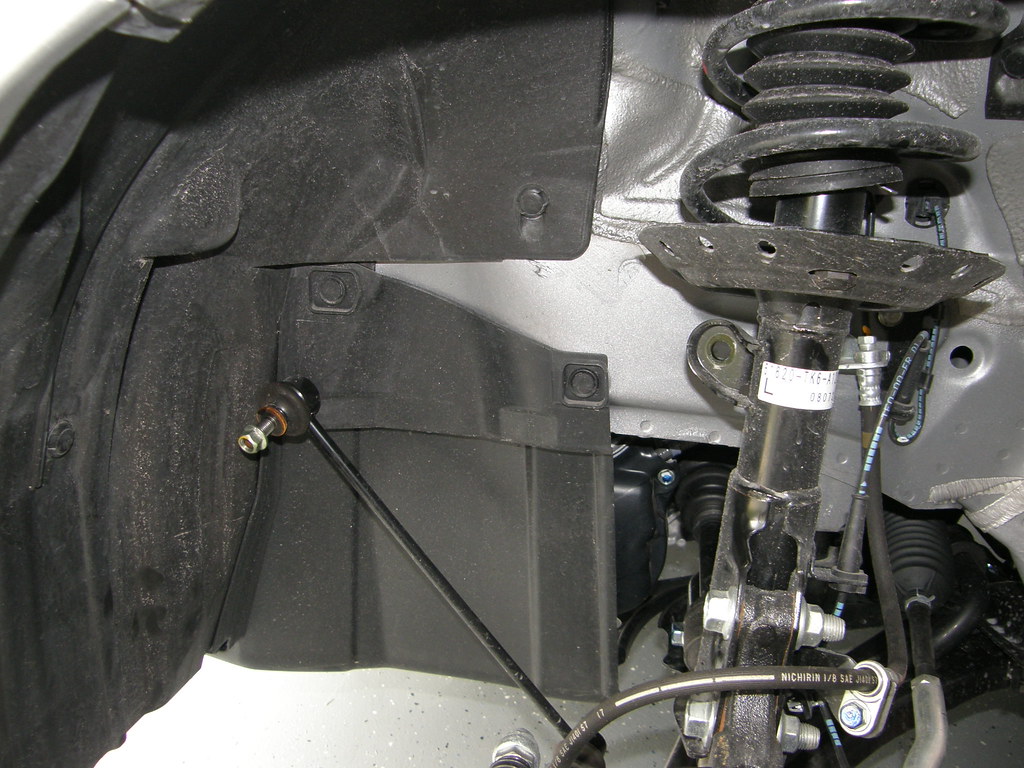
These pictures are for reference only, it shows someone else's very clean car (same YEAR MAKE MODEL AS MINE) which shouldn't have any issues. You can see the lack of work clearance, there is even less space on the passenger side. For this vehicle design, one cannot remove the whole strut without first removing the top nut. Once it strips....... oh..... boy....
2992569168_c3a3d13684_b.jpg


2991682781_beae55d359_b.jpg


2991697191_4431aa1a08_b.jpg


------------------------------------------------------------------------

Do you have some tips to prevent stripping the hex hole for the other side?
-I have already sprayed PB plaster on both sides
-I'm thinking about wrapping the hex bit (3/8" drive) with a layer or two of ALUMINUM FOIL (to reduce play when inserting the hex bit into the hex hole)
(does this make sense?? I've never heard anyone doing it.)
-does it make sense to clean the threads before starting?
-does it make it sense to DESTROY the threads before starting, the idea is to remove as much possible obstruction against the nut spinning out.
 
Last edited:
I’ve got some tips...
1. I clean the hex hole with a dental pick and compressed air. I want full depth and engagement of the bit.
2. I use the very best quality bits (made in USA or Germany). Tap them in with a brass hammer. Full depth and engagement.
3. I’m not a PB’laster fan. I much prefer Kroil.
4. Hold the bit. Turn the wrench.
5. Offset box wrenches give the most clearance between bit and wrench.

I wouldn’t destroy or cut anything, but if it’s very rusty, a wire wheel to clean the threads above the nut would help.

For the damaged one: get a pipe wrench. A big one. Put it on the shaft. Way better grip than anything else. Locking pliers won’t do it.

You’re not going to be able to drill through a hardened convex surface, like the chrome plated shaft.
 
I see plenty of room to cut the top nut with a Dremel cutoff wheel in 2 places 180 degrees apart and splitting it in half.
Do you mean splitting it into two vertical halves? Oh boy, not only have I never used a dremel tool, I don't even have one.. this seems VERY scary to be honest. Also, the pictures give the impression of more clearance than there actually is.
 
I’ve got some tips...
1. I clean the hex hole with a dental pick and compressed air. I want full depth and engagement of the bit.
2. I use the very best quality bits (made in USA or Germany). Tap them in with a brass hammer. Full depth and engagement.
3. I’m not a PB’laster fan. I much prefer Kroil.
4. Hold the bit. Turn the wrench.
5. Offset box wrenches give the most clearance between bit and wrench.

I wouldn’t destroy or cut anything, but if it’s very rusty, a wire wheel to clean the threads above the nut would help.

For the damaged one: get a pipe wrench. A big one. Put it on the shaft. Way better grip than anything else. Locking pliers won’t do it.

You’re not going to be able to drill through a hardened convex surface, like the chrome plated shaft.
You think a pipe wrench can do the job? The pipe wrench adjuster is driven with your fingers, can it really bite into the shaft with enough force to hold it in place? If so, I'll head over to HomeDepot to that giant pipe wrench :)
 
Do you mean splitting it into two vertical halves? Oh boy, not only have I never used a dremel tool, I don't even have one.. this seems VERY scary to be honest. Also, the pictures give the impression of more clearance than there actually is.
You're changing struts and don't have such a basic tool in your arsenal as a Dremel?
 
I’m concerned about the design of your struts. The struts I’ve worked on are bolted to the body by a couple of nuts that hold the strut plate.

That hex head top nut holds the spring seat in place. You do the top nut AFTER the strut is out and the spring compressor has removed the tension from the nut.

Are you certain that you should be unbolting this top nut? Is the spring tension accounted for?

Got a picture of your car?
 
Oh yeah, the pipe wrench can get tremendous grip...you’ll destroy the chrome surface of the strut, but that’s not important if you’re replacing struts.
 
You're changing struts and don't have such a basic tool in your arsenal as a Dremel?
So, my story is that I'm a DIY hobbyist, I'm replacing the factory struts with a set of TEIN Street Basis coil-overs. I don't even have a garage, so I have to do this ON THE STREET. I did this once already with my 2007 Corolla (lowering it with a Bilstein B12 kit.) So, no dremel bit and until recently I didn't even have a drill! All I had were hand tools, no impact wrench. Since starting this project, I've had to buy a number of new tools though.

I’m concerned about the design of your struts. The struts I’ve worked on are bolted to the body by a couple of nuts that hold the strut plate.

That hex head top nut holds the spring seat in place. You do the top nut AFTER the strut is out and the spring compressor has removed the tension from the nut.

Are you certain that you should be unbolting this top nut? Is the spring tension accounted for?

Got a picture of your car?
Exactly the same car: https://www.fitfreak.net/forums/2nd...e-sub-forum/33846-diy-lower-your-ge8-fit.html
Oops: https://www.fitfreak.net/forums/2nd...e-sub-forum/33846-diy-lower-your-ge8-fit.html
 
I did this many times in my hobby Audi repair shop. I had a large NEW Vise Grip I used strictly for this and other tough jobs where you need a new tool. Grab on the shaft below and get the VG on straight as to take out misalignment rock out of the equation. You will need to give the clamping EVERYTHING you got, as the strut shafts are a very high Rockwell. Get a propane or MAPP gas torch heat up the nut and every time it came off with relative ease. In fact in a couple of cases I used 2 Vice Grips with those blue paper rags in a box style paper towels to grip the shaft that did no damage because the paper towel was folded over so many times. I have pulled that off 2 times when I need to reuse the strut. PSI vs enough friction of the paper towel and enough clamping force and heat on a nut. Heating the nut is the game changer here. I then use just a very small amount of Lock-Tite blue on the nut to reinstall, as the nylon nut was burnt up. Some have oval crushed nut, so you just reinstall.

Or I used my air gun, later in years.
 
Last edited:
You can push the boot up and use a large vice grip as tight as you can get it on the strut rod. It will still spin but hopefully the impact will spin faster.

If you can get a flat wrench on it, you may can get a nut splitter on it.

This is really a job for air impact, need a lot of impact power fast, battery impact may get it done but air impact is better.

With an air impact, you would keep tapping the trigger with short taps to impact the nut , letting up before it starts spinning.
 
Last edited:
I did this many times in my hobby Audi repair shop. I had a large NEW Vise Grip I used strictly for this and other tough jobs where you need a new tool. Grab on the shaft below and get the VG on straight as to take out misalignment rock out of the equation. You will need to give the clamping EVERYTHING you got, as the strut shafts are a very high Rockwell. Get a propane or MAPP gas torch heat up the nut and every time it came off with relative ease. In fact in a couple of cases I used 2 Vice Grips with those blue paper rags in a box style paper towels to grip the shaft that did no damage because the paper towel was folded over so many times. I have pulled that off 2 times when I need to reuse the strut. PSI vs enough friction of the paper towel and enough clamping force and heat on a nut. Heating the nut is the game changer here. I then use just a very small amount of Lock-Tite blue on the nut to reinstall, as the nylon nut was burnt up. Some have oval crushed nut, so you just reinstall.

Or I used my air gun, later in years.
You can push the boot up and use a large vice grip as tight as you can get it on the strut rod. It will still spin but hopefully the impact will spin faster.

If you can get a flat wrench on it, you may can get a nut splitter on it.

This is really a job for air impact, need a lot of impact power fast, battery impact may get it done but air impact is better.

So, it comes down to either a vice grip or a pipe wrench then.. I have doubts that I am strong enough to create the necessary force to get it to bite properly..

BUT, I do have an idea: I can use a CLAMP TOOL for the purpose of clamping on the vise grip (or perhaps channel lock) to generate the necessary force. (LOL, it might work......)
 
I use a SMALL amount of anti-seize on the new strut threads, makes it easier to get the top nut tight with out spinning the rod. I don't like to use impact to install the top nut, spins the rod more than i like on a new strut. I use a wrench, drop end wrench.
 
Spasm3 has it, done it many times.

A pipe wrench will also work, but they are generally bulkier and the locking pliers will hold tighter.
 
Back
Top