Well water pressure tank install help.

Joined
Feb 18, 2011
Messages
8,173
Location
Hudson, NH
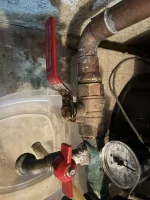
The pressure tank tee for my house is failing. (Well water) The leak is getting bad and looks like it can’t wait till spring. I have not replaced one before. Have most of the parts already, just need help understanding how to remove the old tee.

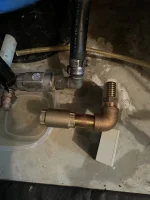
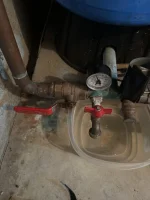
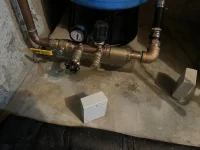
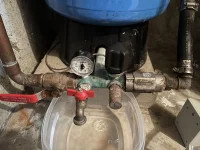
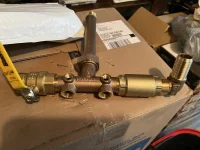
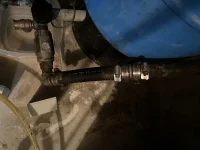
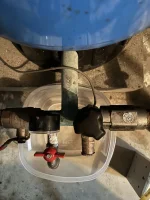
Assembling the new tee and parts I realized there is no union for the old pressure tank tee. Solid. Does not appear to be a union for the pipe to the house. If I unscrew at the shutoff valve it will unscrew away from the house pipe, but it will tighten on the end towards the tee. I doubt there are enough turns to get it off before it’s fully tight on other end. So I’m not sure how they put this on. Maybe soldered the pipe after screwing parts onto the tee? What should I do. Should I just cut through the old tee with a cutting wheel then spin it off? Want to understand before I shut off water to the house in the middle of winter 🥶 Pls help thanks.
 

Attachments

  • 47DFE6A3-92DA-4B7D-B159-999A62D04451.jpeg
    47DFE6A3-92DA-4B7D-B159-999A62D04451.jpeg
    153.7 KB · Views: 98
  • ED2D1A06-8FBD-4F4A-8B3A-96AAD257972C.jpeg
    ED2D1A06-8FBD-4F4A-8B3A-96AAD257972C.jpeg
    145.4 KB · Views: 101
  • D39C0F91-E533-44CA-97A0-0E0D536AEED4.jpeg
    D39C0F91-E533-44CA-97A0-0E0D536AEED4.jpeg
    152.2 KB · Views: 99
  • C92F8ED7-3BF0-4088-BB27-80B999AA8B71.jpeg
    C92F8ED7-3BF0-4088-BB27-80B999AA8B71.jpeg
    96.3 KB · Views: 98
  • 5ABAF152-2266-42DD-890C-482E4F1C07C0.jpeg
    5ABAF152-2266-42DD-890C-482E4F1C07C0.jpeg
    123 KB · Views: 99
Just cut off the house supply an inch or so above the elbow. Remove that section of pipe, male adapter, and elbow from the old valve. Put those parts in new valve and just solder in a coupling. Easiest way.
 
it doesnt matter just take a grinder with a cutting wheel to the old one. then unscrew it.

The new one has the union at the pipe that goes into the tank so you can just turn the new one to screw it onto the house fitting
then tighten the union for the tank.. then slip on the plastic(or is it rubber) that is on the right.

That is assuming the left side is threaded onto the house supply.

Not a professional but I have replaced half a dozen of these for friends and family.

if its soldered and you arent prepared to do that.. sharkbite works.
 
Last edited:
I'd start by unsoldering the vertical pipe from the elbow but as @Rand said if you don't want to work with solder cut the copper pipe a few inches above the elbow, eventually it can be reattached with a sharkbite. Cut or remove the plastic pipe and unscrew the pressure sensor then you can move all the old stuff out.

It looks like you may have 3/4" plastic but the new plastic barb is 1".
 
I would do this at a time of day that you have plenty of time to run for more parts. Have the correct tools - pipe wrench to attempt to remove the pipe/fitting screwed into the tank. If it is terribly seized, have a source for a new tank lined up.

If wanting to avoid soldering, cut the pipe/fitting into the tank where it shows "USA". Then take it apart/cut on the flexible hose side. Then you can disassemble the remainder. Heat might allow you to remove the hose off the plastic barbed elbow, but it might be better to put a new chunk in there unless you can cut it off and have enough play in the remaining hose to hook up the new manifold.

Lots might go wrong. Maybe you cannot unthread the left side of the ball valve. Or threads get damaged, etc.. Again, be prepared for the worst and hope for the best. We assume you are using pipe dope and/or teflon tape. Check valve correct orientation.

Agree with above - check to make sure your Tee hose barb matches the hose diameter. Let us know how it turns out!!!!!
 
Last edited:
I thought the OP has a new tank. Especially with the fixed (non union) kind, the tee is considered part of the tank. It's the first thing attached and probably will get junked with the old tank.
 
I thought the OP has a new tank. Especially with the fixed (non union) kind, the tee is considered part of the tank. It's the first thing attached and probably will get junked with the old tank.
for the price of the tank unless its less than 5 years old I'd replace it so it doesnt have to be touched for another 10 years.

As mentioned its best to start the project in the morning so you have time for 2-3 hardware runs something is always wrong.
I cracked a plastic end once.. and a few other things.
 
Last edited:
I have replaced hundreds of those. The major problem that I have run into is the nipple coming out of the bottom of the tank where it threads onto the 1" elbow. The tank nipple is often thin from corrosion and bends. From the looks of all that I highly recommend a new tank. And I recommend a Well-Xtrol. Not one from HD or other big box store. Visit a plumbing supply store.
 
I purchased the identical v60 tank in a kit off Amazon so it would fit in the same position in the basement without running new pipes. I never liked the plastic elbow at the pump end. It looks like it’s flexing so I’m hoping to replace it with that brass NPT 1” elbow in the pic. It’s shorter, so I need some type of M/F 1” extension. I was hoping to get a M/F 1” brass union for the house side but I don’t think they exist. Only thing left to consider is replacing the pressure sensor. It’s not the standard type. I use a Franklin mono drive constant pressure system with a multi speed pump. So there is no draw down. Technically, I don’t need a pressure tank that big. But that’s what was there before Franklin install and it fits.
 
Looks like today is the day. The dripping is much worse. Test fit looks pretty good. Still trying to find something for that PVC barb at the end.

Pipe dope or tape?
image.jpg
 
LeakySeals said:
Are he Tees usually NPT?
Yes; pretty much anyting you're working on there is some size of NPT. (the only exception is probably the ball-valve stem; it's probably a machine thread).
 
Last edited:
I found the leak. Check out the threads. I need to put this back until I can buy one. What do you recommend for that? Just tape it like crazy?
6B2EAFBB-C54E-4219-8229-20DAA4102336.jpeg
 
The day has come. I can’t wait any longer. I’m not sure where to start. How I’m going to get it all to twist together. I think this is the best fit from the different parts I purchased just in case
 

Attachments

  • ADE619F9-7C21-4123-9378-C99E1B15AC6D.jpeg
    ADE619F9-7C21-4123-9378-C99E1B15AC6D.jpeg
    122.9 KB · Views: 9
It’s all set I just took everyone’s advice and cut it off. It still leaks a little bit. Hopefully the minerals will make it stop. Thanks again for the help.
 

Attachments

  • F20147FF-AADD-4303-B9D4-48318A95F7D2.jpeg
    F20147FF-AADD-4303-B9D4-48318A95F7D2.jpeg
    122.9 KB · Views: 15
Back
Top