You are using an out of date browser. It may not display this or other websites correctly.
You should upgrade or use an alternative browser.
You should upgrade or use an alternative browser.
What are you working on today?
- Thread starter Amkeer
- Start date
Well it was bound to happen. Subaru has been cranking sorta slow since Fall. Past couple weeks if you didn't drive it every couple days, it would crank really slow. Well I hadn't driven it since Wednesday and sure enough today it wouldn't start and measured 9V... I really wanted to get an East Penn battery, but I need the car up and running early tomorrow morning to take an elderly family member to a DR's appointment (and they can't physically get in my Tacoma), so since there's apparently a shortage of group 25 batteries around here, I could only find a Die Hard Silver today. Doubt it will even make it through warranty...


Power washed all the cars, made sure to clean the door jambs also. Armour'ed and cleaned the glass then vacuumed. This is the point where you question 5 cars although the RV will be vacuumed another day. Need to hand wash, clay bar and wax the next warm day.. not sure these old cars are worth it. No one in the house wants to buy something newer so I guess it's my curse.
Replaced a bad relay on the wife’s Skidoo MXZ 600 that took out all of the lights and dash gauges.
Installed these infinity tweeters into the Kia’s factory locations with a little modification. I never knew the detail I was missing out in the music!!


Then changed the oil on the Sonata - Synthetic 5w30 extended protection and a OEM filter for those that are wondering lol and used this pb blaster surface shield on the sub frame components, front and rear.


Then changed the oil on the Sonata - Synthetic 5w30 extended protection and a OEM filter for those that are wondering lol and used this pb blaster surface shield on the sub frame components, front and rear.
AutoMechanic
Site Donor 2026
Changed both fuel filters on dads truck. And just checked everything over. Have several things that need to be worked on for various vehicles just haven’t felt like doing it and don’t have time lol.
I was in a funk yesterday about work and dating, but went down to Harbor Fright to get a vise. Today, rebooted the CV axle on the Sienna. I’m Cardone now, and I still think my reman job is superior to a new Chinese axle. Used a OE Toyota axle boot kit, and gave the intermediate shaft/inboard joint a wire brushing, Ospho, wax & grease + alcohol wipe and a coat of Rust-Oleum.
Monday
2003 Chrysler PT Cruiser
R&I right front spindle assembly for the machine shop to replace the wheel bearing, replaced front brake rotors and pads, changed oil
2013 Kia Sportage
Towed in for no start condition....out of gas
1995 Chevrolet Silverado 1500
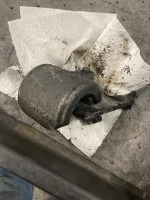
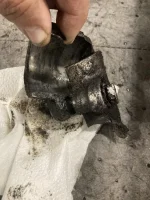
Replaced steering intermediate shaft coupler
2003 Chrysler PT Cruiser
R&I right front spindle assembly for the machine shop to replace the wheel bearing, replaced front brake rotors and pads, changed oil
2013 Kia Sportage
Towed in for no start condition....out of gas
1995 Chevrolet Silverado 1500
Replaced steering intermediate shaft coupler
Buttoned the van back up - installed a new set of Toyota TCMC “value” pads(still made in Japan by Advics) and shims. Turned rotors, run-out is a bit more than I want but plenty of meat(Advics rotors, installed some 40K ago, same castings as OE Toyota, I’m not junking OE for Chinesium), installed a new driver’s side wheel bearing(NSK, Chinese hub, since it’s a pain to extract the inner race without ruining it). New Turkish Delphi sway bar links. Test drive(really an In-N-Out run) was successful.
I was considering Wagner OEX or. Akebono ProACT for this. If I was able to get the “warranty” Toyota pads(same compound), it would have been a pad slap with unmolested rotors.
I was considering Wagner OEX or. Akebono ProACT for this. If I was able to get the “warranty” Toyota pads(same compound), it would have been a pad slap with unmolested rotors.

“Did you figure it out?”BMW : bill me whatever. Not gonna be cheap either since it’s a X7 SUV.
”yep. Done broke.”
Instead of spending $65 on a bed lift 'kit' I spent $20 on some 55# strong arms and did it myself. The space under the bed in the camper has gone from almost completely unusable to a great place to store things.

Ohh i have the same thing! i need that mod! Links to the arms? How did you select the arms to use ?Instead of spending $65 on a bed lift 'kit' I spent $20 on some 55# strong arms and did it myself. The space under the bed in the camper has gone from almost completely unusable to a great place to store things.
View attachment 139352
You should post it to https://rvthe.us/community/
SammyChevelleTypeS3
$50 site donor 2023
Put together Kid's school desk from themed movie Cars for my little grandson. Cant wait to see him flip when he runs into the big toy room we filled up with stuff over the years each time another grandkid arrives. The room could really be a toy store now.

Well, I just sort of guessed. I knew the mattress weighed 75 pounds, and just sortof spitballed it from there. Took me 2 attempts to get the angle right, but a couple chunks of 2x4 and some smaller pieces for the lid and it went all together just fine. I glued the two smaller pieces on the lid, so they should be sturdy, and I might go back with some bolts and nuts instead of the sheetrock screws I used since there's a decent amount of force on them, but that's all quick fixes.Ohh i have the same thing! i need that mod! Links to the arms? How did you select the arms to use ?
You should post it to https://rvthe.us/community/
The way the angle is set up, when the lid is completely down, there's very little upward pressure on it, so it shouldn't be able to bounce up during driving.
The arms came from Amazon:
https://www.amazon.com/dp/B08GX8XCDV?psc=1&ref=ppx_yo2ov_dt_b_product_details
I can snap some better pictures this weekend when I'm home.
Last edited:
I was not crazy about my Velcro mounted voltmeter/radar detector to the bottom of the mirror.... as over a couple days it would point down and not straight and became visually bothersome.
So I went to the hardware store to "make something work" until the actual radar detector mirror mount arrives in the mail.
This is the outcome haha


I spent a little time in the hardware store then I passed by a "U" shaped clamp type of contraption.. what you would even use it for I'm not sure.
I put the U clamp around the mirror mount and used a few washers to tighten down the 12 mm bolts to hold the clamp to mount securely to mirror. then made a "base" out of a nut and sandwiched the radar detector mount (that I bent straight ish) in-between.
Then give it a quick coat of black spray paint as you can tell in the photos because I readjusted it after
The results are way better than I anticipated. It's very secure, perfectly straight and I did it for about $2.90..
I will use the actual radar mount when I receive it but honestly if I did not order the actual mount... I probably would make this permanent")
So I went to the hardware store to "make something work" until the actual radar detector mirror mount arrives in the mail.
This is the outcome haha
I spent a little time in the hardware store then I passed by a "U" shaped clamp type of contraption.. what you would even use it for I'm not sure.
I put the U clamp around the mirror mount and used a few washers to tighten down the 12 mm bolts to hold the clamp to mount securely to mirror. then made a "base" out of a nut and sandwiched the radar detector mount (that I bent straight ish) in-between.
Then give it a quick coat of black spray paint as you can tell in the photos because I readjusted it after
The results are way better than I anticipated. It's very secure, perfectly straight and I did it for about $2.90..
I will use the actual radar mount when I receive it but honestly if I did not order the actual mount... I probably would make this permanent
Changing the right front hub assembly on the Explorer again - yay!
That thing eats wheel bearings for breakfast for some reason.
That thing eats wheel bearings for breakfast for some reason.
Hardcore tech: changed oil on my beater '07 F150 with 2V 4.6. I used five qts 0W-40 Amazon oil (because I had it and I have to find somewhere to use it) and one qt 0W-20 RGT. Pretty sure the universe will implode now....
I also rotated the tires. The RF was not great because I rotate so infrequently but I realized I had a new tire under there for my spare so the spare got rotated in. This also ensures the spare tire winch gets exercised and doesn't seize.
Anyway if gravity stops working you can blame me for putting "euro" oil in my truck
Similar threads
- Replies
- 8
- Views
- 5K