I am staying away from the garage this 40f does not feel to warm on my old bones!My 2006 Honda Accord with 133k I replaced rear both caliper with pads and rotor, not bad for 200$ all from Amazon .No fun with 40f weather and some rusty bolts.
You are using an out of date browser. It may not display this or other websites correctly.
You should upgrade or use an alternative browser.
You should upgrade or use an alternative browser.
What are you working on today?
- Thread starter Amkeer
- Start date
Headgasket prep.. wonder clean I actually need to get it. Used a green scotchbrite and brake clean so far.


Short staffed again and ever busy... plus I had to leave an hour early to make a dentist appointment. Today:
Oil cooler/filter housing and front links on a 1.8 Sonic
2x lower control arms and align on an Equinox
Brake light inop on a box van (why do people do their own repairs)
Couple diag's
Multi-function switch on an '06 C280. That was a curveball
Oil cooler/filter housing and front links on a 1.8 Sonic
2x lower control arms and align on an Equinox
Brake light inop on a box van (why do people do their own repairs)
Couple diag's
Multi-function switch on an '06 C280. That was a curveball
I'm 64 and took me less 3 hours plus I did oil change and installed winter tires, now ready for winters.I am staying away from the garage this 40f does not feel to warm on my old bones!
Working at my friend's shop again this week.
Monday
2011 GMC Sierra 1500
Replaced rear drums, brake shoes, wheel cylinders and self adjuster assemblies, changed oil
Tuesday
2001 Ford Ranger
Replaced rear wheel cylinders and one brake spring, serviced power steering fluid
Wednesday
1970 Chevrolet C10
Front and rear shocks, rear axle seals, changed engine oil
- Joined
- Sep 20, 2022
- Messages
- 334
Attached to my above post:

A few weeks ago the shop cut that hole in the molded panels, the wife and I then mounted Razorback offroad spare tire mount on the inside of the van. Then using a 2005 Thunderbird balloon spare (same lug pattern and center bore as the Connect) we mounted this to the new spare tire mount. Next up.. 5 more yards of diamond tucked carbon fiber arrived. This will help us finish the interior panels and create a spare tire cover. Still not liking the powder coated wheel as it NOT the same color as the van..

A few weeks ago the shop cut that hole in the molded panels, the wife and I then mounted Razorback offroad spare tire mount on the inside of the van. Then using a 2005 Thunderbird balloon spare (same lug pattern and center bore as the Connect) we mounted this to the new spare tire mount. Next up.. 5 more yards of diamond tucked carbon fiber arrived. This will help us finish the interior panels and create a spare tire cover. Still not liking the powder coated wheel as it NOT the same color as the van..
I see you took our advice on that whole sabotage-the-tire-duty thing. Good for you! At least you're not humping over the tire machine anymoreShort staffed again and ever busy... plus I had to leave an hour early to make a dentist appointment. Today:
Oil cooler/filter housing and front links on a 1.8 Sonic
2x lower control arms and align on an Equinox
Brake light inop on a box van (why do people do their own repairs)
Couple diag's
Multi-function switch on an '06 C280. That was a curveball
Finally replaced the 3 belts on my 85 RX-7 today.
I should have done it much sooner, it's totally changed the driving characteristic of it since I used to shift early due to a terrible rattle above 4k rpm. The rattle is gone now with the new belts and pulley fasteners retightened.

I should have done it much sooner, it's totally changed the driving characteristic of it since I used to shift early due to a terrible rattle above 4k rpm. The rattle is gone now with the new belts and pulley fasteners retightened.
Last edited:
I see you took our advice on that whole sabotage-the-tire-duty thing. Good for you! At least you're not humping over the tire machine anymore
Oh that was never going to be a thing, I was simply being a good sport that day. I have plenty of actual work to do believe me!
60 seconds of a pillar trim, dash end panel, and headlight switch panel removal gives you lots of working room
Here I am hardwiring the
 parking mode of the Thinkware dashcam, because the power point isn't switched, so if you forget to unplug, you come back to a weak battery
Fuse taps are a more elegant way to add 12v electronics, all most dashcams need is a constant 12v+, switched 12v+, and a ground
That's how it knows (ignition status) to switch in and out of parking mode
Then I set the voltage cutoff to something I felt comfortable with, balancing recording time with not having a dead battery
I loathe cluttered 12v sockets, hanging wires, shoddy connections, and dead batteries
A well installed dashcam is darn near invisible

Lots of zip tying and tucking, to prevent rattles and avoid side airbag interference
This isn't rocket science, yet so many people screw it up
Tomorrow when the sun's up I'll come back in and finish tying everything away, I've still gotta run the cable for the rear camera
I replaced the vacuum pump on this 2020 Chevy Spark (1.4l) and I couldn’t resist snapping a few pics to share with everyone. Normally I don’t think to snap pictures of anything that I’m working on, but this was special.
When I was backing it off of the car hauler, I noticed that the brakes were a bit dodgy, they would barely hold the car when it was in gear, you had to really step on them. I suspected the vacuum pump right away, so I got under the hood and pulled the hose off of the vacuum pump and nothing, nada,…dead silence from the pump.
I also suspected that if I checked the oil, it would be nasty looking,….I was right. It wasn’t only nasty looking, it was very low. This car has an oil capacity of only 3.7 quarts,….four for those who can’t be bothered to measure out .7 of a quart.
I am not shocked anymore by the amount of neglect that I see when I go over a lot of these cars. People just seem to drive these cars into the ground without doing any kind of maintenance. It’s a shame really.
Cheers everyone!
Rear half of dashcam installed, now I can watch with precision the distracted person as they rear end me
...it's only happened once

No working just shopping and buying.. well maybe that's worse than any type of work! Got the kitchen cabinets from IKEA ordered and got the Frigidaire appliances ordered elsewhere. New frig, stove and dishwasher. Today was a expensive day but should be 20-30 year purchase. 111 boxes will be coming the 19th.. what a day that'll be!
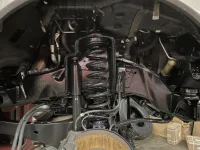
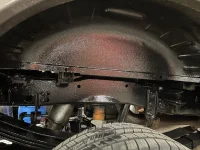
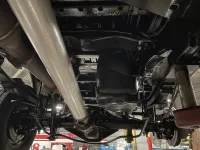
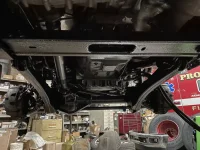
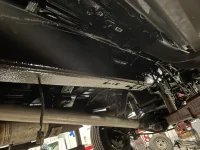
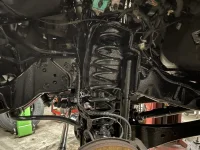
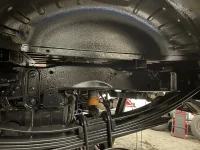
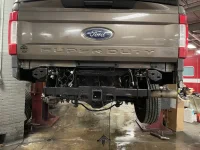
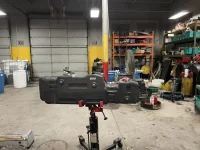
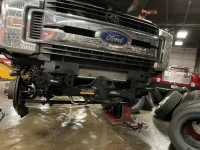
Undercoated my truck this weekend. Noxudol 300 and 700 were used. Pulled both bumpers and fuel tank , FULL pressure wash, dry and application. Took about 15 hours start to finish. The two photos of the small surface rust spots were right above the fuel tank and not accessible otherwise. This shows the importance of removal to be thorough.
Attachments
-
 D7E02462-2969-4CFA-95A9-1E8AC40EBEE1.webp133.1 KB · Views: 21
 -
 444A48D2-4DC8-4DCB-9AE9-1F9E6DB52B7F.webp180.2 KB · Views: 21
 -
 EEB5EF56-CDFD-4D7E-B7A3-07A4A3DC916E.webp113.9 KB · Views: 18
 -
 3347F900-9295-451F-AB5D-80AF6C03D57D.webp123.3 KB · Views: 18
 -
 134868C9-CAFC-43EE-91B5-B2CA6EEFF8F2.webp112.6 KB · Views: 18
 -
 47563596-4744-4E07-A25A-0A93E456B58E.webp145.5 KB · Views: 17
 -
 690A7AB7-9D51-420C-8976-29CA6C3BCDB7.webp184.8 KB · Views: 18
 -
 30BD9F71-95AC-4778-AA2D-C0CE1F1DCF60.webp121.5 KB · Views: 18
 -
 157860F5-737D-4C69-889A-C914D910799E.webp164.9 KB · Views: 17
 -
 A90D0FB5-FDB3-476B-801B-7E750CF8073C.webp129.8 KB · Views: 18

New front brake hydraulics (calipers, rubber hoses and lines.) Cleaned and regreased brake pad backing plates and contact areas. Then to later find oil leaking from the bottom of the Bilstein 5100 shocks.
It's the second time where the bottom mount failed on Bilstein shocks. This is the second pair after the Toyota OEM Bilstein shocks I had to replace due to the rubber bushing failing.

It's the second time where the bottom mount failed on Bilstein shocks. This is the second pair after the Toyota OEM Bilstein shocks I had to replace due to the rubber bushing failing.
Similar threads
- Replies
- 8
- Views
- 5K