You are using an out of date browser. It may not display this or other websites correctly.
You should upgrade or use an alternative browser.
You should upgrade or use an alternative browser.
What are you working on today?
- Thread starter Amkeer
- Start date
AutoMechanic
Site Donor 2026
What year are they? I love C10 trucks. Is it a Custom 10 or Cheyenne 10?These
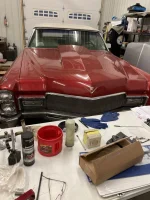
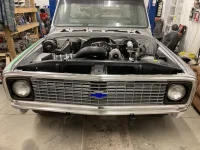
71’C-10 longbed truck. Cadillac is 1968 DeVille convertible
AutoMechanic
Site Donor 2026
Very nice71’C-10 longbed truck. Cadillac is 1968 DeVille convertible

I helped a friend install a Kenwood DDIN deck - he wanted CarPlay in a Frontier he bought. We wrapped up tonight.
I was doing maintenance on my MIL's '02 LeSabre. Oil, coolant, and brake fluid were changed.
Hood scoop on a 68 Caddy convertible! Lovin it!71’C-10 longbed truck. Cadillac is 1968 DeVille convertible

AutoMechanic
Site Donor 2026
The Beetle. Putting a new release cable for the front hood on and a new handle on the front as well since the cable stretched and wouldn’t open so I had to cut the latch off. And going to hopefully get the other piece in for the ignition then get the battery box in and see if she will start up.
This week I am doing some maintenance and repairs on the XR400:
New kill switch (broken)
New wheel bearings (fronts are clicky, rears are a tiny bit loose)
Change fork oil (overdue)
New fork bellows (ripped)
New front brake line holder (broken)
Grease steering head (overdue)
Nice new grips
Remove/clean carburetor and check float level
Wire brush rust from the frame and spray paint over
I installed a PCV valve on my Gen 1 Tundra with 161,000 miles on it. It has the 2UZ-FE 4.7L V8.

It was the original. Here’s the old next to the new. The original valve still rattled but was very slow.

The PCV is located under the plastic engine cover near the oil filler tube. It is covered by a rubber boot you must remove first.


Then just remove with a 22mm open end wrench and clean the area with brake cleaner, and install. There will still be threads visible. Put the boot back on and reattach the vent hose to the new PCV valve.

then reinstall the engine cover with 10mm socket

Easy job. The hardest part of the job was locating it because it is hidden by the removable rubber boot.
It was the original. Here’s the old next to the new. The original valve still rattled but was very slow.
The PCV is located under the plastic engine cover near the oil filler tube. It is covered by a rubber boot you must remove first.
Then just remove with a 22mm open end wrench and clean the area with brake cleaner, and install. There will still be threads visible. Put the boot back on and reattach the vent hose to the new PCV valve.
then reinstall the engine cover with 10mm socket
Easy job. The hardest part of the job was locating it because it is hidden by the removable rubber boot.
Yesterday I also installed tailgate cable stays on my Gen 1 Tundra. It was finally time.

I only use genuine factory parts on my repairs. Do you want to drive a Toyota, or do you want to drive a Fram? Or a Dorman?

To remove you just raise the tailgate slightly and bend the locking tab with a screwdriver then push the keyed end of cable upwards to remove. It comes right off.

Then unbolt the tailgate end using a T40 Torx bit

Repeat other side it is very quick and easy
new ones look great and should be good for the next 17 years.

I only use genuine factory parts on my repairs. Do you want to drive a Toyota, or do you want to drive a Fram? Or a Dorman?
To remove you just raise the tailgate slightly and bend the locking tab with a screwdriver then push the keyed end of cable upwards to remove. It comes right off.
Then unbolt the tailgate end using a T40 Torx bit
Repeat other side it is very quick and easy
new ones look great and should be good for the next 17 years.
AutoMechanic
Site Donor 2026
I agree. No Dorman parts for me. I’ve used that T40 torx plenty of times. I have the socket version.Yesterday I also installed tailgate cable stays on my Gen 1 Tundra. It was finally time.
View attachment 38877
I only use genuine factory parts on my repairs. Do you want to drive a Toyota, or do you want to drive a Fram? Or a Dorman?
View attachment 38880
To remove you just raise the tailgate slightly and bend the locking tab with a screwdriver then push the keyed end of cable upwards to remove. It comes right off.
View attachment 38878
Then unbolt the tailgate end using a T40 Torx bit
View attachment 38879
Repeat other side it is very quick and easy
new ones look great and should be good for the next 17 years.
View attachment 38881

Yesterday I also replaced the security hood lock bracket on my Gen 1 Tundra. I was in there to change the PCV valve anyway. Over the summer I had changed the latch itself because old was frozen, and got to 90% reliability but sometimes had to shut the hood twice. I don’t like that. There’s a cause for everything.

Here’s the old one before removal. Except for rust it looked pretty good but was imperceptibly bent somewhere. I also used 2 new Toyota retaining clips rather than install a new part with old clips. You can see under the parts bag the latch mechanism itself is brand new.

The new one. The hood now closes crisply with no bounce and very little sound.

Here’s the old one before removal. Except for rust it looked pretty good but was imperceptibly bent somewhere. I also used 2 new Toyota retaining clips rather than install a new part with old clips. You can see under the parts bag the latch mechanism itself is brand new.
The new one. The hood now closes crisply with no bounce and very little sound.
Yesterday I repaired the electronic clock on the 2006 Toyota Corolla LE. These are known to go out after many years, 15 years, due to brittle solder joints. Mine would go from full black to working to very dim. Needed to be fixed. The factory part is a $246 item my price. I decided to attempt a repair of the old one.

You remove the shifter cover by using a thin screwdriver or trim tool and gently pop up the plastic. Had to shift transmission nto neutral to remove it.

The pull off the middle heater knob which is fan speed, and remove Phillips had screw underneath. Near the electrical connectors under the drawers is a metal ledge, pull towards you and whole console comes out. Then push both ends of clock from front it just pops out. It is a friction fit. Unplug the electrical connector at back of clock.

I then took it to the soldering station and opened it up. There are 5 SMD resistors on the printed circuit board that need to be resoldered. If you are not comfortable with SMD soldering I would not try it. You need a temp controlled soldering station not your $25 Weller iron. I resoldered all 5 using narrowest solder tip with a bit of extra thin gauge solder to float it in all 10 solder joints.
Put it all back together and reset the time. Works like brand new and brighter than ever.

with my ham fisted approach I managed to break off one of the ears of the top drawer and cemented it back on with Tiger Bond and letting the joint cure another day before reinstalling the drawer.
You remove the shifter cover by using a thin screwdriver or trim tool and gently pop up the plastic. Had to shift transmission nto neutral to remove it.
The pull off the middle heater knob which is fan speed, and remove Phillips had screw underneath. Near the electrical connectors under the drawers is a metal ledge, pull towards you and whole console comes out. Then push both ends of clock from front it just pops out. It is a friction fit. Unplug the electrical connector at back of clock.
I then took it to the soldering station and opened it up. There are 5 SMD resistors on the printed circuit board that need to be resoldered. If you are not comfortable with SMD soldering I would not try it. You need a temp controlled soldering station not your $25 Weller iron. I resoldered all 5 using narrowest solder tip with a bit of extra thin gauge solder to float it in all 10 solder joints.
Put it all back together and reset the time. Works like brand new and brighter than ever.
with my ham fisted approach I managed to break off one of the ears of the top drawer and cemented it back on with Tiger Bond and letting the joint cure another day before reinstalling the drawer.
AutoMechanic
Site Donor 2026
Ah yes one of those to repair lol. I’ve never repaired one just replaced them. We had one of the older techs get angry once and just try to jerk it out and he screwed up a bunch of other things with it. He didn’t have a job long after that lol. He was one of the ones where this is how we done it 30 years ago and it didn’t hurt it so why did this one do it lol.Yesterday I repaired the electronic clock on the 2006 Toyota Corolla LE. These are known to go out after many years, 15 years, due to brittle solder joints. Mine would go from full black to working to very dim. Needed to be fixed. The factory part is a $246 item my price. I decided to attempt a repair of the old one.
View attachment 38893
You remove the shifter cover by using a thin screwdriver or trim tool and gently pop up the plastic. Had to shift transmission nto neutral to remove it.
View attachment 38894
The pull off the middle heater knob which is fan speed, and remove Phillips had screw underneath. Near the electrical connectors under the drawers is a metal ledge, pull towards you and whole console comes out. Then push both ends of clock from front it just pops out. It is a friction fit. Unplug the electrical connector at back of clock.
View attachment 38895
I then took it to the soldering station and opened it up. There are 5 SMD resistors on the printed circuit board that need to be resoldered. If you are not comfortable with SMD soldering I would not try it. You need a temp controlled soldering station not your $25 Weller iron. I resoldered all 5 using narrowest solder tip with a bit of extra thin gauge solder to float it in all 10 solder joints.
Put it all back together and reset the time. Works like brand new and brighter than ever.
View attachment 38896
with my ham fisted approach I managed to break off one of the ears of the top drawer and cemented it back on with Tiger Bond and letting the joint cure another day before reinstalling the drawer.
Changed the oil and filter on Jr's '09 Kia Sedona van - Mobil 1 Advanced Fuel Economy and a NAPA 7016 cartridge filter. There's a baffle under the oil-fill cap which looked very clean. Oil had 8500 km on it, which is over the recommended interval, but about half the km were racked up on a long road trip in the fall. Most of the rest of the mileage is hard miles - frequent cold starts and short trips.
Also syringed about 200 ml of brake fluid out of the master cylinder and replaced it with new. Old fluid didn't look bad. I'm not of the "Brownian motion will take care of it" school, but figure this is better than nothing.
Also syringed about 200 ml of brake fluid out of the master cylinder and replaced it with new. Old fluid didn't look bad. I'm not of the "Brownian motion will take care of it" school, but figure this is better than nothing.
Hey, AutoMechanic, you young pup, what're you laughing about, huh?
Though it's a balmy -5 C (23 F) here today, there was no way I was pulling the wheels off to do a proper brake bleed! Getting soft in my old age.")
Though it's a balmy -5 C (23 F) here today, there was no way I was pulling the wheels off to do a proper brake bleed! Getting soft in my old age.
Similar threads
- Replies
- 8
- Views
- 5K