Today I changed the sparkplugs on my 2006 Toyota Corolla LE with 95,600 miles. I used Genuine Toyota Parts. The old plugs were the originals.
To change the plugs first remove the engine cover with a 10mm socket and removing two retaining clips. All harware removed is 10mm
View attachment 39717
Then disconnect the negative battery terminal
View attachment 39719
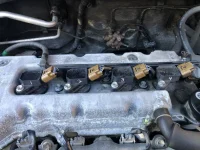
I numbered the four coils with a white Sharpie paint marker.
Here are the plugs and the 5/8” plug socket with 10” wobble extension. With this tool no way you can loose the socket inside the cylinder and have a disaster. Also it grips the plug with a strong magnet.
View attachment 39727
View attachment 39725
Lift the tab with a hook and unplug the wiring connector from the four coils. They unplug quite easily.
View attachment 39720
View attachment 39721
Remove the 10mm bolts that attach the coils to the cylinder head then remove the coils and set aside. The first two came out easily but #3 and #4 coils were quite difficult to remove. I sprayed those two with silicone lubricant to loosen the rubber boots, and after a few minutes both came out easily.
View attachment 39733
The plugs themselves came out quite easily and it was easy to install the four new plugs.
View attachment 39734
After that it was easy to reattach the coils. I was glad I had numbered them. They were super easy to put on the new plugs and reinstall the mounting bolts. Then I reattached the negative battery terminal.
With the engine cover off the last time when I had changed the PCV valve a week ago I noticed a bit of greasy dirt around the base of the oil filler tube. Today I replaced the filler cap gasket too with the Toyota part. I had to put it in a vice and use two picks to slowly worm out the old oil filler gasket away from the filler cap. The new one went in easily.
View attachment 39732
It was overall an easy job. I took it for a 20 mile test drive.
")