The Ranger went home today - washed it with Griot’s Ceramic Wax & Wash via foam cannon, installed a new Fram air filter. Owner is happy with it.
You are using an out of date browser. It may not display this or other websites correctly.
You should upgrade or use an alternative browser.
You should upgrade or use an alternative browser.
What are you working on today?
- Thread starter Amkeer
- Start date
Those 1-piece shoes are wild. I’m twitching because the old man in me simply knows that’s not right.Replaced the e brake shoes on my avalanche
View attachment 146820
We've tried a couple services over the years but my wife just prefers YouTube.. cheap. I hooked the Apple TV 2 up so she can use her AirPods. She loves it.We have Malimar for Thai TV through Roku boxes.

- Joined
- Nov 29, 2021
- Messages
- 5,383
Going to be watching the oil level on the Taurus. Let's see if it is "fuel being added" or if it will simply even itself out, as any overdose of additives (some oil-based like Yamalube Ring Free) - administered as in this video here
- works itself through the system, post-new Fuel Pump and Fuel Filter.
I need to see it not "adding oil to itself" and again the cooling system is fine, up to Full Max When Cold line when cold.
Here is the level so we can have no doubt if the level went UP any. Reading taken when engine WARM at the following mileage: 130,470 (it is just above the minimum dot, the 2nd picture shows it best in my opinion. You can see the clean break of oil pretty much one crosshatch past the minimum dot. Color seems OK not brand new but definitely not bad. I don't believe I smell fuel on it at this time. Been driven and warmed up, maybe is why. We will see.)


Other than that.. all levels look good.. time to send it. Will revisit in about 10 or so days.
- works itself through the system, post-new Fuel Pump and Fuel Filter.
I need to see it not "adding oil to itself" and again the cooling system is fine, up to Full Max When Cold line when cold.
Here is the level so we can have no doubt if the level went UP any. Reading taken when engine WARM at the following mileage: 130,470 (it is just above the minimum dot, the 2nd picture shows it best in my opinion. You can see the clean break of oil pretty much one crosshatch past the minimum dot. Color seems OK not brand new but definitely not bad. I don't believe I smell fuel on it at this time. Been driven and warmed up, maybe is why. We will see.)
Other than that.. all levels look good.. time to send it. Will revisit in about 10 or so days.
I put a new driver's front window regulator in our 08 Expedition. Not a bad job and hopefully the Dorman unit I bought will make the rest of the life of the rig.
You laugh, D60, but I'm not really expecting it to last another 260k miles. 
Pre-trip inspection and maintenance visit on a friend’s 12 Civic 1.8.
Oil change, tire rotation, air filter, cabin filter, coolant drain/refill, battery test, wiper inserts, one headlight bulb and air intake boot. The air intake boots on the R18 12-15 Civics like to split at higher mileage; it is one of those things that are cheap enough to proactively replace.


I was only allowed two hours with the car, so I only had time to replace the burned out headlight bulb. Friend is going to tackle the other one on her own.
Oil change, tire rotation, air filter, cabin filter, coolant drain/refill, battery test, wiper inserts, one headlight bulb and air intake boot. The air intake boots on the R18 12-15 Civics like to split at higher mileage; it is one of those things that are cheap enough to proactively replace.
I was only allowed two hours with the car, so I only had time to replace the burned out headlight bulb. Friend is going to tackle the other one on her own.
Last edited:
Reminds me of "The Michelin Man hose" on old turbo Audis (Type 44's). That infamous hose would develop a small leak and cause stalling and bad bucking under boost.Pre-trip inspection and maintenance visit on a friend’s 12 Civic 1.8.
Oil change, tire rotation, air filter, cabin filter, coolant drain/refill, battery test, wiper inserts, one headlight bulb and air intake boot. The air intake boots on the R18 12-15 Civics like to split at higher mileage; it is one of those things that are cheap enough to proactively replace.
{snip}
Nasty CAF

Radiator slowly failing
How TF did I damage the new part

2011 Sonata, 2.4 118k
Creaking lower ball joint, Oil change, cabin filter, hood struts
I struck out on installing these studs, luckily they are the same part # for both sides, so I replaced the obviously loose and creaky one, the other intact one will get changed in a week or two
I tried hammering, I tried using the nut to pull it through
I don't fully understand how they expect you to install this, but in hindsight, I should treat it as a lugnut stud, that's kinda what it looks like
I've ordered a two back of lug nut installer tools, hopefully the other side will be less eventful
I might be able to warranty this part, or I'll just have to eat it and order another
The oil change was a Pennzoil Full synthetic 5w30, and a genuine Hyundai filter
I step up Theta engines in viscosity because maybe it'll help

I would jokingly offer to take some of those lathes off your hands as a favor, but the truth is then I'd just wind up with a space looking like yours.Cleaning this dump today..
Been at it 4 hours. This was the before picture. 5 lathes in there and ....
View attachment 146954
Quoting myself from Nov 1 '22: this water pump is now gushing from the weep hole! It was an AC Delco "Gold Professional" from RA.2000 Ram 1500 new water pump, timing cover gasket, timing set, valve cover gaskets
View attachment 123991View attachment 123992View attachment 123993
Gold and Professional my posterior!!
I've previously endorsed and selected this wp because it includes the metal bypass tube which you usually wind up needing 95% of the time, but what a joke.
I can't find any wobble by hand so it's like the seal just failed....
- Joined
- May 5, 2018
- Messages
- 27,121
Yes that is true. I have 13 total.I would jokingly offer to take some of those lathes off your hands as a favor, but the truth is then I'd just wind up with a space looking like yours.
Oh, man that stinks! I put some AC Delco gold ball joints in my truck around the beginning of last year and one of them is clunking again.Quoting myself from Nov 1 '22: this water pump is now gushing from the weep hole! It was an AC Delco "Gold Professional" from RA.
Gold and Professional my posterior!!
I've previously endorsed and selected this wp because it includes the metal bypass tube which you usually wind up needing 95% of the time, but what a joke.
I can't find any wobble by hand so it's like the seal just failed....
It sounds like the fifth stage of machine equipment is quite similar to that of exercise equipment. Machines get boxes and materials stacked on them and exercise equipment holds damp laundry.
Not knowing much (anything?) about it, what does one do with and why does one need 13 lathes? In my basically complete ignorance I can figure maybe 3-5 but can't get close to double figures so maybe I'm about to learn something.
Because Facebook Marketplace?Not knowing much (anything?) about it, what does one do with and why does one need 13 lathes? In my basically complete ignorance I can figure maybe 3-5 but can't get close to double figures so maybe I'm about to learn something.
Changing the pretty much bald front turf tires on the JD riding mower with only tire irons, what PITA. Got the new ones partially back on then I got called by the neighbor to pull their JD 1025 4wd w/loader out of the mud with my bigger JD950. Couldn’t even see the front tires it was so buried down to frame rail.
Will finish the tires another day or take them into town to get finished.
Will finish the tires another day or take them into town to get finished.
Worked on this again yesterday and got it going, with a big assist from my dad. For the hanger where I broke off the bolt, I left the old one in place and just drilled a new hole - there was room to put a nut above the spot in the frame where this connects.2010 Nissan Frontier 4L V6
I'm replacing all the exhaust behind the cats on this - luckily no rush because I expected things might go wrong. I got out the 1/2" socket set and used the breaker bar....miraculously, both driver's side nuts easily came off the exhaust studs behind the cat. 5 minutes - this is easy, right?
I quickly ended up rounding off both nuts on the other side. Tool selection was limited but I eventually managed to grind them off with a combination of an under-powered Dremel tool, hand chisels, and an air chisel with a vastly under-powered, tiny air compressor. It took several hours.
I managed to break off a bolt holding one of the hangers in place so will have to drill that out. The studs on the passenger side are also in questionable shape but I'm a bit scared to try to remove them in case I break those too. I do have new ones so I'll think about it. I probably won't get back to this again until next weekend.
A couple of the studs were a bit rough but we managed to get them back into shape with the tap and die set - worked well and everything tightened up well. I hadn't noticed before but when I went to put the new stuff in, it turned out rockauto sent the wrong muffler/pipe assembly! The length wasn't too much different but about a foot shorter than it should have been - this was for the wrong wheelbase. I checked and confirmed it was their error. I've had bad luck with Rockauto parts, including the wrong parts a few times and also old/used parts in new boxes. I may have to stop using them.
To resolve this I went to Canadian tire and grabbed some connectors/clamps and a length of pipe and got it together and working fine. I would rather not have the extra joints but it is what it is and as long as it's working well I'll leave it be.
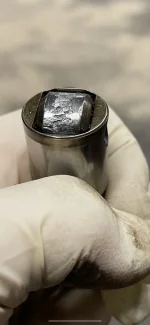
Dad brought his can of Anti-Seize compound (pic attached). He told me he bought it in 1964. It's getting down to the dregs but I think I can get another 20 or 30 years out of it at the rate I do these jobs.
Similar threads
- Replies
- 8
- Views
- 5K