First of all, this is what I did. You do what you want to your vehicle. If you try and fail, don't blame me. This is for my 4.0L Nitro with the NAG1 aka W5A580 transmission. My Nitro has 40800 miles on it.
I reviewed this topic on forums for the 300C, Charger, Jeep, and Sprinter vans. One interesting fact is the Sprinters have a drain plug, and access to drain the torque converter. Not the case on the Chrysler built NAG1 however.
This was no more difficult than changing fluid on any other rear wheel american vehicle. It was pretty straight forward actually. My only complaint is all this "don't open the magic voodoo box designed by black forst trolls" nonsense. The only issue is DCC, Chrysler LLC, Fiat or whatever doesn't give you a dipstick or usable fluid capacities.
First I got a baseline by getting a old Ram truck transmission dipstick off ebay. I measured the fluid level cold, after sitting overnight. After getting the same measurement on three days, this was my baseline. I did measure it hot, but that can very widely. I also was very careful to capture as much fluid as a could, and measure it out. I got just shy of a gallon.
When I picked up the transmission filter at the dealer, the parts guy told me to just note where the pan bolts went. He indicated the keeper on the bolt was different for every position. The parts catalog showed only one being different. Each one did have a unique number stamped on it however. It was interesting that the Dodge parts guy handed me a OEM Mercedes box, with the Chrysler number hand written on the side. (MB A1402770095, Mopar 52108325AA) The pan gasket is reusable, so you really only need one if it's damaged.
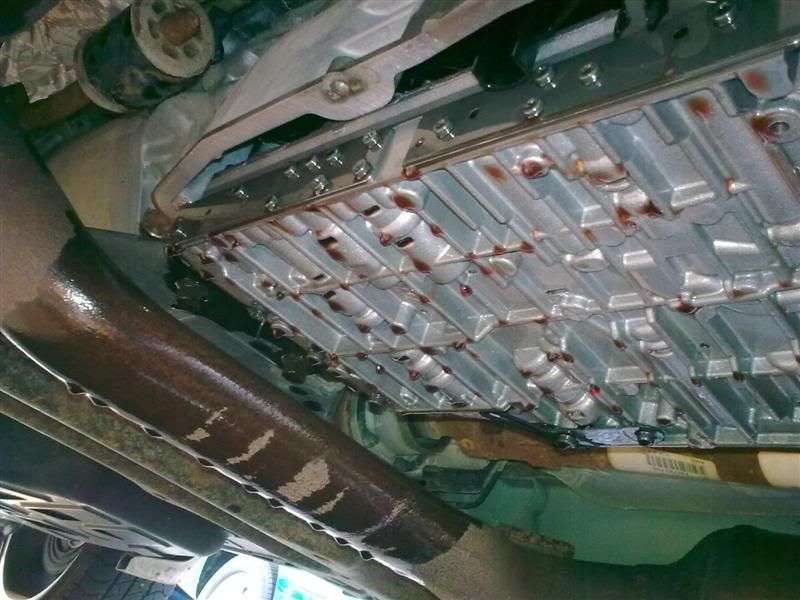
To drop the pan, pick which end you want to drain from. Place you drip pan and loose that end some. You'll need a Torx driver, T27 I think. Also for the rear driver's bolt, a swivel to get above the exhaust H pipe. Loosen the bolts to enough to get as much fluid out before trying to take the pan off. Now here's where I got stuck. I couldn't get the pan to drop far enough because the exhaust H (crossover) pipe was in the way. I had to unbolt the exhaust header flanges and drop the pipe. Pull the pan off and dump the fluid in your drain pan. Remember to know where each pan keeper needs to go back. Then get the pan under the filter and pull it straight down. Some fluid will come out of the hole the filter goes in to. Here's a photo with the pan off, and the H pipe across the back of the transmission.
Now clean up the pan. The whole inside had a very thin layer of deposits on it, and the magnet had at least an 1/8" coating of iron dust stuck to it. The magnet is just sitting in the bottom of the pan. Pull it out, clean it up, and put it back in the same spot.


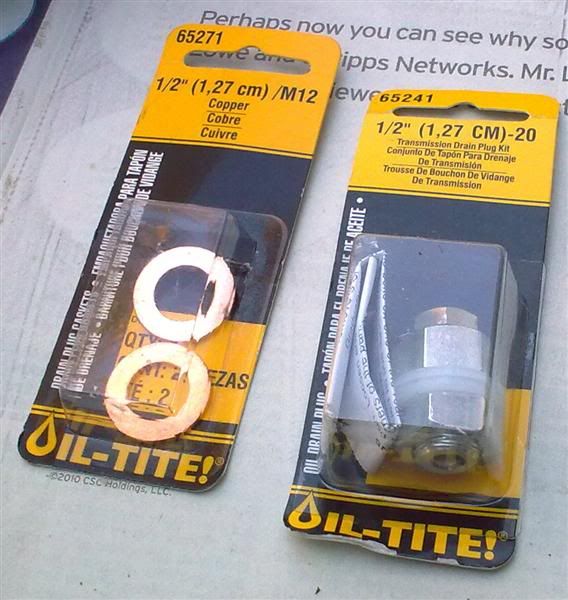
Now I chose to add a drain plug kit. This was about $4 at Advance. I replaced the plastic washers with copper crush washers, another $2. I really put this on tight in order to crush the copper washers. This is what makes your seal. I understand if you don't feel like drilling a 1/2 hole in the bottom if your pan. Just be careful with placement. I carefully looked at the MB pan, as well as the bottom if the transmission. http://www.mb4x4parts.com/product_info.php?products_id=6774
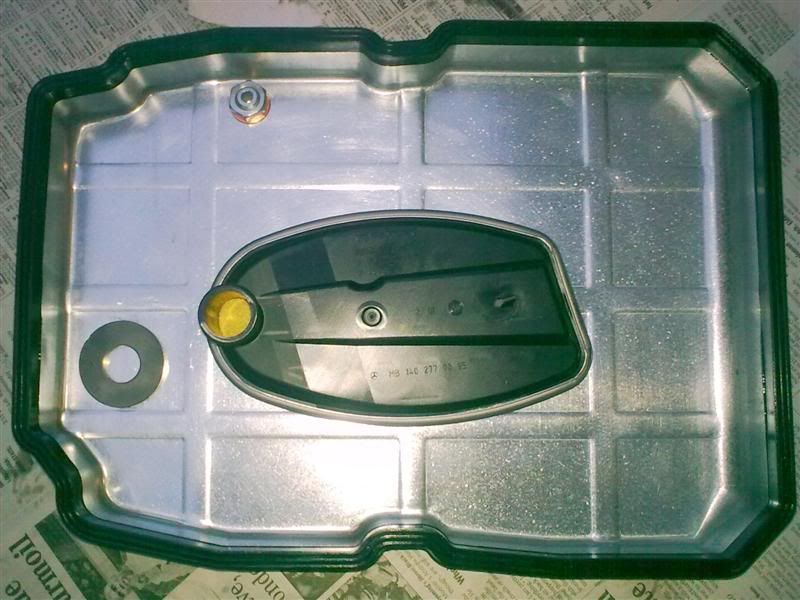
The valve body does take up most of the pan space, and the plug kit will extend some in to the pan. Just chose your spot carefully. Also remember where the exhaust H pipe will be. You don't want the plug to end up over the H pipe.
Once everything is cleaned up, install the new filter, making sure it's seated all the way, and in the correct orientation. At first I couldn't get the pan to go all the way back on, because the filter wasn't in the exact spot. Then I noticed the ribs on the bottom of the valve body had a contoured void in the shape of the filter. There's also a little tab on the filter that seats in the the valve body.
Line up your pan and thumb tighten the screws. Make sure the gasket is correct, and tighten everything up. I always snug up covers and pans in a pattern, starting with the middle bolts. Criss cross like you would a wheel lug patern, and go ever it a couple times. This doesn't need to be super tight, just even.
Reconnect the exhaust pipe. I took the time to add a little antiseize to the exhaust bolts. Might save my butt in the future. I added 4 quarts of Valvoline ATF+4, and took it for a drive. Checked the level the next morning and was right on the money. My wife drove it to work 30 miles away today, and everything was good.
I did take a fluid sample I'm going to send to Blackstone labs just to see what's what.
As always, YMMV.
I reviewed this topic on forums for the 300C, Charger, Jeep, and Sprinter vans. One interesting fact is the Sprinters have a drain plug, and access to drain the torque converter. Not the case on the Chrysler built NAG1 however.
This was no more difficult than changing fluid on any other rear wheel american vehicle. It was pretty straight forward actually. My only complaint is all this "don't open the magic voodoo box designed by black forst trolls" nonsense. The only issue is DCC, Chrysler LLC, Fiat or whatever doesn't give you a dipstick or usable fluid capacities.
First I got a baseline by getting a old Ram truck transmission dipstick off ebay. I measured the fluid level cold, after sitting overnight. After getting the same measurement on three days, this was my baseline. I did measure it hot, but that can very widely. I also was very careful to capture as much fluid as a could, and measure it out. I got just shy of a gallon.
When I picked up the transmission filter at the dealer, the parts guy told me to just note where the pan bolts went. He indicated the keeper on the bolt was different for every position. The parts catalog showed only one being different. Each one did have a unique number stamped on it however. It was interesting that the Dodge parts guy handed me a OEM Mercedes box, with the Chrysler number hand written on the side. (MB A1402770095, Mopar 52108325AA) The pan gasket is reusable, so you really only need one if it's damaged.
To drop the pan, pick which end you want to drain from. Place you drip pan and loose that end some. You'll need a Torx driver, T27 I think. Also for the rear driver's bolt, a swivel to get above the exhaust H pipe. Loosen the bolts to enough to get as much fluid out before trying to take the pan off. Now here's where I got stuck. I couldn't get the pan to drop far enough because the exhaust H (crossover) pipe was in the way. I had to unbolt the exhaust header flanges and drop the pipe. Pull the pan off and dump the fluid in your drain pan. Remember to know where each pan keeper needs to go back. Then get the pan under the filter and pull it straight down. Some fluid will come out of the hole the filter goes in to. Here's a photo with the pan off, and the H pipe across the back of the transmission.
Now clean up the pan. The whole inside had a very thin layer of deposits on it, and the magnet had at least an 1/8" coating of iron dust stuck to it. The magnet is just sitting in the bottom of the pan. Pull it out, clean it up, and put it back in the same spot.
Now I chose to add a drain plug kit. This was about $4 at Advance. I replaced the plastic washers with copper crush washers, another $2. I really put this on tight in order to crush the copper washers. This is what makes your seal. I understand if you don't feel like drilling a 1/2 hole in the bottom if your pan. Just be careful with placement. I carefully looked at the MB pan, as well as the bottom if the transmission. http://www.mb4x4parts.com/product_info.php?products_id=6774
The valve body does take up most of the pan space, and the plug kit will extend some in to the pan. Just chose your spot carefully. Also remember where the exhaust H pipe will be. You don't want the plug to end up over the H pipe.
Once everything is cleaned up, install the new filter, making sure it's seated all the way, and in the correct orientation. At first I couldn't get the pan to go all the way back on, because the filter wasn't in the exact spot. Then I noticed the ribs on the bottom of the valve body had a contoured void in the shape of the filter. There's also a little tab on the filter that seats in the the valve body.
Line up your pan and thumb tighten the screws. Make sure the gasket is correct, and tighten everything up. I always snug up covers and pans in a pattern, starting with the middle bolts. Criss cross like you would a wheel lug patern, and go ever it a couple times. This doesn't need to be super tight, just even.
Reconnect the exhaust pipe. I took the time to add a little antiseize to the exhaust bolts. Might save my butt in the future. I added 4 quarts of Valvoline ATF+4, and took it for a drive. Checked the level the next morning and was right on the money. My wife drove it to work 30 miles away today, and everything was good.
I did take a fluid sample I'm going to send to Blackstone labs just to see what's what.
As always, YMMV.
Last edited:
