I'm in the middle of replacing the fuel filter on my 96 Pontiac sunfire 2.2L. I have been trying for the past hour to disconnect this "quick disconnect" plastic retaining tab on the fuel filter with no luck. I have blasted the thing with PB blaster and it still won't budge. I read that I don't need a special tool for this. anyone got any tips on how to get it off?
You are using an out of date browser. It may not display this or other websites correctly.
You should upgrade or use an alternative browser.
You should upgrade or use an alternative browser.
GM quick disconnect fuel filter
- Thread starter Cutehumor
- Start date
- Status
- Not open for further replies.
GM uses 3 different types that I can think of. Does it have a flare fitting on one side and a 2-pronged clear plastic retainer on the other? If so, then squeeze the 2 prongs together and pull out. If it has the metal quick fitting, a special tool is required. It looks like a plastic collar that slides into the end of the line to release the clips holding the fitting onto the filter. NAPA sells them in a set. If it has the quick fitting with the green end, flip up, then slide the green locking retainer out and pull the filter off.
http://autorepair.about.com/library/a/1f/bl951f.htm
There is a 4th kind of connection I didn't think about. On this one, you just squeeze the connector itself, and discard the little plastic locking clip on your new filter when you replace it. You may have to squeeze pretty hard or borrow someone who has gorilla strength.
There is a 4th kind of connection I didn't think about. On this one, you just squeeze the connector itself, and discard the little plastic locking clip on your new filter when you replace it. You may have to squeeze pretty hard or borrow someone who has gorilla strength.
it was. now it's shifting back to normal, after a transmission fluid change.
The flare nut side is off. here's what the quick connect looks like that I'm having problems with. my fingers hurt after battling this thing for a couple of hours. There's a tool that supposed to help remove this. I'm about to go to autozone and see what they have.
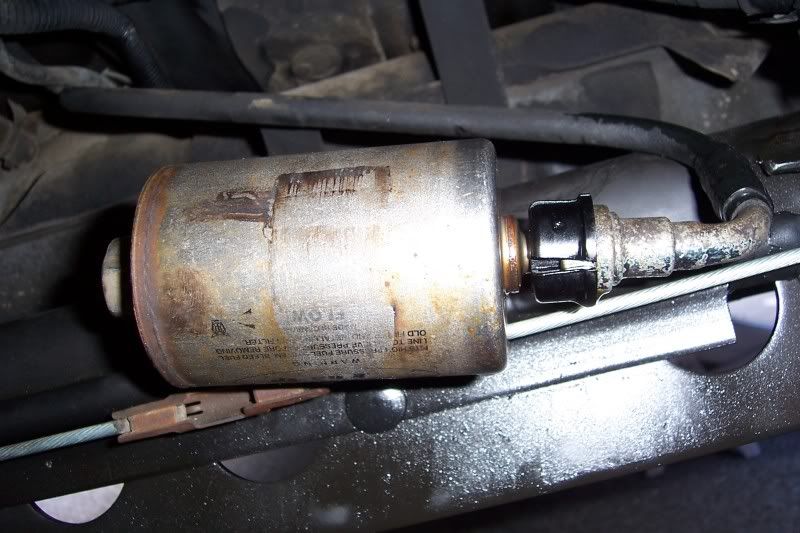
The flare nut side is off. here's what the quick connect looks like that I'm having problems with. my fingers hurt after battling this thing for a couple of hours. There's a tool that supposed to help remove this. I'm about to go to autozone and see what they have.
Push that plastic clip toward the line while pushing the line toward the filter.
Another tip on GM fuel filters,use a 20mm wrench fuel filter where it screws in the flare line.A 13/16 wrench fits,it is too sloppy and a 20mm fits better.Cornwell tools does sell a 20mm flare nut wrench for GM fuel filters
Here you go - Straight from GM (sorry the pics did not cut/paste:
Service Information
1996 Pontiac Sunfire | Cavalier, Sunfire (VIN J) Service Manual | Document ID: 22691
--------------------------------------------------------------------------------
In-Line Fuel Filter Replacement
Removal Procedure
The fuel filter is located under the rear of the car, rearward of the fuel tank. There is no service interval for fuel filter replacement. Replacement is required only if the fuel filter becomes restricted.
Disconnect the negative battery cable.
Caution: Unless directed otherwise, the ignition and start switch must be in the OFF or LOCK position, and all electrical loads must be OFF before servicing any electrical component. Disconnect the negative battery cable to prevent an electrical spark should a tool or equipment come in contact with an exposed electrical terminal. Failure to follow these precautions may result in personal injury and/or damage to the vehicle or its components.
Relieve the fuel system pressure. Refer to Fuel Pressure Relief Procedure .
Raise the vehicle and suitably support.
Caution: Provide additional support when a vehicle is on a hoist in the following ways:
• Before removing parts, support the opposite end. This helps prevent the vehicle from slipping off.
• Before removing major components, chain the vehicle frame to the hoist pads at the same end as the removal. This helps avoid a tip-off.
Failure to follow these precautions could cause vehicle damage, serious personal injury, or death.
Use a back-up wrench in order to remove the fuel filter fitting.
Caution: In order to Reduce the Risk of Fire and Personal Injury:
• If nylon fuel pipes are nicked, scratched or damaged during installation, Do Not attempt to repair the sections of the nylon fuel pipes. Replace them.
• When installing new fuel pipes, Do Not hammer directly on the fuel harness body clips as it may damage the nylon pipes resulting in a possible fuel leak.
• Always cover nylon vapor pipes with a wet towel before using a torch near them. Also, never expose the vehicle to temperatures higher than 115°C (239°F) for more than one hour, or more than 90°C (194°F) for any extended period.
• Before connecting fuel pipe fittings, always apply a few drops of clean engine oil to the male pipe ends. This will ensure proper reconnection and prevent a possible fuel leak. (During normal operation, the O-rings located in the female connector will swell and may prevent proper reconnection if not lubricated.)
Caution: Wear safety glasses when using compressed air in order to prevent eye injury.
Grasp the filter and the nylon fuel connection line fitting. Twist the quick-connect fitting 1/4 turn in each direction to loosen any dirt within the fitting. Use compressed air in order to blow out dirt from the quick-connect fittings at the end of the fuel filter.
Remove the quick connect fitting by pushing inward toward the filter. Grasp the plastic tab around the connector and pull the connector apart.
Remove the fuel filter (1).
Installation Procedure
Caution: Always apply a few drops of clean engine oil to the male pipe ends before connecting the fuel pipe fittings in order to reduce the risk of fire and personal injury. This will ensure proper reconnection and prevent a possible fuel leak. During normal operation, the O-rings located in the female connector will swell and may prevent proper reconnection if not lubricated.
Remove the protective caps from the new filter.
Install the filter in the same position as the old filter.
• Apply a few drops of clean engine oil to the male tube end of the filter and of the fuel sender assembly.
• Push the connectors together in order to cause the retaining tabs/fingers to snap into place.
• Once installed, pull on both ends of each connection in order to make sure they are secure.
Tighten
• Use a back up wrench to prevent filter, O-ring or fuel line damage.
• Tighten the fitting to 27 N·m (20 lb ft).
Notice: Use the correct fastener in the correct location. Replacement fasteners must be the correct part number for that application. Fasteners requiring replacement or fasteners requiring the use of thread locking compound or sealant are identified in the service procedure. Do not use paints, lubricants, or corrosion inhibitors on fasteners or fastener joint surfaces unless specified. These coatings affect fastener torque and joint clamping force and may damage the fastener. Use the correct tightening sequence and specifications when installing fasteners in order to avoid damage to parts and systems.
Install the fuel filter fitting using a new O-ring.
Lower the vehicle.
Install the fuel filler cap.
Connect the negative battery cable.
Inspect for fuel leaks through the following steps:
7.1. Turn the ignition to the ON position for two seconds.
7.2. Turn the ignition to the OFF position for ten seconds.
7.3. Turn the ignition to the ON position.
7.4. Check for fuel leaks.
© 2009 General Motors Corporation. All rights reserved.
Originally Posted By: silverrat
We get a lot of these at work. We found the easiest way is to cut that part of the fuel line and replace it with a new "updated" fitting that will make it easier to service next time.
I think your right. I believe the fuel line will have to be cut which is beyond what I can do. My fingertips on both hands are raw from squeezing that black plastic quick connector. I'm about to use my quick connect tool that I just got.
I used a fuel line tool from autozone, sucker still wouldn't budge after messing with it for almost two hours. it's about to storm here, so I had to button it back up. started it and there were no leaks. I'm going to have to cut the line next weekend.

My sons 95 Sunfire was so rusty I couldn't tell what was what so I cut everything off with side-cutters.Had to put on a new fuel pump to get all the lines.This didn't matter anyway because I had to replace all the fuel/brake lines from front to back anyway...might as well put in a new fuel pump after 245,000km.Actually worked out pretty good.The dealer had all 4 lines pre-bent,factory install, from front to back for $172

- Joined
- Sep 29, 2020
- Messages
- 4
it was. now it's shifting back to normal, after a transmission fluid change.
The flare nut side is off. here's what the quick connect looks like that I'm having problems with. my fingers hurt after battling this thing for a couple of hours. There's a tool that supposed to help remove this. I'm about to go to autozone and see what they have.
Better late than never!
Use a wrench like a 14 and pry it carefully away from the filter.
Black quick connect general motors GM oldsmobile alero 99 remove fuel filter.
Did you relieve the pressure?
2009. This is the BITOG version of getting rickrolled.
- Joined
- Sep 29, 2020
- Messages
- 4
Yes I did! I pulled the fuse on the fuel pump then started the car and let it die. Then cranked it a few times for 3 seconds to try and get it to burn any pressurized fuel in the line.
- Joined
- Sep 29, 2020
- Messages
- 4
Because I am working on a 1999 Alero. I couldn't find any relevant help. So I am sharing.
- Status
- Not open for further replies.
Similar threads
- Replies
- 9
- Views
- 5K
- Replies
- 11
- Views
- 4K
- Replies
- 6
- Views
- 1K
- Replies
- 6
- Views
- 2K