This is going to be a large article with a few pictures that are 800 x 600 in pixel size, so I apologize for the long load time.
This is the install on my 1995 Mercury Grand Marquis, which was quite fun.
A little background:
After finishing a ~4,500 mile Auto-RX clean on the transmission, I flushed the transmission with 8 quarts of Super Tech ATF (to dilute/flush out a large amount of the contaminates) and then followed that up with a filter change and a 15.5 quart flush & fill with Amsoil ATF (Dexron-VI, Mercon SP, rated version).
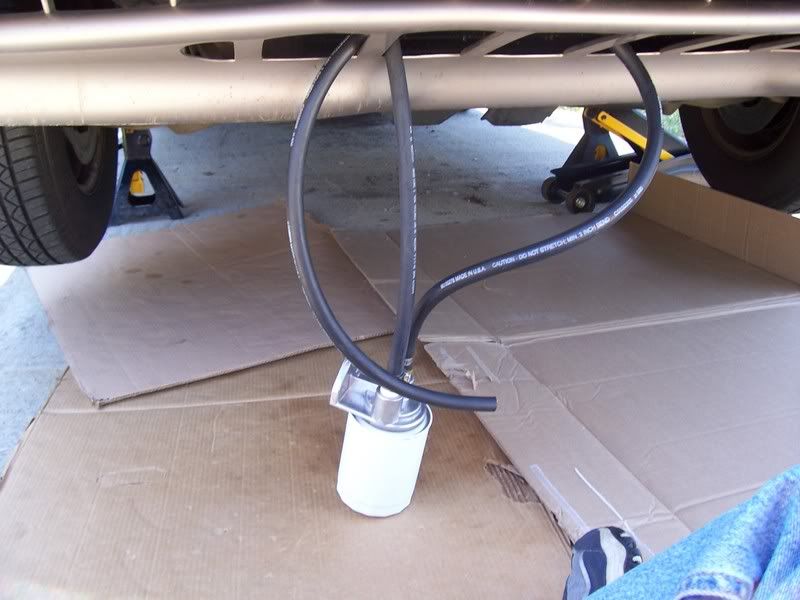
First, this is what the transmission lines look like before the installation. I modified the upper line, which is the return line.

I've been working on this for quite some time, but finally finished it up an hour or so ago. Gary Allan is a great help when you need advice on filter installations. I got the B&M filter kit from a member on this board and purchased some hoses (two 4-foot kits) and clamps from Advance Auto Parts for ~$15.
Hoses used:

I mounted the filter assembly on the frame rail going in front of the radiator, and is accessible from the underside of the bumper.

I started by connecting the hoses to the filter assembly.
Then mounted the filter to one of the available bolt holes on the frame rail. I could only use one bolt, as there is only one hole in the frame fail, but I used two heavy-duty zip ties, which are routed through the other bolt holes and around the long openings on the frame. After tightening, I wiggled everything and the assembly did not budge at all. I also routed the hoses behind the side plastics, and that is what the brown piece is in front of the hoses.

When the hoses come through the side plastics, they are visible and accessible from the wheel well. There is a plastic shield under the engine and has a large enough opening for the two hoses to be routed into the engine bay.

Now, removing the entire return line is an absolute pain in the a**, but it was necessary so I wouldn't have any metal shavings in the line. I had to remove the metal bracket that is connected to the engine and is wrapped around the transmission lines. It can be discarded once it's removed, as the bolt will not go back into the hole, and the metal bracket will most likely get deformed from the bending that is required to remove it. Due to the clearances underneath, you basically have to slice the transmission line in two, which is what I did.

I then taped off the parts that I plan to cut off each line, and used a hacksaw to slice the line.


I then took a blade and deburred the inside of the metal line, and used a grinder to smoothen out the cut marks and edges. Then I dipped the ends in some old ATF, and used compressed air (~80 psi) to blast out the lines, just to verify that any metal shavings were removed from the lines.
After installing the lines, I eyeball measured the amount of hose I would need, then cut them and inserted the metal line into the rubber hose. Sliding the rubber hose onto the metal line that is coming from the transmission was a b**** because of the angle of the bend on the line. I finally managed it by removing the plastic shield and using two hands. I used standard clamps and tightened them to where the lines would no longer budge when tugged. I tugged on the lines several time and nothing moved, so it sounds like I got it on there good. Now the installation is done!

After I was done, and verified that all connections were tight, I started the car and checked for leaks. I saw no leaks so I then added 1/2 quart of Amsoil ATF. I drove around for 6-7 miles, with speeds from 25-55 mph, and then checked the fluid level, and added 8 ounces, which brought it to the crosshatched marks on the dipstick. So that is a 3/4 quart increase in fluid capacity.
Sure not many Crown Victoria/Grand Marquis/Town Car owners are going to install this, but it gives some good step by step ideas for all cars. Hope you all enjoyed this read.
This is the install on my 1995 Mercury Grand Marquis, which was quite fun.
A little background:
After finishing a ~4,500 mile Auto-RX clean on the transmission, I flushed the transmission with 8 quarts of Super Tech ATF (to dilute/flush out a large amount of the contaminates) and then followed that up with a filter change and a 15.5 quart flush & fill with Amsoil ATF (Dexron-VI, Mercon SP, rated version).
First, this is what the transmission lines look like before the installation. I modified the upper line, which is the return line.
I've been working on this for quite some time, but finally finished it up an hour or so ago. Gary Allan is a great help when you need advice on filter installations. I got the B&M filter kit from a member on this board and purchased some hoses (two 4-foot kits) and clamps from Advance Auto Parts for ~$15.
Hoses used:
I mounted the filter assembly on the frame rail going in front of the radiator, and is accessible from the underside of the bumper.
I started by connecting the hoses to the filter assembly.
Then mounted the filter to one of the available bolt holes on the frame rail. I could only use one bolt, as there is only one hole in the frame fail, but I used two heavy-duty zip ties, which are routed through the other bolt holes and around the long openings on the frame. After tightening, I wiggled everything and the assembly did not budge at all. I also routed the hoses behind the side plastics, and that is what the brown piece is in front of the hoses.
When the hoses come through the side plastics, they are visible and accessible from the wheel well. There is a plastic shield under the engine and has a large enough opening for the two hoses to be routed into the engine bay.
Now, removing the entire return line is an absolute pain in the a**, but it was necessary so I wouldn't have any metal shavings in the line. I had to remove the metal bracket that is connected to the engine and is wrapped around the transmission lines. It can be discarded once it's removed, as the bolt will not go back into the hole, and the metal bracket will most likely get deformed from the bending that is required to remove it. Due to the clearances underneath, you basically have to slice the transmission line in two, which is what I did.
I then taped off the parts that I plan to cut off each line, and used a hacksaw to slice the line.
I then took a blade and deburred the inside of the metal line, and used a grinder to smoothen out the cut marks and edges. Then I dipped the ends in some old ATF, and used compressed air (~80 psi) to blast out the lines, just to verify that any metal shavings were removed from the lines.
After installing the lines, I eyeball measured the amount of hose I would need, then cut them and inserted the metal line into the rubber hose. Sliding the rubber hose onto the metal line that is coming from the transmission was a b**** because of the angle of the bend on the line. I finally managed it by removing the plastic shield and using two hands. I used standard clamps and tightened them to where the lines would no longer budge when tugged. I tugged on the lines several time and nothing moved, so it sounds like I got it on there good. Now the installation is done!
After I was done, and verified that all connections were tight, I started the car and checked for leaks. I saw no leaks so I then added 1/2 quart of Amsoil ATF. I drove around for 6-7 miles, with speeds from 25-55 mph, and then checked the fluid level, and added 8 ounces, which brought it to the crosshatched marks on the dipstick. So that is a 3/4 quart increase in fluid capacity.
Sure not many Crown Victoria/Grand Marquis/Town Car owners are going to install this, but it gives some good step by step ideas for all cars. Hope you all enjoyed this read.


")
