The 1995 version 4l60e is it's own animal and I have rebuilt one for the V-8 but not the V-6. Besides there being 12 boost valve choices what other tips can you all give me? It is for a little S10 4.3l truck that I will give to a retired old woman neighbor so I don't see any burnouts in it's future.I need upgrade durability parts advice--thanks in advance--Help a bro out clinebarger !!
You are using an out of date browser. It may not display this or other websites correctly.
You should upgrade or use an alternative browser.
You should upgrade or use an alternative browser.
1995 4l60e rebuild tips needed
- Thread starter Vger
- Start date

Use TransGo "4L60E-BOOST-472" This is a .472" Boost Valve & Sleeve.
TransGo "46-PLT-95" Separator Plate, Leave the 2nd Clutch Feed Orifice alone!
Corvette 2nd Servo.
Sonnax extra long band apply pin, "77787-02K" Set 2-4 Band clearance to .040" to .060".
TransGo shift kit "SK-4L60E" Follow all directions except for the 2nd Accumulator, 4th Accumulator, And leave the 2nd clutch orifice be.
Sonnax Forward & Reverse Abuse Valve plug "77754-21" You need 2.
Molded-Steel 3-4 Clutch Piston, If the unit has a Aluminum Piston....Do not use it! And do not reuse a Molded-Steel Piston either....Buy a new one.
Borg Warner Friction Module. With .080" 3-4 Frictions.
Borg Warner Forward Sprag.
Borg Warner Lo/Revere Roller Clutch.
Borg Warner 2-4 Band.
DuraBond Bushing kit "TK-23HP"
I use GM 2nd Accumulator Housing "24227711" & ordered 25 of them because they were @$10, Appears they are now discontinued. Looks like GM part# 24226359 is your best bet far as availability.
**If the Accumulator Housing doesn't have a Outer Spring.....Install GM Accumulator Spring "24219942"
Gut the 4th Accumulator, & Drive a .250" Checkball in the 4th Accumulator Feed Hole in the case.....Omitting the 4th Accumulator piston will allow Accumulator Feed Oil to lube the Lo/reverse Clutches at all times!
GM Sunshell "24228345" For use with a Thrust Washer.
**3-4 Clutch Stack**
GM 3-4 Apply Plate "8685044"
GM 3-4 Backing Plate "24212460"
5 .106" 3-4 Steels....Preferably Kolene coated Alto's or GM.
6 .080" Borg Warner Hi-Energy frictions out of the friction module.
We are not worthy

Vger
Thread starter
Dang Clinebarger, I asked for it for sure but remember I am giving this thing away to an old lady. I was expecting maybe some sonnax pinless accumulator pistons and perhaps a couple simple mods . Do you really think all of this is nesessary for an 4.3 S10 with a 79 year old behind it ? How much more would you guess this will set me back from a standard rebuild? Much appreciated though
Vger
Thread starter
After more reading I think I will follow Clinebarger's build list.
Hey Chris--I don't need to make this old woman swallow her denture on the 1-2 shift
The real pain is that I have to travel to Charlotte to get my WIT parts at a fair price as Columbia SC has no wholesale trans parts supplier.Somebody open a parts house here!!! We have an excellent old established Converter company - Camerons torque converter, Specializes in racing converters with a really good reputation.
Last edited:
That's why you set the Band Clearance tight, Don't drill the 2nd Clutch Orifice, And follow the directions in the shift kit by using the lightest Accumulator Valve Spring.Hey Chris--I don't need to make this old woman swallow her denture on the 1-2 shift
**If you still feel the 1-2 is firm after the Band breaks in.....Remove the Accumulator Valve Spring altogether, But I doubt you or her will think it's too firm......This is the beauty of the TransGo Accumulator Valve Pin, You can swap springs without dropping the Valve Body.
Using the Corvette Servo is more about cleaning up the 2-3 shift & extending 3-4 Clutch life than gaining a firm 1-2 shift.
I'm sure you noticed that 4L60E's behind 4.3L's have a rough "Double Bump" 1-2 shift, Though it happens behind V8's as well......Problems are,
*Excessive Band Clearance
*.076" 2nd Clutch Feed Orifice, TG plates usually come with a .060" Feed, Though check it & make sure it's at least .059"
*To large a Accumulator Valve, Bet it has the largest one (Code D, DX)....Where it really needs a (Code A, AX, B, BX) Accumulator bushing & valve, But these are getting difficult to source & usually need to be robbed from 700R4 Valve Bodies.
*Notching the 2nd Servo Cushion Spring Retainer allows oil to freely drain out from behind the Servo, In stock form, Oil gets trapped, Causing a hydrolock where the Cushion Spring is no longer effective.
*Needs additional Servo Cushion Springs, The TG Shift kit comes with.
Installing a new 1-2 Accumulator Housing assembly also guarantees no crossleaks which can cause erratic 1-2 shift feel. Sonnax Pinless Accumulator Pistons also eliminate crossleaks......BUT, They also restrict the range of Accumulation.
Blocking the 4th Accumulator is standard procedure.....Even with a .093" 4th Clutch Feed Orifice, The 3-4 Shift will still be barely noticeable. I drill mine out to .110" on V8 builds.
Vger
Thread starter
Awesome--I'll keep you in the loop as I move forward. I think I speak for thousands when I say Thank you and how appreciated you are in the industry and to regular and pro builders.
Vger
Thread starter
Nut cutting time Clinebarger. Re-read the sk4l60e instructions along with all the other instructions please--We are dealing with the sonnax EXTRA long servo pin--1995 4l60e. I suppose the servo cap extension rings along with other Transgo mods are moot--I have way too much money in this--way too much!! I hope you are serious
I do not use the TransGo Gold Shim as it's the incorrect way to set Band Clearance. Grind the Sonnax pin to achieve .040" clearance.
Do all the other TransGo mods to the 2nd Servo (Black & Blue Cushion Springs & Notch the Cover), You can use the spiral spring if you want but I find it unnecessary.
Sorry you find this too expensive, But it's a $40 shift kit.....Not using every single piece isn't the end of the world. Sonnax stuff has always been expensive. You're welcome to build units the way YOU want. This whole passive-aggressive thing doesn't work for me & it's not the first time with you.
Vger
Thread starter
Sorry for being passive aggressive and I have a few thousand extra in the bank so 40 bucks won't break me.I am speaking of all the parts I have purchased for this unit alone based on your build sheet.What I did not properly convey is the fact that mixing Transgo & Sonnax parts changes the rules and directions. This being a 1995 is even more difficult and throw in giving it away to boot ,well-- I am adding up the cost of rebuilding the valve body and gave serious thought on purchasing a ready to go GM047 Sonnax unit but Hey!! There are none left according to the Sonnax rep. For all concerned--stay away from the 1995 4l60e until China perfects it as we as a nation can't keep up with parts.
I am too far into it to stop Clinebarger --I will order a remanufacured valve body from a company that Tory Royce from sonnax suggested.This unit had 200k and pulled lawn equipment . I also see evidence of someone rooting around in it. I never asked you about the torque converter for the 95 model which is also a concern . Did the 4.3 have a different style?-I see no sticker on the converter and it is not painted but the pump is shiney without a smudge of grease --Again others rooting around ?--I have not disassembled the pump yet.It is my way,One disappontment at a time-I apologize for being frustrated,My respect for you and your advice is real.
I am too far into it to stop Clinebarger --I will order a remanufacured valve body from a company that Tory Royce from sonnax suggested.This unit had 200k and pulled lawn equipment . I also see evidence of someone rooting around in it. I never asked you about the torque converter for the 95 model which is also a concern . Did the 4.3 have a different style?-I see no sticker on the converter and it is not painted but the pump is shiney without a smudge of grease --Again others rooting around ?--I have not disassembled the pump yet.It is my way,One disappontment at a time-I apologize for being frustrated,My respect for you and your advice is real.
Last edited:
Vger
Thread starter
Well whata you know--I have purchased a Sonnax remanufactured valve body. Does this change the plan? If the V.B. specs are now up to Sonnax mechanical and vacuum standards ,Does this affect the Transgo SK4L60E instructions ?
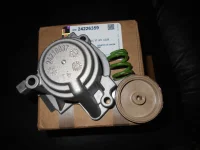
I also received the 24226359 accumulator with the 24219937 stamp. GM sure played with these over the years.I see your theory of more volume as it looks like example #3 in the Transgo instructions. Of course the plastic piston will be trashed and I have the outer delco spring 24219942 you suggested .The dinky small green spring pictured is trash right? Which transgo center spring would you suggest for this 4.3 and lastly, Can't I reuse my old aluminum piston if there is little shaft play? Or is the Transgo 4l65-2acm piston different?Thanks in advance.
I also received the 24226359 accumulator with the 24219937 stamp. GM sure played with these over the years.I see your theory of more volume as it looks like example #3 in the Transgo instructions. Of course the plastic piston will be trashed and I have the outer delco spring 24219942 you suggested .The dinky small green spring pictured is trash right? Which transgo center spring would you suggest for this 4.3 and lastly, Can't I reuse my old aluminum piston if there is little shaft play? Or is the Transgo 4l65-2acm piston different?Thanks in advance.
Attachments
Last edited:
Use the 24219942 along with the new Green Inner spring that came with the new housing, I've had issues with the TG springs breaking.
Don't want to get to off the deep end, But.....How many times have you seen a plastic accumulator piston break/crack that didn't have 200,000 miles or more? In fact I rarely see one crack anymore. And something people rarely talk about is the fact that the pin in the housing is too soft to run a Aluminum Piston.....It's Hardness is specifically suited for plastic/phenolic piston & will give the best long term seal.
Not familiar with Sonnax reman valve bodies, But I assume it has a sleeved TCC Regulator Bore & Valve & New Bore Plugs?
If the AFL Valve has been reamed & sleeved.....Don't worry about adding the White TG Spring inside the Original AFL Spring.
In fact the only thing you likely need to concerned with in the Valve Body now is the Accumulator Valve Spring weight.....What code Bushing is in the reman valve body?
*Use the 2 TG Cushion Spring in the 2nd Servo.
*Notch the 2nd Servo Cover.
*Drill the Valve Body for the quick change Accumulator Bushing Pin.
*EPC Screen Mod.
*Follow the TG Plate Hole size instructions except for.....
Band Release......Drill to .086", Provides the cleanest 2-3 shift.
The 2 AFL Feeds......Drill to .055"
4.3L's cam with different stalls for different applications, My converter guy knows which stalls came in what.......Performance Torque Converters of Texas.
From the factory GM converters have a tag with a code to tell you the Stall & TCC material, It might still be there hiding under the paint?
From the factory GM converters have a tag with a code to tell you the Stall & TCC material, It might still be there hiding under the paint?
Vger
Thread starter
You Rock sir--Let me catch up with that brain.
Vger
Thread starter
Please veify Your stated AFL feed sizes please
.055", TG says to drill them to .093" which is ridiculously large.
Vger
Thread starter
Chris,
1-- 3-4 stack is all new with the part numbers you listed.I am reading .040 with medium drag of feeler gauge, Will that suffice for this 4.3 or please advise?
2--My 95 reverse piston has the 1 hole drilled all the way through the piston while the other hole is half way.I am reading mixed opinions on the Transgo drill & plug instructions,Your opinion?
Thank You!!!!
Vger
Thread starter
Forget question #2
Similar threads
- Replies
- 22
- Views
- 9K
- Replies
- 64
- Views
- 5K
- Locked
- Replies
- 5
- Views
- 43K
- Replies
- 67
- Views
- 31K
- Replies
- 31
- Views
- 13K