Bottom caliper bolt keeps spinning.....

Status
Not open for further replies.
Joined
Mar 28, 2011
Messages
127
Location
Winnipeg, Canada
2003 Protege 5


So replaced my steering knuckle since it was bent and throwing alignment off. Got new caliper bolts and the top one tightened fine. However, the bottom one kept spinning when trying to get it to spec torque. Pulled off the caliper/bolt to check it. Bolt is not stripped and when I look inside the caliper hole, it does not look stripped. When I try threading the bolts with the caliper off, the bottom and top bolts look like they bottom out at the same point and stop.

Any suggestions?

Thanks!
 
I doubt any of us can help since we are not there. You are going to have to do some detective work on your own to figure out what is going on. Certainly sounds like the bottom hole is stripped.

You could use some large nuts or sockets as spacers and tighten the bottom bolt with the spacers on and see what happens.
 
Caliper pins are free to spin in the bracket. Just need to keep the pin from spinning while tightening the bolt. On my Odyssey, I use a thin wrench to hold the pin.
 
Last edited:
Originally Posted By: SIXSPEED
Caliper pins are free to spin in the bracket. Just need to keep the pin from spinning while tightening the bolt. On my Odyssey, I use a thin wrench to hold the pin.


If this is what happened, and it sounds like it is, make sure your rubber boot hasn't torn and make sure it isn't twisted after final assembly. Did you lube the pin with the right hi-temp brake grease?
 
Screenshot2012-04-24at73317AM.png


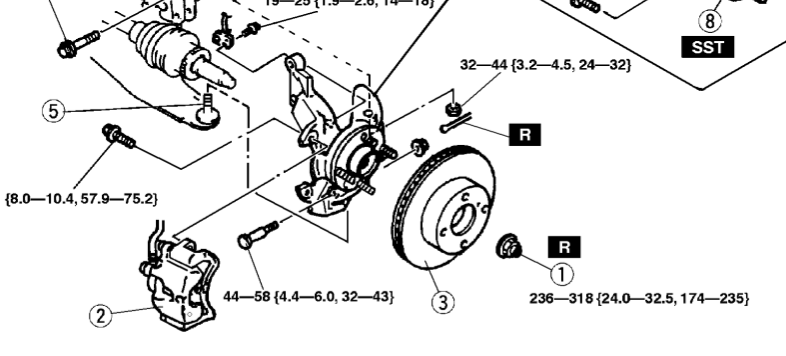
It is the bolt by the circled 5.
 
Yes, as other's have posted, it sound like the caliper slide pin is spinning. This begs the question as to whether the other slide pin is seized since it's not turning. Did you remove the slide pins and clean and lube them both? Also, as already posted, you may need to use wrench to hold the slide pin from spinning as you tighten the bolt.
 
Originally Posted By: cutchemist42
Screenshot2012-04-24at73317AM.png


It is the bolt by the circled 5.

If it's the bolt with the text "{8.0-10.4...}" pointing to it, that's the bracket-to-knuckle bolt, not the bracket-to-caliper bolt.

My experience with these is that the bracket has the female threads, and thus acts as the "nut". If one bolt is tightened before the other is inserted, it is possible to lock the bracket in such a position that the threads of the second bolt won't "grab".

Try loosening the installed bolt, THEN try and feed the second one into its hole. You may need to wiggle the bracket while feeding the bolt into its hole. Once they're BOTH seated, THEN tighten them.
 
Originally Posted By: Tegger
Originally Posted By: cutchemist42
Screenshot2012-04-24at73317AM.png


It is the bolt by the circled 5.

If it's the bolt with the text "{8.0-10.4...}" pointing to it, that's the bracket-to-knuckle bolt, not the bracket-to-caliper bolt.

My experience with these is that the bracket has the female threads, and thus acts as the "nut". If one bolt is tightened before the other is inserted, it is possible to lock the bracket in such a position that the threads of the second bolt won't "grab".

Try loosening the installed bolt, THEN try and feed the second one into its hole. You may need to wiggle the bracket while feeding the bolt into its hole. Once they're BOTH seated, THEN tighten them.


Yep, you were referring to the right bolt with the 8.0-10.4 beside it. I will try working with it a little more after work! Thanks for the help eeryone!
 
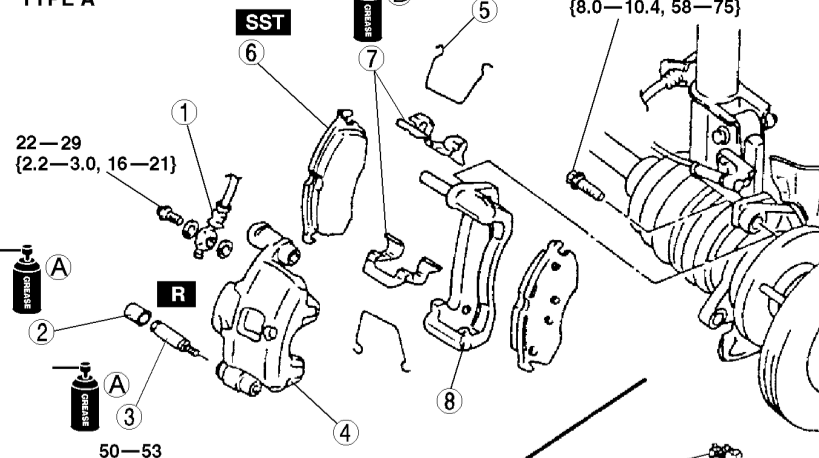
Whoops. When you posted that it was the caliper to bracket bolt, I didn't bother to look at the diagram. So....never mind about the slide pin spinning (but do make sure you remove the slide pins and clean and lube them).
 
Originally Posted By: bdcardinal
So it is the bracket to upright bolt that is stripped? Make sure the upright itself isn't stripped. Did you buy a new one or a junkyard unit?


New OEM and new bolts at same time. When the caliper is off, the bolt goes in fine, settles and cannot be tightended further, and both bolts go in same distance when I look at it on both sides.
 
Quote:
My experience with these is that the bracket has the female threads, and thus acts as the "nut". If one bolt is tightened before the other is inserted, it is possible to lock the bracket in such a position that the threads of the second bolt won't "grab".


+1
 
Originally Posted By: Tegger


My experience with these is that the bracket has the female threads, and thus acts as the "nut". If one bolt is tightened before the other is inserted, it is possible to lock the bracket in such a position that the threads of the second bolt won't "grab".

Try loosening the installed bolt, THEN try and feed the second one into its hole. You may need to wiggle the bracket while feeding the bolt into its hole. Once they're BOTH seated, THEN tighten them.


I agree with this.

I had this issue recently when reinstalling the intake on my girlfriend's Beetle. I had to keep the bolts loose until all of them were partially threaded in. Otherwise, some of them wouldn't engage the threads properly. It was actually a pretty decent PITA.
 
Well I'm going to guess it's stripped enough to not grab. Opinions then what to do? The part is number 8. Buy a new one or is rehreading possible?


Screenshot2012-04-24at72657PM.png
 
No need to guess here. Clean the thread of the bolts and the bracket thoroughly. You can probably see what's stripped by looking, but if you can't then try threading each bolt into each hole by hand "on the bench" [floor] away from the car. If one bolt won't work in either hole, replace that bolt. If one hole won't accept either bolt, fix that hole. I'm assuming you don't have a suitable tap, so just make a makeshift one-time-use tap. Buy a bolt and nut with the same thread but longer. Screw the nut all the way onto the bolt. Use a fine hacksaw or other suitable tool to cut two lengthways grooves into the threaded end of the bolt 180 degrees apart. Coat the threads with oil, then remove the nut. Clean the bolt and reoil it. Slowly run it into the damaged hole (from the back side if possible) and then remove it and clean out the threads of the hole. It should be fixed now, but test fit it before you put it on the car.
 
Status
Not open for further replies.
Back
Top