Charcoal canister is at the core of every EVAP system. It consists of activated carbon -- a substance with an extremely large effective surface area (due to its pores and/or granular structure) -- which stores fuel vapors. A bad charcoal canister causes drivability problems such as flooding, fuel odor, reduced power, rough engine, and increased pinging, and it results in reduced fuel economy. Unfortunately there are no instructions anywhere on how to repair it if it goes bad. This post is aimed at filling that gap and providing repair instructions for malfunctioning charcoal canisters.
Here are the schematics of the charcoal canister for the 1985 Corolla and similar models with a 4A-LC or similar engine sold in US:
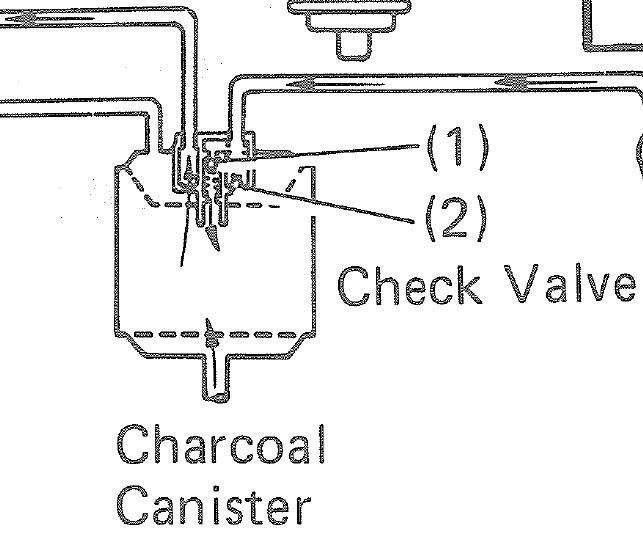
There are two filters in the canister (dashed lines).
A tank port leads the fuel-tank vapors into the canister for storage. There are two check valves in opposite direction to each other at this port. No. 1 can only open toward the inside and No. 2 can only open toward the outside. They are made of a stainless-steel spring and a stainless-steel ball. No. 2 check valve can be seen through the tank port if you shine a light.
Carburetor port (for carbureted cars) is connected to the float chamber through the outer-vent control valve (OVCV), which is off when the ignition is on and on when the ignition is off. You can see the filter through this port if you shine a light. It collects the float-chamber vapors when the engine is not running.
The purge port connects to the intake manifold to send the vapors to the intake manifold for combustion when needed. There is a vacuum-switching valve (VSV) connected between this port and the intake manifold to control this.
The atmospheric port at the bottom is for balancing the pressure inside. It has a hose that goes into a hole inside the left fender. This hose may also occasionally release fuel vapors to the atmosphere and it's important to route it through the hole provided inside the fender for eliminating fire hazard.
Note that as part of the EVAP system, the fuel-filler cap also has a check valve in, which leads air into the fuel tank if vacuum forms in the fuel tank, hence preventing the collapse of the fuel tank due to the atmospheric pressure.
The idea is to store the vapors from the fuel tank and float chamber, which would otherwise be released to the atmosphere and pollute and waste, and then send them to the intake manifold for combustion when appropriate. OVCV and VSV control this action and the properly placed ports, check valves, and filters make sure that the system works in the intended way.
Study the schematics above to understand how the canister works. The schematics is taken from the 1985 Corolla FWD repair manual EVAP emission system pages. See these pages for the basic description, diagrams and schematics, and maintenance instructions.
Maintenance instructions in the manual describe how to clean the filter and how to inspect for a stuck check valve. But they don't instruct how to repair a stuck check valve, which cannot be accessed from the outside. This is a common problem happening due to fuel and fuel-additive varnish and dirt and the manual instructs for replacing the canister in this case. Unfortunately, the canister is no longer made and sold and this is impossible. Fortunately, due to its simple stainless-steel-ball-and-spring construction, it's easy to fully clean and free the check valve and hence repair the canister.
Note that the check valve that goes bad is No. 1, which is not visible from the outside. The check valve that is visible through the tank port is No. 2 and you should not pry it as it doesn't open toward inside but it opens toward the outside.
Tools needed:
Compressed-air source
Compressed-air-gun attachment
Safety goggles
Gumout carburetor & choke cleaner by SOPUS (Shell Oil Products US)
Various-size hoses
Clamps or Vise grips to clamp the hoses closed
10 mm socket and rachet
Pliers
Shop towel or paper towel
Gloves if you prefer
Hand cleaner
As usual, always take your time and proceed slowly and with caution to avoid breaking things while you're trying to fix them. Many things involved are delicate and can easily break if you do the wrong, unpredicted, and badly planned move. There is always trial and error involved and proceed cautiously to minimize error during trial.
Make sure to use safety goggles as it's very easy to get the carburetor-cleaning solvent in your eyes when working with compressed air.
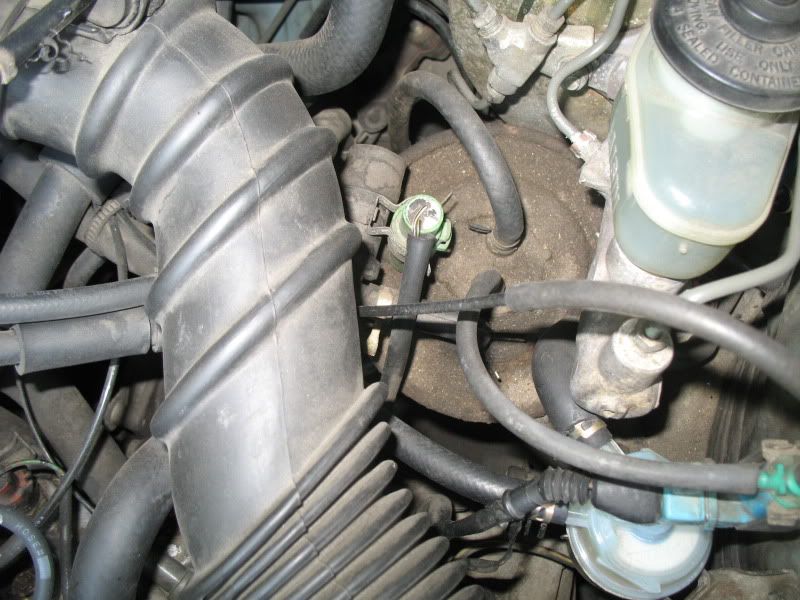
In order to access the canister, detach the cold-air-intake hose from the air cleaner.
Also pull the fuel filter off its bracket but do not disconnect the fuel hoses.
Remove the bolt that attaches the OVCV to the canister bracket.
Unplug the OVCV.
Note down the orientation of the three ports and hoses connected to them at the canister.
Pull the clips backward and carefully pry the hoses by pulling them from the very bottom. Do not pull the hoses from the top. They can easily break and you could have a hard time finding a good replacement. The molded hose that connects to the OVCV is no longer made but you can fit a regular hose if you aren't careful and break it or if it's already broken. A good trick: I twist the hoses clockwise and counterclockwise at the very bottom to break the seal -- it helps a lot to remove them.
Remove the nut and bolt that tightens the clamp around the canister. (Do not remove the clamp and bracket itself.) Be careful not to drop and lose the nut and bolt when removing them.
Lift out the canister.
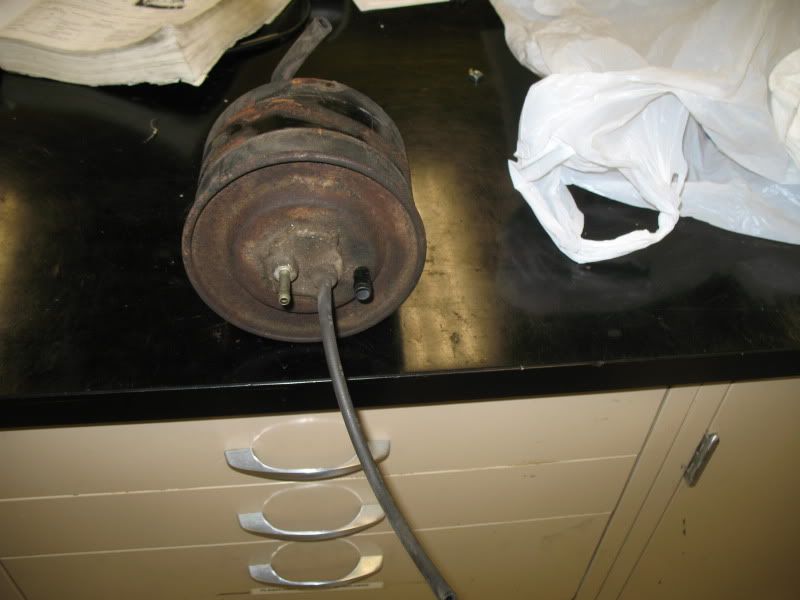
Clean the outside of the canister.
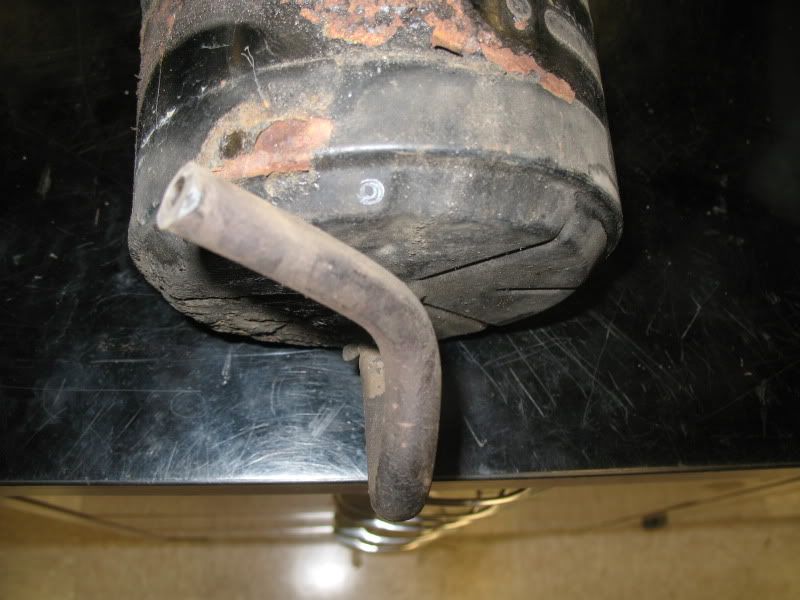
Before you remove the S-shaped bottom atmospheric hose, note its orientation. There is a mark -- two concentric circles-- on the canister to denote its orientation. It needs to be in the correct orientation so that it goes into the hole inside the fender.
First clean the air filters. The outer surface of the bottom filter is the most likely to be dirty. Therefore, blow 43 psi (specified in the manual but you can use up to 100 psi) compressed air from the carburetor port while holding the other two top ports closed with your fingers. If you can attach a hose to carburetor the port, it will work much better. No activated carbon should come out. If it does, you have a broken filter.
Then clean the outer surface of the top filter by blowing 43 psi compressed air from the bottom atmospheric port.
Clean the bottom filter one more time by blowing from the carburetor side with 43 psi air.
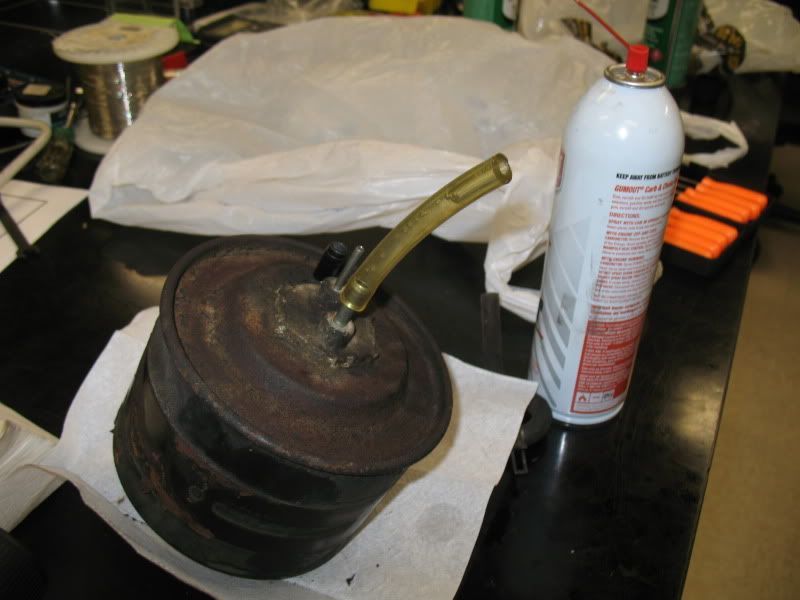
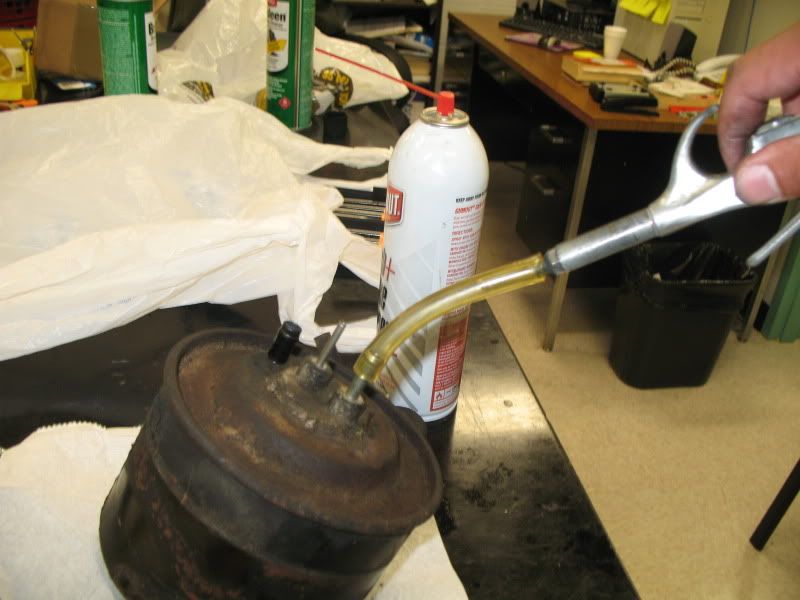
To see if the No. 1 check valve is stuck, connect a hose and blow 43 psi air from the tank port. When you trigger the air on and off, you should hear the stainless-steel ball click. If it's stuck, pour some Gumout carburetor & choke cleaner into a hose attached to the port and blow up to 100 psi compressed air. Repeat it several times until the ball freely clicks when you repeatedly trigger the compressed-air gun on and off.
CAUTION: Avoid using excessive amounts of Gumout cleaner, as there is a chance that it might damage the activated charcoal or filters. Also, do not put any Gumout cleaner into the carburetor, purge, or bottom atmospheric ports, as they directly open to the filter. The filters should remain as dry as possible during the cleaning process to avoid permanently clogging them. Gumout cleaner should only be used at the tank port.
Drop the compressed-air pressure to around 15 - 20 psi. When the compressed-air is flowing through the tank port, you should hear a ringing sound (like a cricket) coming from the No. 1 check valve, indicating that it's opening slightly.
Likewise, clean the No. 2 check valve by pouring Gumout cleaner into the hose connected to the tank port but this time connect hoses to the carburetor and purge ports and clamp them closed. Blow up to 100 psi from the bottom atmospheric port.
Reclean the filters as described above.
Reattach the bottom hose (atmospheric hose) in the correct orientation (according to the mark on the canister). Put its clip back.
Reinstall the canister. You may need a hand in putting in the bolt and nut for the clamp as the bolt is very short. It will help if someone can squeeze the clamp with pliers when you thread the nut. If not, use a Vise grip to squeeze the clamp or struggle with it for half hour like I did.
Replug all the hoses and put their clips back. Replug OVCV and install the bolt that attaches it to the bracket. Put the OVCV connector in its clamp.
Put the fuel filter back in its bracket.
As part of ensuring safety, make sure that all fuel hoses and clips are in good condition and all fuel-hose insulators are in appropriate positions.
Reattach the cold-air-intake hose to the air cleaner.
Don't forget to put the canister bottom atmospheric hose through the hole in the fender; otherwise, it might suck in hot air from under the hood, which would cause drivability problems. Since it may also occasionally release fuel vapors, it could create a fire hazard as well. In order to do that, turn the wheels all the way to the right and use your left hand to feel the hose and hole from above the left wheel and put the open end of the hose into the hole.
Enjoy better fuel economy, more horsepower, smoother-running engine, and less flooding.

Here are the schematics of the charcoal canister for the 1985 Corolla and similar models with a 4A-LC or similar engine sold in US:
There are two filters in the canister (dashed lines).
A tank port leads the fuel-tank vapors into the canister for storage. There are two check valves in opposite direction to each other at this port. No. 1 can only open toward the inside and No. 2 can only open toward the outside. They are made of a stainless-steel spring and a stainless-steel ball. No. 2 check valve can be seen through the tank port if you shine a light.
Carburetor port (for carbureted cars) is connected to the float chamber through the outer-vent control valve (OVCV), which is off when the ignition is on and on when the ignition is off. You can see the filter through this port if you shine a light. It collects the float-chamber vapors when the engine is not running.
The purge port connects to the intake manifold to send the vapors to the intake manifold for combustion when needed. There is a vacuum-switching valve (VSV) connected between this port and the intake manifold to control this.
The atmospheric port at the bottom is for balancing the pressure inside. It has a hose that goes into a hole inside the left fender. This hose may also occasionally release fuel vapors to the atmosphere and it's important to route it through the hole provided inside the fender for eliminating fire hazard.
Note that as part of the EVAP system, the fuel-filler cap also has a check valve in, which leads air into the fuel tank if vacuum forms in the fuel tank, hence preventing the collapse of the fuel tank due to the atmospheric pressure.
The idea is to store the vapors from the fuel tank and float chamber, which would otherwise be released to the atmosphere and pollute and waste, and then send them to the intake manifold for combustion when appropriate. OVCV and VSV control this action and the properly placed ports, check valves, and filters make sure that the system works in the intended way.
Study the schematics above to understand how the canister works. The schematics is taken from the 1985 Corolla FWD repair manual EVAP emission system pages. See these pages for the basic description, diagrams and schematics, and maintenance instructions.
Maintenance instructions in the manual describe how to clean the filter and how to inspect for a stuck check valve. But they don't instruct how to repair a stuck check valve, which cannot be accessed from the outside. This is a common problem happening due to fuel and fuel-additive varnish and dirt and the manual instructs for replacing the canister in this case. Unfortunately, the canister is no longer made and sold and this is impossible. Fortunately, due to its simple stainless-steel-ball-and-spring construction, it's easy to fully clean and free the check valve and hence repair the canister.
Note that the check valve that goes bad is No. 1, which is not visible from the outside. The check valve that is visible through the tank port is No. 2 and you should not pry it as it doesn't open toward inside but it opens toward the outside.
Tools needed:
Compressed-air source
Compressed-air-gun attachment
Safety goggles
Gumout carburetor & choke cleaner by SOPUS (Shell Oil Products US)
Various-size hoses
Clamps or Vise grips to clamp the hoses closed
10 mm socket and rachet
Pliers
Shop towel or paper towel
Gloves if you prefer
Hand cleaner
As usual, always take your time and proceed slowly and with caution to avoid breaking things while you're trying to fix them. Many things involved are delicate and can easily break if you do the wrong, unpredicted, and badly planned move. There is always trial and error involved and proceed cautiously to minimize error during trial.
Make sure to use safety goggles as it's very easy to get the carburetor-cleaning solvent in your eyes when working with compressed air.
In order to access the canister, detach the cold-air-intake hose from the air cleaner.
Also pull the fuel filter off its bracket but do not disconnect the fuel hoses.
Remove the bolt that attaches the OVCV to the canister bracket.
Unplug the OVCV.
Note down the orientation of the three ports and hoses connected to them at the canister.
Pull the clips backward and carefully pry the hoses by pulling them from the very bottom. Do not pull the hoses from the top. They can easily break and you could have a hard time finding a good replacement. The molded hose that connects to the OVCV is no longer made but you can fit a regular hose if you aren't careful and break it or if it's already broken. A good trick: I twist the hoses clockwise and counterclockwise at the very bottom to break the seal -- it helps a lot to remove them.
Remove the nut and bolt that tightens the clamp around the canister. (Do not remove the clamp and bracket itself.) Be careful not to drop and lose the nut and bolt when removing them.
Lift out the canister.
Clean the outside of the canister.
Before you remove the S-shaped bottom atmospheric hose, note its orientation. There is a mark -- two concentric circles-- on the canister to denote its orientation. It needs to be in the correct orientation so that it goes into the hole inside the fender.
First clean the air filters. The outer surface of the bottom filter is the most likely to be dirty. Therefore, blow 43 psi (specified in the manual but you can use up to 100 psi) compressed air from the carburetor port while holding the other two top ports closed with your fingers. If you can attach a hose to carburetor the port, it will work much better. No activated carbon should come out. If it does, you have a broken filter.
Then clean the outer surface of the top filter by blowing 43 psi compressed air from the bottom atmospheric port.
Clean the bottom filter one more time by blowing from the carburetor side with 43 psi air.
To see if the No. 1 check valve is stuck, connect a hose and blow 43 psi air from the tank port. When you trigger the air on and off, you should hear the stainless-steel ball click. If it's stuck, pour some Gumout carburetor & choke cleaner into a hose attached to the port and blow up to 100 psi compressed air. Repeat it several times until the ball freely clicks when you repeatedly trigger the compressed-air gun on and off.
CAUTION: Avoid using excessive amounts of Gumout cleaner, as there is a chance that it might damage the activated charcoal or filters. Also, do not put any Gumout cleaner into the carburetor, purge, or bottom atmospheric ports, as they directly open to the filter. The filters should remain as dry as possible during the cleaning process to avoid permanently clogging them. Gumout cleaner should only be used at the tank port.
Drop the compressed-air pressure to around 15 - 20 psi. When the compressed-air is flowing through the tank port, you should hear a ringing sound (like a cricket) coming from the No. 1 check valve, indicating that it's opening slightly.
Likewise, clean the No. 2 check valve by pouring Gumout cleaner into the hose connected to the tank port but this time connect hoses to the carburetor and purge ports and clamp them closed. Blow up to 100 psi from the bottom atmospheric port.
Reclean the filters as described above.
Reattach the bottom hose (atmospheric hose) in the correct orientation (according to the mark on the canister). Put its clip back.
Reinstall the canister. You may need a hand in putting in the bolt and nut for the clamp as the bolt is very short. It will help if someone can squeeze the clamp with pliers when you thread the nut. If not, use a Vise grip to squeeze the clamp or struggle with it for half hour like I did.
Replug all the hoses and put their clips back. Replug OVCV and install the bolt that attaches it to the bracket. Put the OVCV connector in its clamp.
Put the fuel filter back in its bracket.
As part of ensuring safety, make sure that all fuel hoses and clips are in good condition and all fuel-hose insulators are in appropriate positions.
Reattach the cold-air-intake hose to the air cleaner.
Don't forget to put the canister bottom atmospheric hose through the hole in the fender; otherwise, it might suck in hot air from under the hood, which would cause drivability problems. Since it may also occasionally release fuel vapors, it could create a fire hazard as well. In order to do that, turn the wheels all the way to the right and use your left hand to feel the hose and hole from above the left wheel and put the open end of the hose into the hole.
Enjoy better fuel economy, more horsepower, smoother-running engine, and less flooding.
