Oh man that’s so good.
You are using an out of date browser. It may not display this or other websites correctly.
You should upgrade or use an alternative browser.
You should upgrade or use an alternative browser.
What are you working on today?
- Thread starter Amkeer
- Start date
So I got the Buick back from the body shop after I was rear ended back in June. My quick look was fine until I stopped at the bank and then walked back to the car from behind. What is that? It was two mars in the new bumper from someone at the shop hitting hit. So they need to redo the bumper which I know will be close to $1000 if you brought your car in to have it painted. Carelessness.
However I did solve my P0446 code today. I jacked the car up and started looking with a pen light in front of the gas tank. On the driver's side, opposite the hit, I saw a break in the conduit high up near the floor pan. Hmm, nothing sharp and nothing out of order so I wonder why. I then saw a reflection of my light that looked like metal. Sure enough there was not one but two broken wires. The two ends are no longer going to meet so I have to try and maybe splice. Tried a short bridge that I soldered but when released the inherent tension broke the joint. So in the end I use two small bullet connectors as the bridge and they are in there firmly. Ran the car and erased the data from the CPU. Still have no blinker in the replaced tail light so have to work on that as all wiring under the car looked fine.


However I did solve my P0446 code today. I jacked the car up and started looking with a pen light in front of the gas tank. On the driver's side, opposite the hit, I saw a break in the conduit high up near the floor pan. Hmm, nothing sharp and nothing out of order so I wonder why. I then saw a reflection of my light that looked like metal. Sure enough there was not one but two broken wires. The two ends are no longer going to meet so I have to try and maybe splice. Tried a short bridge that I soldered but when released the inherent tension broke the joint. So in the end I use two small bullet connectors as the bridge and they are in there firmly. Ran the car and erased the data from the CPU. Still have no blinker in the replaced tail light so have to work on that as all wiring under the car looked fine.
Fitting new reproduction side curtains to a close friend's show quality '59 MGA. He purchased new curtains for his MGA while waiting to find someone to rebuild his originals. The good news is you can get current production ones, the bad news is that while the 'panels' themselves are decent, they are missing some of the original features and the mounting pins and brackets are flat out wrong.... Oddly, they are well made and well finished, just the absolute wrong shape.
Five hours of fitting, filing and fiddling and they came out great, well enough to use and most would not know the difference. Took some cutting and shaping of the pins, but the brackets in the pic needed to be completely reshaped using a torch, small hydraulic press and various things I had in the garage used as forms to bend metal over....you can see the discolored plating where we got the metal hot.
Kind of fun actually...retired pilot and a finance guy playing w/ torches, presses, saws and we didn't burn anything down and still have 10 fingers each..success.
OVERKILL
$100 Site Donor 2021
Closed up the cottage!

Pretty proud of myself this weekend. Never having replaced brakes or ever believed I could do it, I replaced the pads, rotors and hardware on all 4 corners of my 09 Camry. The only issue I ran into was that I bought all the parts at a Toyota dealer 2 weeks ago and only noticed that they gave me 2 packs of rear shims and no front shims while in the middle of the work. Since the brakes were were last serviced by the dealer several years ago, I reused the OEM shims/squealers that were already on, as I just didn't feel like stopping to correct the order. But overall, went well and I'm no longer fearful of doing it.
Did a project on my mom’s Craftsman DGS6500 54” garden tractor on Saturday.
I installed a new PTO switch and added a voltmeter and fuel gauge. Why? Why not! The parts were not that expensive and I also wanted to see if I could do it. And anyway the PTO switch was so old and faded that the new switch is way better. The old one still worked but looked chewed up.
I had replaced the engine on this tractor back in August and noticed that, while fuel level is read by looking at the translucent tank body through a slot on the back, the view is now all clouded and hard to read. Being far afield and running out is a chore,
I got the fuel gauge and tank sending unit from Amazon, and finally put them in while listening to our MN Golden Gophers lose handily to Illinois . Cut the holes, wired up the lines, making sure not to get the sending wires tangled in any moving parts.
Now the tractor has a working fuel gauge, but I’ll need to look up the voltmeter. I suspect it’s set to 6volt (it’s a combination 6/12 volt), since it pegs out at 18, and I know the little 340 amp battery isn’t that powerful.
Just a project to add something that didn’t NEED to be done, but done just because
Later this week: the Mini rear brakes since all of my ordered parts are in today, and my niece’s Jaguar rear suspension. Woo hoo.
I installed a new PTO switch and added a voltmeter and fuel gauge. Why? Why not! The parts were not that expensive and I also wanted to see if I could do it. And anyway the PTO switch was so old and faded that the new switch is way better. The old one still worked but looked chewed up.
I had replaced the engine on this tractor back in August and noticed that, while fuel level is read by looking at the translucent tank body through a slot on the back, the view is now all clouded and hard to read. Being far afield and running out is a chore,
I got the fuel gauge and tank sending unit from Amazon, and finally put them in while listening to our MN Golden Gophers lose handily to Illinois
. Cut the holes, wired up the lines, making sure not to get the sending wires tangled in any moving parts.Now the tractor has a working fuel gauge, but I’ll need to look up the voltmeter. I suspect it’s set to 6volt (it’s a combination 6/12 volt), since it pegs out at 18, and I know the little 340 amp battery isn’t that powerful.
Just a project to add something that didn’t NEED to be done, but done just because
Later this week: the Mini rear brakes since all of my ordered parts are in today, and my niece’s Jaguar rear suspension. Woo hoo.
Awesome doing it yourself AND saving quite a bit of $ in the process. The only time I will pay for car service is if it involves specialty equipment/space that I don't have, but otherwise nothing beats doing it yourself anytime possible.Pretty proud of myself this weekend. Never having replaced brakes or ever believed I could do it, I replaced the pads, rotors and hardware on all 4 corners of my 09 Camry. The only issue I ran into was that I bought all the parts at a Toyota dealer 2 weeks ago and only noticed that they gave me 2 packs of rear shims and no front shims while in the middle of the work. Since the brakes were were last serviced by the dealer several years ago, I reused the OEM shims/squealers that were already on, as I just didn't feel like stopping to correct the order. But overall, went well and I'm no longer fearful of doing it.
Pretty place. Looks peaceful.Closed up the cottage!
View attachment 121539
OVERKILL
$100 Site Donor 2021
Thanks, it is!Pretty place. Looks peaceful.
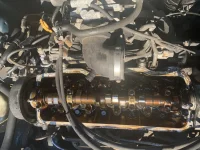
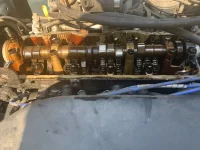
It looks like I still need my 93 Tercel for a few months. I “replaced” the valve cover gasket yesterday at 364,000km.
It was a Fel-Pro part and I just could not get it to stay in place. I eventually gave up and just put the old one back and some new sealant in the recommended spots. Comparing them, the new gasket wasn’t formed correctly so would never have fit properly. Junk.
Looks good in there for going about 180k since the rebuild I did in 2007. It's got whatever random oil is cheapest for the last 5 or 6 years.......
Attachments
Had one of those "YOU SCREWED UP MY CAR!" customers today...
Last week, he brought his '09 Camry in for an "ever since ya". Few 6-7 months back, we replaced the left and right CV shafts, which apparently caused a slow ATF leak in his driveway.
I traced the leak to the RH output seal, which I replaced last Wednesday. Today, the car was towed in, along with said customer RANTING about how we'd failed to fix his car properly.
Since I was the one to last service the car, I was the one to pull it in and investigate. Upon lifting, I found ZERO transmission leaks. I did, however, find an oil filter that, while tight, had decided to puke oil any time the engine was running. Thankfully, the last OC had been performed at a Jiffy Lube. What could have been a serious negative mark on me and my shop turned into a massive thumbs up.
Wife informed me that the CEL was back on in her Equinox even after replacing both check valves for the air injection code. Sigh, I was afraid of that. Got home and she showed me a video she took of her turn signal "going crazy". No, that's just GM's clever way of letting you know you've got a bulb out by blinking the turn signal with the bad bulb more rapidly. Left rear signal was out, easy fix. While at the Zone getting a new bulb, decided I'm trying one last thing before I fork over a chunk of change to do some significant disassembly to clear the deposits from the air injection ports.
Found this:
https://www.autozone.com/fuel-and-e...oducts-deep-clean-gdi-cleaner-11oz/104878_0_0
Gave a few rounds through the air injection inlet after commanding the air pump on and the check valves open with the scan tool. Waited 15 minutes between rounds. At least it seems to have lowered the air injection pressure while I was spraying it in. Definitely burned off something, there were some strange smells from the exhaust and some black water dripping off the tailpipe. No new codes came up. Cleared the air injection code again after a few rounds, guess we'll see if it comes back.
I changed the oil after running the push mower till the fuel was exhausted.
Oil in mower was in for 2 years.
Out: 16 oz of 10w30 Valvoline Maxlife Full Synthetic
In: 16 oz of the same
I have 7 more changes left of this oil. 18 year old mower just purrs on this stuff.
Oil in mower was in for 2 years.
Out: 16 oz of 10w30 Valvoline Maxlife Full Synthetic
In: 16 oz of the same
I have 7 more changes left of this oil. 18 year old mower just purrs on this stuff.
2005 Camry vapor canister, above rear sub-frame, not a difficult job except getting the vacuum connections off. Here's the Lexus equivalent good example that saved me from farming this one out as at first look thought this being at the limits of my ability, at 4:30 he discusses that vent hose connection;
And my experience with that vent hose connection went well with the rear one, the other was not so easy, eventually I pulled each side over the ridge separately with a (recommended from JamieJones TheCarMan review video linked) Lisle 80290 hose remover. The electrical connection has the tab to press in at the bottom, so it is a small space between that and the rear vent connection below it. I used the Dorman vapor canister as Amazon had the best price I could find.
I think the plastic is stiff at first, work it a bit to soften it and then the connector should be straight on as possible for less resistance, meaning the rear of the canister positioned diagonally across the sub-frame decreases the stress on the connection for easier removal. I took a picture of the connector but it's blurry, what I wanted to show was the tabs, as you squeeze in, the tabs kind of rotate inward as if they are on a center axis, to clear the ridge.
 And previously but still a blurry picture from shoddy camera operator, the Kia Sedona with new oil filter housing, oil sender housing and 3 new OEM coils on the rear bank, Denso makes these Kia coils, no leaks as I have been running it for a few days;

And my experience with that vent hose connection went well with the rear one, the other was not so easy, eventually I pulled each side over the ridge separately with a (recommended from JamieJones TheCarMan review video linked) Lisle 80290 hose remover. The electrical connection has the tab to press in at the bottom, so it is a small space between that and the rear vent connection below it. I used the Dorman vapor canister as Amazon had the best price I could find.
I think the plastic is stiff at first, work it a bit to soften it and then the connector should be straight on as possible for less resistance, meaning the rear of the canister positioned diagonally across the sub-frame decreases the stress on the connection for easier removal. I took a picture of the connector but it's blurry, what I wanted to show was the tabs, as you squeeze in, the tabs kind of rotate inward as if they are on a center axis, to clear the ridge.
Put a Chineseium cat on the Prius. Also swapped in the sway bars from a Corolla, Toyota in their infinite wisdom used hollow sway bars in Prii. Solid ones from a 2003-2009 Corolla are a one for one swap, save for different bushings - I used Moog ones for a 07 Corolla/Matrix.
But, I broke a few fasteners in the process - an engine mount bolt, tie rod end nut, steering U-joint bolt. All on order from Toyota in SoCal. All my fault. Also have an exhaust clamp on order from O’Reilly.
Not much  changed out a flat tire on a neighbors Subaru
The front tire was flat so I put the spare tire on the rear then took the good rear tire and put it on the front..

changed out a flat tire on a neighbors SubaruThe front tire was flat so I put the spare tire on the rear then took the good rear tire and put it on the front..
Had a full bay at work last night. Got out around 1:30am. The loader has no heat(recirculation filter was clogged), none of the wipers work, and most of the lights are inop. Front wiper has a short somewhere so I pulled the dash out to access the cab harness. Rear wiper had a blown fuse and broken arm. Also due for major PM(all fluids and filters) since it hit 8000 hours yesterday.
The bobcat had a blown o ring on a wheel motor hose and was due for a PM also.

The bobcat had a blown o ring on a wheel motor hose and was due for a PM also.
Nice to see another Tercel on here! Mine is a 94 and looks like it was the same color as yours before the repaint. Best $1500 I’ve ever spent.It looks like I still need my 93 Tercel for a few months. I “replaced” the valve cover gasket yesterday at 364,000km.
It was a Fel-Pro part and I just could not get it to stay in place. I eventually gave up and just put the old one back and some new sealant in the recommended spots. Comparing them, the new gasket wasn’t formed correctly so would never have fit properly. Junk.
Looks good in there for going about 180k since the rebuild I did in 2007. It's got whatever random oil is cheapest for the last 5 or 6 years.......
Similar threads
- Replies
- 8
- Views
- 5K