What are you working on today?

My problem is I seem to cry for two hours before starting any type of auto work.
I find auto work almost theraputic in a way.
I'm able to address current issues and look for ways to prevent/mitigate wear of other components.
I come away physically drained, but feeling like I've accomplished my goals...kinda like a good workout at the gym.
 
Not much today.. Pulled a few more nails hiding after removing 3-4 layers of flooring out of the kitchen. Then had to pull one of the youngest sons tooth, man that thing bleed a lot till I got it out. Yuck.

Few days ago rewired the kitchen then put a battery in the oldest sons iPhone. Craziness!
 
Nighttime Chevy radiator replacement.

1F9A2FCD-4AC1-49A3-94DF-18D35B702056.jpeg
A13C8538-8F2B-444D-9E8A-38BF08D8568A.jpeg
 
Rebuilding a Ford 4R70W, I rarely get to build these anymore so it's kinda fun & interesting, Besides all the crossleaks & age related internal leaks they suffer from they are a well designed unit.

This one had a serious crossleak between the Forward Clutch Circuit & the Direct Clutch Circuit causing the Forward Clutch to burn up. The funny thing is.....The truck ('03 F150) came in for a Flexplate replacement from a damaged ring gear. I go to pull it in the shop & it took a full 90 seconds for it to move forward after putting it in drive. Called the customer & he stated it had been doing that for a couple months & it'll fall out of gear "hot" at a stop light.
So he has transmission problems.....But he wants me to pull the transmission to replace the flexplate without mentioning these issues?? Good thing I caught it before blindly installing a flexplate!

The Accumulator Pistons, O/D Band Servo Piston, & Lo/Reverse Band Servo Piston & Cover are on back order from WIT & Transtar.....Had to order these parts from Ford. The fact I had to special order them tells me that local builders are NOT replacing them!!

The Forward Clutch to Direct Clutch crossleak is caused by the lack of a "Stiffener Plate" under the 2-3 Accumulator Housing Bore. The plate was eliminated on 2001 & later 4R70W/4R75W units. Sonnax 76507F-01K repairs this issue.......But guess what, Also on backorder from local suppliers. Thankfully one of my colleges/fellow builder has a few in stock & was gracious enough to sell one to me.

Forward Clutch going together....
R50Q1Gg.jpg

 
PXL_20220923_190611196.jpg

PXL_20220923_205250801.jpg

PXL_20220923_212001696.jpg

PXL_20220923_213206194.jpg

Standard PM work on a 2005 RAV4 and a 2020 Elantra
PXL_20220923_212859881.jpg

She's had this car over 2 years now, this is oil change #2 🙄
Everyone got wiper blades, washer fluid, PP 5w30 and respective OEM oil filter
Adjust tire pressures (somehow too low AND too high 🤔)
At this point, do the work, collect the 💰, rinse/repeat
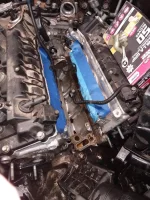
I turned to the exhaust leak on Project xB
The exhaust shop charged me $70, welded in some spots, and it was better
But it still wasn't quite right
The Critic put me onto FWD Toyotas that wear the exhaust donut out, causing an intermittent leak where the front pipe meets the converter
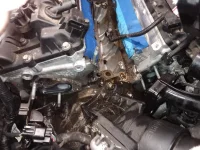
I took it for a drive, doused it in Kroil, hit it with a torch, caught it on fire, put out the fire, torched and Kroiled some more
Rounded the 14, hammered on a 13, and somehow got the bolts out
PXL_20220923_223848481.jpg

PXL_20220923_230322333.jpg

PXL_20220923_230340548.jpg

PXL_20220923_230940542.jpg

Seems I've got the exact same sharp cheese grater type indentations and worn donut gasket
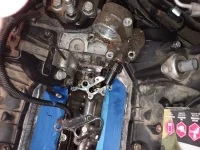
PXL_20220923_233201410.jpg

Oh we're rigging it 😏
I cleaned the best I could, anti seized the new bolts, layed down some of the high temp RTV to smooth out rough edges, tightened it all own, and I'm gonna let it cure for 24 hours.
 
Friday
2008 Ford Fusion
Passenger side CV axle, left outer tie rod, two wheel studs and lug nuts

1990 Chevrolet Silverado 1500
Replaced all four shocks, oil change and new air filter
 
Got some work done on the 4R70W.....

*Direct Clutch.
*Reverse Input Clutch, Found a broken Bevel Plate, Had one to replace it. 2nd & 3rd pic.
*Stacked up to the Center Support.
*Sun Shell, Reverse Input Drum, Forward Clutch Drum stacked, Installing the O/D Band & Servo. 5th & 6th pic.
*Intermediate Clutch.
*Pump built & ready to drop in.

QTKc9b3.jpg

7CASARq.jpg

PGB8HcW.jpg

5fgp1ty.jpg

wi7W0So.jpg

vu2WVF3.jpg

8N09eM5.jpg

eso3Jh9.jpg
 
Repaired a power window motor in a 2000 Dodge Dakota. The electrical contacts on the rotor were completely black and I used brasso until they looked like shiny copper again. Then cleaned the contacts with acetone, regreased and reinstalled. It works GREAT now. It was totally unusable before. Drivers side too "the important window".
 
Finished up the 4R70W, Perfect time.......On a Saturday morning with no one around (Turned my Cell off & unplugged the shop phone)

*Got the pump installed & checked end play.
*Installed the Lo/Reverse Band Servo & Cover, 1-2 Accumulator & Cover, & the 2-3 Accumulator. The Proto Puller I'm using to press the covers down is older than I am, One of the many tools I inherited from my Grandfather & I think of him everytime I use one.
*Got the Sonnax support plate installed, Requires some precision marking, Drilling & Thread tapping. I used to have a old AODE Plate to quicken the process, But I couldn't find it. If I built more 4R70W's.....I'd fabricate a jig.
*Installed the TransGo shift kit minus the pressure relief valve as I've seen them stick open & burn units down (No pics).
*Valve Body assembled & torqued down, Very critical to torque it in sequence to prevent valve binding &/or wear!
*OE Filtran filter & new pan gasket to round it out. (No pics)
*The piece of steel bolted to the back of the Case is to keep the Parking Pawl Pivot Pin from falling out while washing/handling the Case.....You can guess how I know it can fall out & get lost;)
*Tail Housing cleaned up, New Bushing & Seal, And a new housing to case gasket. (No pics)


9HGPHg9.jpg

vwnvEtB.jpg

omPPSFR.jpg

rpfm6tq.jpg

ShpNqLN.jpg

NaLtoaF.jpg

R6pjEbY.jpg

vt4wHcz.jpg
 
Worked on neighbours early ninety Dodge Magnum V6 2 barrel. He thought it sounded rough and idled bad even though he put a new air filter and gas additive from quickshop. Ran CRC GDi cleaner and treated it as any other model of car for the procedure. Claimed oil looked "dirty" under cap and wanted to flush before oil change next week. Talked him out of that and lucky for us the oil was on the stick put not by much so I added LM Hydraulic Lifter Additive and top off with high mileage 10w30 Castrol. Power steering fluid was bad and offered to do a turkey baster replacement but he didn't have any fluid.

Outcome was good as we heat soaked for thirty minutes during cleaning up and oil top off. Had a tiny bit of smoke from tailpipe but was informed it runs much better now. Informed client he should get it on the highway 🛣️ weekly along with using a slightly better fuel system cleaner twice annually. Never a dull moment.
 
Added about a quarter quart of 80W-90 differential fluid (because the Valvoline 75W-90 stuff they wanted $16 for it) for a $6 bottle, previously $5.. because sure enough when I checked the differential fluid it was a little bit low wasn't even on the dipstick for the front diff. I noticed that the car wanted to downshift on the highway and it hadn't done that before so I figured something was off and I'm happy I checked my fluid this morning. I added approximately a quarter quart because those bottles don't leave any vent window to see the level and I checked the level again after about 15 minutes and it was at the top of the dipstick cross hatch area and so far the car is feeling smoother maybe with a little bit of a whine because this fluid is subpar but I haven't verified that yet.

No idea if it is an actual leak or if it just burned off because this car gets driven hard, at least in a spirited manner and make sure to hit redline in a shift almost every time car is driven to keep engine clean and avoid internal deposits, the outside is NOT shiny actually dirty but those internals are never given a chance to build deposits, since we started from an unknown and all fresh fluids. So it got low on front diff fluid in... let me see.. (checking notes) about 7400 miles of not looking at it. ~7400 miles July 22nd to present.
 
Nothing big today, lube door/trunk/hood hinges on the CRV and Subaru today. Used 3m silicone paste, as well on the weatherstripping, some looked dry. Lubed the window tracks so no more slow power window(s)

Cleaned out the garage, consolidated a few oil jugs together. About 8 Rotella T6 5w40 jugs 1/4 full, made 2 full ones. Range btwn 3 to 8 yrs old, just shook them to agitate the additives. 2 more free oil changes for the Subaru.

Misc 2x Pennzoil, 3x Castrol edge, 3x QSuD 0w20 bottle made 3 full 5L jugs. Friends always use my garage for oil changes. Leave me their leftovers.
 
Washing machine door switch temporary repair as the symptoms left it at a stand still after the wash cycle, just like when I got it from a garage sale year's ago - $35, and I suspected the same problem after a desperate moment of what's wrong now...basically the wire connector has a send, return and ground. There just has to be continuity from the send to the return when the door(lid) is shut.

My solution was feed a u-shape wire between the send/return at the back of the connector; then order part online, as finding a door switch locally probably isn't going to happen like last time. That worked, finished the load and now to order that switch before I forget...like I just did leaving Menard's this afternoon, I was supposed to look for the door switch there and completely forgot...
20220924_102741.jpg


Next thing going on is the Kia Sedona seemed to have a oil leak and the parts guy at the dealer said they usually change the oil filter housing and the oil sender housing when changing the oil sender. I'm thinking it's the oil filter housing o-ring, but I started this task last Thursday figuring just get the wire harness out of the way and the rest should be easy, and no rush as it's parked for the summer months.

Only difficult part was getting the thermostat housing off, it attaches to both heads and the coolant pipe between the heads. Started putting it back together today, put both oil housing units and the thermostat housing on. Using low strength purple thread lock for assembly on this Kia as fasteners always seem to come loose - at least for me. I also got 3 new OEM coils for the rear bank, I'll be be updating the 2012 Kia Sedona thread with that and probably a few more pictures/part numbers/more detail, for those who might one day have a Kia/Hyundai v6 that leaks oil from the valley.

This is just as I got it disassembled, on the left is the oil sender housing - gasket placed across the valley, and right side is the oil filter housing with the thermostat housing behind as I left the coolant lines connected to the back so it is hung out of the way on a bungee strap. The oil pools more on the left so that's why I'd guess it a problem at the oil filter housing. Gorilla Grip gloves were used as I didn't want to get my hands dirty.
20220924_184922.jpg
Last photo is my vacuum attachment, the long hose goes to the bottom and the short hose is just a space filler, the smaller vacuum attachment fits in to create enough to suck out the oil, coolant and others...the jug collapses a bit but the set-up seems to work good enough for small liquid pools. I added the white connector to better access the smaller spaces.
20220924_192105.jpg
 

Attachments

  • 20220924_185017.webp
    20220924_185017.webp
    167.6 KB · Views: 6
  • 20220924_185040.webp
    20220924_185040.webp
    125.3 KB · Views: 5
  • 20220924_185105.webp
    20220924_185105.webp
    136.2 KB · Views: 5
Back
Top Bottom