newb mechanic - brake issues round 2

Status
Not open for further replies.
Joined
Oct 6, 2014
Messages
264
Location
Minnesota
Back to working on the dodge. Have a few new questions since new things are going wrong again setting me back further.

Vehicle 87 dodge caravan normal length 2.6L mitsubishi, 135k miles almost always garaged and surprisingly low rust for the body (but the underside of the bottom inches at common snow height sorta bad). Trying to do the rear brakes to start because they were seized/haven't even gotten to inspecting the fronts yet. Drums/all hardware removed.


#1 I have brake line where it seems to have rusted to the connector. I've already accepted i have to replace this brake line (it broke on the side to the brake cylinder) and am going to have to use a vise grip on the other unmoving end despite days of PB Blaster (it rounded off the nut despite using a flare nut wrench, [censored]! its like the metal went soft??) but am worried about damaging what it connects to in turn which is rubber brake lines. (maybe its opposite of normal? but the caravan uses rubber hoses down to the axle, then metal lines along the axle to the brake cyl on each side. I thought normal is opposite that like in the front it usually is.)

#2 When putting on a new brake line should I use thread seal, or antiseize compound, or neither? How much should I have to snug down the brake connectors? (I dont have a torque wrench handy and it needs a flare nut or open end anyway)

#3 If i'm inspecting the brake hose upstream from here what do I look for to indicate whether it's bad? Besides obvious big cracks or "you try to move it and it breaks" obviously...
 
You have two choices...keep repairing as the lines keep blowing out..or replace all that looks suspect on your inspection we all know its no fun to replace or repair lines beside the road.

Your vehicle is 28 years old and you should plan on looking at the above plan on most of the vehicle.

brake lines are compression fittings...so no need for anything but snugging up.
 
1. If it's from '87, replace the rubber brake lines. They aren't too expensive, especially considering how important they are.
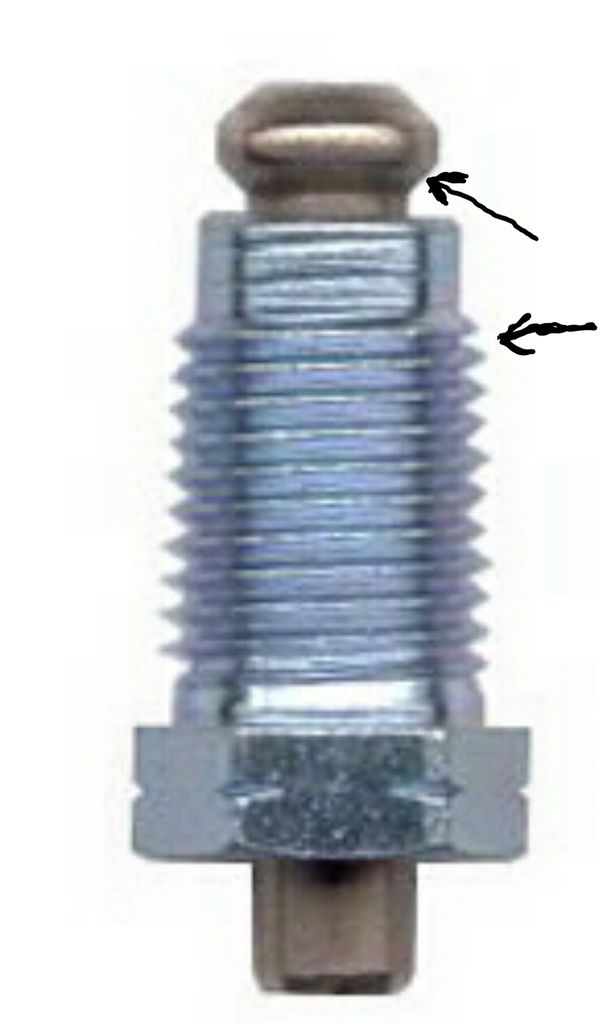
2. No thread sealant, the sealing is done by the flair, the nut just holds it together. You can put a small (and I can't stress that enough) amount of antisieze on the back side of the flair and on the thread, see picture.
It is extremely important that no antisieze enter they hydraulic system!
Tighten the nut to around 11-14 foot pounds.
Imagine a standard length 3/8" ratchet, applying as much force as you can with just the tip of your index finger should get you in the ballpark.

3. If in doubt replace them. They only have to fail once to kill someone
 
Last edited:
Use some heat on that stuck fitting (carefully).

Don't apply anything to the new fitting. Flared brake fittings work best all by themselves.

Since the vehicle is 28 years old, I assume the other brake lines are too. By that time, treat all lines as if they are bad, especially rubber ones.

Unless the van is in REALLY good shape I wouldn't bother repairing it. Just being what it is, it's practically worthless as cars go and you'll never get your money out. The 2.6 Mitsu is not a great motor either. I would be expecting major problems out of it at that mileage.
 
Couple thoughts. Flare nut wrenches don't work well, even Snap On or other premium tools will spread. If you can't shift it with a good open end, then the line is probably rusted to to the nut and will rip as you back it off. I remove rusty brake lines with a pair of dikes and a 6 point socket. If you dont want to mess with double flaring new lines, you can buy lengths of pre- flared line and couplings at any parts store. Living in the rust belt, the hard lines are iffy on a classic car. Hoses deserve a good look at as well as E-brake cable.
If the hard ware is iffy under the rear shoes, replace it. I got most of the brake parts from Auto Zone when I replaced the hard lines, the E brake cables. the calipers, hoses and wheel cylinders on the Rat. I was able to take my time because the Rat isn't a daily driver
 
Had an 86 Caravan with the 2.6 L. Warned and got mine in time. The engine has a timing chain BUT the plastic guides wear, the chain pops off the oil pump and the engine seizes. Also a good carb on it when it works BUT had a lot of weird parts that I could only get from California. At a Dodge dealer once , saw a dealer mechanic holding the carb and calling it a piece of s***, when the dealer parts people couldn't help him with parts.
 
Every dollar and every minute spent working on this vehicle is time and money that can never be recovered. Do you need this vehicle for your livelihood? If yes put minimum amount of either into getting it running so you can save some money for a better. If this is a 2nd vehicle or you can get tp work without it, this car is not worth fixing. Sell for scrap.
 
What andyd said. Cut the line 1/2 inch from the Tee you're trying to save, then stick a socket on. Hammer one on, even. There will be a mix of metric and SAE but I suspect yours is 3/8". If you maul the nut, grind a flat down so you can get a vise grip on the new flat.

Those Tees are pricy and hard to find. You can find naked Ts but ones with the little loop for the bolt that holds them to your axle are unobtanium.

I don't even use flare wrenches anymore. If they won't come off with an open end wrench they're rusty junk anyway, and will twist the line, as you discovered. I reassemble with an open wrench and stop just before I round off the outside. With brass you can feel this point coming.
 
Originally Posted By: thr_wedge
Every dollar and every minute spent working on this vehicle is time and money that can never be recovered. Do you need this vehicle for your livelihood? If yes put minimum amount of either into getting it running so you can save some money for a better. If this is a 2nd vehicle or you can get tp work without it, this car is not worth fixing. Sell for scrap.


We all need projects. Dude could pay 1000s of dollars to go to trade tech school to learn what he's going to learn for free on this van.
 
Unless you have the Cali emissions engine, all parts for this vehicle should be cheap and available. At the moment we're just talking rear brakes here. Yes, brake lines can be a hassle but in the grand scheme of things, if all he has to do is brakes and brake lines, this could be a really cheap repair.

Call a few dealers, realize the phone price is a high MSRP list price, the part is usually much cheaper once you get it at the parts desk. If the Mopar preformed brake lines are still available, they are reasonably priced. If not, learn how to bend your own, it's not very hard.

#1 Flare nuts are always soft. It is part of what makes them seal.

#2 already answered

#3 If it looks like flaky rust, is cracked, wet, drips, or seeps, it's bad. If it look good and works OK and doesn't suck air it's good.
 
Thanks especially to eljefino for that idea on being able to use a socket and gofastman's suggestion on how much torque I should use which is less than I thought.
smile.gif


Going to work on it again monday/this week, just been stupid rain all last week, will post updates if I run into any other problems. (obviously)


To others - it's just a paid for vehicle that is useful, the body and interior is in surprisingly decent shape, and about the only thing needing fixing is just the brakes afaik. The main trouble area is just underrust like those lines from whatever sat in 8 inch snow in parking lots or got splashed on the drive home - there's a noticible "waterline" of rust when I look under it when the stuff above that is fairly decent actually. The body itself has very little rust but JUST under that mark mechanically is where it turns notably rougher on the axles/brake lines/etc.

I like it for hauling stuff around I wouldn't want to put in a nicer van and it knocks down 20mpg around town which even the new ones don't. So I dont mind driving it longer if I can just get around the things that seem minor... it's just frustrating because the job I was more familiar with got more annoying when the brake cylinder [censored], then removing that damaged the line because I don't have any experience at that, and I didn't want the next-up rubber line to be the next problem. (though that may just get replaced preemptively with the warnings I got here even if it seems just fine)
 
Last edited:
Originally Posted By: columnshift
Thanks especially to eljefino for that idea on being able to use a socket and gofastman's suggestion on how much torque I should use which is less than I thought.
smile.gif


Going to work on it again monday/this week, just been stupid rain all last week, will post updates if I run into any other problems. (obviously)


To others - it's just a paid for vehicle that is useful, the body and interior is in surprisingly decent shape, and about the only thing needing fixing is just the brakes afaik. The main trouble area is just underrust like those lines from whatever sat in 8 inch snow in parking lots or got splashed on the drive home - there's a noticible "waterline" of rust when I look under it when the stuff above that is fairly decent actually. The body itself has very little rust but JUST under that mark mechanically is where it turns notably rougher on the axles/brake lines/etc.

I like it for hauling stuff around I wouldn't want to put in a nicer van and it knocks down 20mpg around town which even the new ones don't. So I dont mind driving it longer if I can just get around the things that seem minor... it's just frustrating because the job I was more familiar with got more annoying when the brake cylinder [censored], then removing that damaged the line because I don't have any experience at that, and I didn't want the next-up rubber line to be the next problem. (though that may just get replaced preemptively with the warnings I got here even if it seems just fine)


A few good tips here. Brake work on these older vehicles is a lot easier if you resign yourself right away to replacing everything- and really, it's not that expensive.

Like others, I cut the tubing near the nut and bend new to match, then flare the ends for a factory quality replacement (all in Nickle/Copper tube).

To break a nut loose from the tube, heat with a propane torch and crack it loose with a flare nut wrench, then wiggle rapidly back and forth 1/8th to 1/4 turn (don't use lots of force- you'll only twist the tube). Spray some penetrant in there. Eventually it'll work loose of the steel line. You can then pull it back and inspect the tube for excessive corrosion. (I don't do this on the obviously rusted lines).

There was a comment about high end flare nut wrenches not working- I will say that I disagree. Mine don't spread, but on the extremely stuck nuts, they will still round. That's where you heat them if you sense that's the direction it's going to go.


Finally, ignore the comments about your van not being "worth it"... If you listen to the majority here, they'd have you spending 20k+ dollars so you can have a vehicle that is now "worth something"... Too bad you had to spend 20 grand or more to get it...
 
When I scrapped a few 528e s for money to put toward purchasing the Rat, I harvested several of the brake lines running between the ABS pump and the MC These were in plain sight and clipped to the fenders, fire wall. Pristine under a coat of engine bay grime. 10 footers. I shot the fittings with PB Blaster and tapped the flats on the nuts with a small ball peen hammer or a hammer and a punch. Most started with little drama. German cars use a different flare and the tool is 'spensive. I had several lengths of euro brake lines. When I rebuilt the rear brakes last yr, I pieced a good set of rear lines out of them. I just joined them with a double flare coupling.

This is a perfect project for a DIYer. To hire it done costs more than the car is worth. You can do it for materials, which dont cost much. Nor does a flaring tool. Its not rocket surgery. Please update your progress.
laugh.gif
 
Okay, three days later and still some frustration because I dont want to break more things. But i can finally share some pics.

download_20150908_221401.jpeg


Here's my cute little mopar. I think it's not too bad for a deep north vehicle in the saltland, no? :P It's spent almost all it's life garaged is why - I rarely see them and theyre totally rusted out when I do. there's a little rust near the fender corner that i'll eventually bondo, and I should wirebrush the rust on the wheels, and the paint has gotten faded admittedly, but I don't think it's a bad little van at all.

And it gave me 20mpg around town consistently. The new ones struggle to do that.

6Bqnj6aGtEZwKiJuBWSvNqda08fnu.jpg


Here's what the underbody looks like in the rear. I dont think it looks bad at all - the underside of the body isn't much touched, but you can see where during the day in winter it sat in axle-level snow. Shocks look horrible but seem to work fine.

I wasn't sure how to mark up the image but the specific connector i'm having a bear of a time with is after the rubber hose, on the axle side, before it goes to the brake. (actually on the left, but I couldn't get a pic from that side with the jack in the way) I felt the hoses physically and they actually feel just fine - pliable rubber, no cracks I can see. Any 'wetness' in the picture is from PB Blaster, not any leaks. I'm tempted to leave the hoses - i'm going to assume they were replaced sometime between 2001 and 2006 when my mom died afterall, I cant imagine 1987 hoses lasting this long. Maybe up to 15 years is still old but if you told me they were 2 years old I couldn't tell the difference - they feel soft!

Another look slight different angle:

download_20150908_221344.jpeg


The metal line on the axle side of the rubber hose is notably way worse off than that above it - and it still took a 180 twist from my hamfisted vise grip to the rusty line before it started to leak. So I would like to leave the brake lines back to this point and rubber hoses intact (since there was no sign of leakage up to that point and the rubber seems soft and pliable and without even small cracks) if I could.

download_20150908_221355.jpeg


This is the left rear, the side so far giving me all the trouble where the line broke and the flare nut wrench just rounded off the side near the rubber hose and the small 5 inch vise grip just rounded even worse. The wetness is PB Blaster not leaking. I might try cutting the line and using a 6 point socket on the fitting next - it's that or the big vise grip.


Is there some specific trick to getting this off without torquing everything upstream on the hose damaging that too?

I've been spraying it with PB Blaster morning and evening for three days before trying anything else. I DONT want to damage or be forced to replace the rubber hose - because i'm worried the upstream (non-axle) upside will stick to the metal line the same way this part did and don't want to find out the hard way since the lines werent sitting in the snow the way the bottom ones were. I don't even know where the brake lines route from there I think theyre tucked up under the fuel tank and that's more work than I was looking for at this point.


If I use a propane torch how many seconds of heat application would be 'safe'?

How can I clamp the other side (rubber hose side) of this miserable connector without risking damaging the hose or connector, so I can crank on the metal-line side better?

Is there any other tricks to getting this b_tch off? :-P
 
The chances are more than just extraordinarily high that the rubber hoses are original. Do yourself a favor and replace them and the steel line attached to them. Save the headache. They don't cost that much- then your repair will be much quicker.
 
Whether I replace the rubber hoses or don't replace the hoses at this moment is irrelevant if I can't even remove the connector on the near side of it. I just tried it again with the 8 inch vise grip and it's still no dice/not wanting to move. Even if I cut the brake line and hammer on a socket I dont think it will make a difference at this point.

I'm hesitant to use a propane torch not sure at what point it risks catching on fire because where the vehicle is I have no running water. I'll try it but I need some rule of thumb - how flammable is brake fluid for starters since the other end of that connector is open. How hot can I risk getting it when one inch on the other side is a rubber hose which may not be readily replaceable.

In meanwhile i'm trying more PB Blaster except smacking near it with a hammer - i didnt do that before/wasnt sure how necessary that was not wanting to whack off the metal tab on the axle. But maybe its not soaking in.

Dont really want to just start hacking everything off because the mount still goes through the tab on the axle which would involve welding to replace. Getting confused how such a simple job became so complicated all the sudden due to one single rusty nut.
frown.gif
 
Last edited:
What I was getting at was to simply hack and slice your way back to something you can get apart. Think about it... how much time have you spent trying to get it apart? Cut the steel line at the rubber hose, pull the retaining clip at the bracket, throw the hose over your shoulder and work your way up the steel line until you can get it apart. Forget trying to get the nut out of the rubber hose.

The mount you're referring to, I'm assuming (dangerous, I know) is what holds the rubber line on? There should be a spring clip that holds the shoulder of the rubber line against the bracket/mount.

Brake fluid is an oil of sorts and as such is flammable. However it's not like gasoline- it'll smoke and smolder, then catch a small fire. Nothing that you couldn't smother with a rag of douse with a glass of water.
 
Gaaah, FINALLY got the brake fitting off ITS TAKEN THIS LONG. I sprayed it with PB Blaster nonstop originally for the original two weeks and for the last week have been using the 50/50 mixture of ATF and acetone... I also used a name brand Vise Grip 12 inch. You wouldn't think there'd be that big of a difference between a generic locking plier and a proper Vise Grip but all I can say is that there was.

I'm going to post a picture of how mangled the brake fitting is for entertainment when I get a chance. :-P Yet i'm also worried if the force on it might have damaged the connector it attaches to so thats another reason to show a pic. The rubber hose and metal line seem to thread through some tee mounted on the axle (visible in the above pictures) which i'm afraid if is damaged i'm not sure what to do about, but I plan to just connect up and see if it leaks before getting more worried.

My problem now is that it's been so many weeks since I started this I can't remember the proper tricks, videos I watched, and reverse order to put everything back together. >_< Since i'm not experienced and am trying to avoid newbie mistakes can someone walk me through any important points about things to check?

First i'm going to bend replacement brake lines with a tubing bender, then when theyre ready i'm going to try replace the upstream rubber hoses as long as they don't fight me too bad but I dont have the energy for three more weeks if they do. How much force to use cinching up brake lines, what kind of silicone to use on the back of the brake cylinder (ATV red maybe?), any other important points to keep an eye out for? I'd like to get at least attached to the cylinder and verify no leaks for a bit first before I try to reassemble the brake hardware. Then i'll need separate tips to avoid breaking the new cylinder like I did the old one during the reassembly that started this nightmare.
 
Last edited:
Without seeing how the rubber hose is mounted, it's hard to say... but it may have a threaded section that passes through the bracket and a sheet metal nut retaining it.

Skip using the tubing bender- use your thumbs instead. I only ever use a bender for tight radius bends (and I don't use a regular bender for that either). Using your thumbs will very closely approximate most of the factory bends.

On the sealant- use none. These are flared fittings and are not designed to use it.
 
Tip: Keep the last inch or more of brake line absolutely straight before it enters the connector, and bend the rest to relieve any sidewise tension. If there's any tension at all, it should be lightly pushing into where it should go.
 
Status
Not open for further replies.
Back
Top Bottom