Drain Field Slowly Draining

Status
Not open for further replies.
Update:
The pump removed quite a bit of "black water" today. A rather alarming amount. If the intake hose had been longer, I'm sure the results would have been even greater.

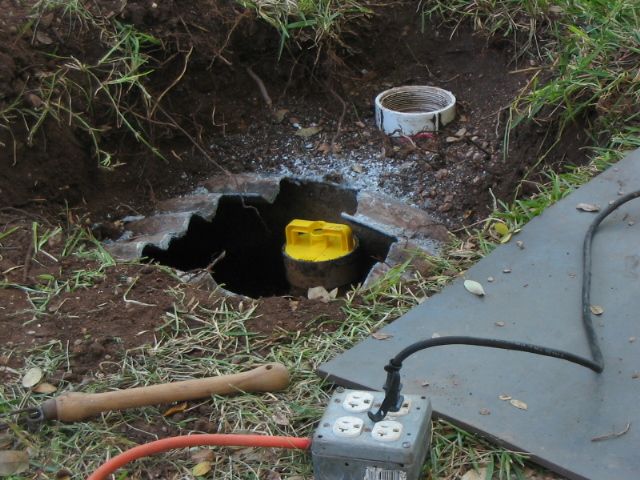
What is clear is that solids/waste has been allowed into the drain field and is causing the problem. I haven't opened up the end of the tank yet, so I'm not sure if the T is still connected or not but something has really changed since the 6 years I'd been into it.

I also discovered that I could snake a water hose with a brass high-pressure stream on it down into the pipe about 15 feet or so, then follow it with the pump intake. This way I could shot a very strong blast of water down the length of the pipe and when it began backing up, the pump would remove it.

Unfortunately, no matter what tip I put on the hose, not even using black, plastic, polyethylene drip irrigation pipe, I wasn't able to snake it all the way down to the right angle..about 24'. It would always snag on a pipe joint! Frustrating indeed!

I did try the rubber balloon trick suggested by a neighbor. It went OK for about 6 min. then I heard a BANG. Evidently I'd managed to position just across a joint, with a small gap and this is where it chose to rupture. Rats.....rotten luck. I'll get a new one and try again.

After pumping out as much water as possible today, more acid went down the hole. I'll let it cook overnight, then use another balloon to force it further down into the laterals. Hopefully without another rupture.

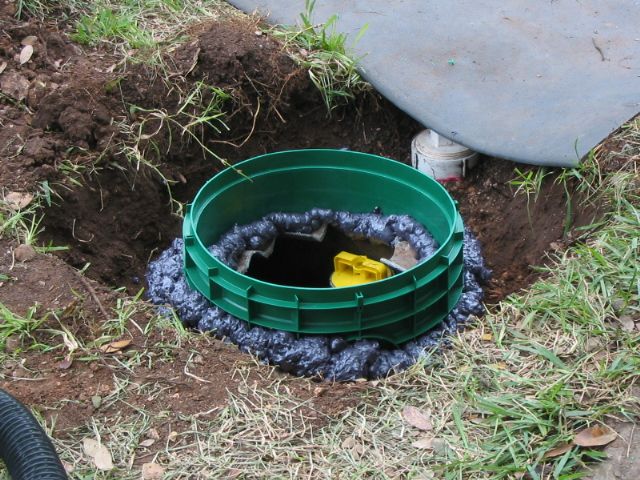
My large, long fiberglass tank has only a single chamber, and no baffles to separate incoming effulent from settled. I'll also investigate this tomorrow as I do further excavation.

When it rains, it pours. And things always come in threes...and close to holidays. This mess was quite unexpected and has hijacked my planned schedule to attend to other matters! The joys of home owner-ship continues.
 
Most of what you describe, especially the single compartment fiberglass tank without a filter, isn't even permitted here. There is no chance the county engineer would ever issue a permit for a septic system designed as you describe.

Personally, if it were me I'd have a competent septic system company out by now to figure out what's going on. There is something seriously wrong with your system, and your DIY repair attempts may well be causing more damage.
 
I've been fighting a slow drain for three months now. Finally got it open with a 100' snake and attacking the tile from both ends.

The 50/50 Sodium Hydroxide will dissolve the grease and turn it into soap. What to do with it then is questionable but it liquifies it into a slime.

The root killer will kill the roots. It takes time for them to naturally break down. This may be where the acid works best. It is a twice a year application to maintain the system free of roots as they never form inside the tile.

The enzymes work very well for me.

Once the system is plugged up though only cleaning out with a snake will cure it.
 
You went way to far on pumping for a family four and your solids layer built up.

You can pray or whatever that not enough solids went into your leach field as the holes are quite tiny where the liquid is supposed to exit your pipes.

Additives are nothing more then a ruse and last ditch effort to extract money from home owners.

Wish you luck but if drainfield is plugged(dig it up and check) it will never work properly.
 
I would be tempted at this point to dig up a small area of the leach field and see if the holes are plugged in the drain field pipe. Do they even use drain field pipe these days?...All I see here lately the last 10 yrs in residential construction is the "Infiltrator" or dome system drain fields.
 
Update:
No water in the access port this morning. Inserted the 4" pressure balloon, turned on the hose about 1/2 turn to fill the balloon. When I could tell it sealed off the pipe, I added another full turn. Let it run about 5 minutes. Then opened it up another 1/2 turn. The balloon instructions warn about using water pressure more than 50psi, so I inserted a 50psi pressure limiter to be on the safe side and never fully opened up the valve.

I checked the water meter and about 10ga every 80sec was going in. I could hear some burbling/surging going on like the pressure would build, then release, then build again then release.

I turned off the hose, removed the balloon, stuck the hose in and opened up the valve. A lot of water rushed in with no issues! So I turned it off, dumped in a gallon of 34% HCL (by weight), reinserted the balloon and repeated. I set the flow to about 10ga/min. using the water meter.

After 50ga. had gone through, I repeated the above, adding another gallon of acid, inserted the balloon and forced another 50ga. through.

Hopefully this is forcing it through & down all the laterals where the acid can sit and do some work. I'll repeat this tomorrow.

Next task is to prevent any more solids from flowing down this pipe, so I'll be working on the tank. A filter sounds like a wise investment!
 
Maybe I'm reading wrong, but it looks like you're doing all of this without even looking at the tank outlet. From your description a few posts up, it certainly looks like a) it's improperly constructed, b) damaged, or c) non existent.

If your description on the amount of solids is accurate and I'm reading it right (which it's certainly possible I'm not), you're field might be pretty screwed. I'll assume there's some sort of drop box network and you need to dig those up to see what's happening.

This is all under the assumption you have a typical gravity fed, in-ground line design.
 
Originally Posted By: SevenBizzos
Maybe I'm reading wrong, but it looks like you're doing all of this without even looking at the tank outlet. From your description a few posts up, it certainly looks like a) it's improperly constructed, b) damaged, or c) non existent.

If your description on the amount of solids is accurate and I'm reading it right (which it's certainly possible I'm not), you're field might be pretty screwed. I'll assume there's some sort of drop box network and you need to dig those up to see what's happening.

This is all under the assumption you have a typical gravity fed, in-ground line design.


I'll dig up that end of the tank tomorrow. I reinforced the outlet several years ago with fiberglass. If my field was "screwed" I wouldn't have seen a noticeable improvement in draining today. I talked with a knowledgeable company rep this afternoon who stalks everything related to septic systems, including filters. I'll be visiting with him and picking up one tomorrow.

More later.....
 
Using a Sazall, I cut a 12x12" hole in the outlet end of the tank. Fortunately, the outlet T is still in place. Unfortunately, signs of 'scum' were seen on top the T meaning that the tank level had risen high enough to precipate this. I think that's the #$%^! I pumped out earlier.

Today I picked up a 24" long effluent filter and talked with a local distributer re: chemicals vs. bio-remediators. He has a point though further study on my part is needed. What he was selling for $40/ga sounds a lot like Medina Soil Activator for $12/ga. I'll be trying the later, first. Makes sense.

Tommorow I'll notch the tank opening to accept the filter, then slide it home. Then I'll have to figure a way to keep the section I removed, in place: Right now, it would just fall through.

He also sells PE collars & a lid. The bottom of which is flat and my tank is curved. So I'd have to scribe the bottom of the collar to match the tank, cut out an arc on both sides, then attach it to the tank with screws and use either PU foam or mortar or perhaps fiberglass-reinforced concrete to fill the gap between the two. This would entail more work but give me a sealed opening and easier access to the filter, which I'm going to need to keep an eye on until I get a handle on just how much is being filtered by it.

I'm finally getting the upper hand on this one....what a PITA!
 
You will need to clean the filter regularly. Might be a good idea to adapt some form of "quick access" cover. Some form of tight sealing lid, like a porthole with a latch.

I end up cleaning my septic filter annually. In my case, it's easy. I simply lift off the concrete plug, pull the filter and hose it off.

Is the drain field now "functional" ???
 
^^^Yep...that's the collar w/ lid mentioned above.

When I dug this all up years ago, I made a map with measurements to permanent landmarks (house, trees, corner of garage, etc) to assist in locating key areas. Huge help and saved lots of time & frustration. But I'd like a hatch for easy filter maintainence.

Re: drain field. Yes, it's functional and draining fine..for now. Time will tell. I think the pressure balloon idea helped a lot + the acid helped break down any of the organic matter I wasn't able to pump out. What I'm not sure of is if there was a clog before the distribution T's or if one or more lines not draining as well caused this.

Another potential problem is that the thin-wall drain field pipe has collapsed due to age, expansive clay/rock soil here and this is causing the flow restriction. I have previously replaced sections of pipe leading to and from, the tank. They'd completely collapsed, reducing flow to next to nothing. Where the pipe cracks, tree roots invade making it even worse. I replaced these sections with Sch40. It could be that I'll have to dig up and replaced each lateral with Sch40 in the future. This contractor said that they've seen numerous cases where the field looked fine, but the thin-wall piping itself collapsed. No "additive" will fix that.

I ran across many references to "jetting" out drain field lines, as a first step. I just did this on a much smaller scale. Now that I've figured out what works, I'll know what to do the next time.

Thanks for the site you got the filter from. Luckily, I found one locally.
 
Update:
Notched out enough fiberglass to slide the filter home without bending it: They sure installed the outlet T close to the inner tank wall!

Went back and picked up a 16" dia., 12" high riser and lid made of green polyethylene. Scribed it to the curved, ribbed fiberglass tank top and removed the excess with a Moto-tool and a jigsaw. Fits pretty good. I'll put a few SS screws into it to hold it fast to the tank, then fill the gaps with black polyurethane foam, which is used in water-scapes to hold rocks in place to vinyl liners, and poly-tubs for ponds & fountains. This stuff is made for outdoors and is water & weather proof. This will give me an air & water-tight seal and allow quick access to the tank filter.

Good thing to as light rain is forecasted to begin tomorrow afternoon! Man alive am I going to celebrate when this task is done! My whole schedule has been hijacked!
 
Originally Posted By: sleddriver
I going to celebrate when this task is done! My whole schedule has been hijacked!


Yeah, no kidding! That's a thankless task. I wish you complete success!
 
Good progress. Did you ever pump your tank out?? You can "read" the condition of the tank by measuring the sediment and scum layer.......aka, the septic whisperer.
 
Thank you very much! By "digging into it" I have learned quite a bit + saved myself from a large repair bill and potentially getting ripped off. I'm an old-school "do-it-yourself" guy. Part of being a home-owner. I sure have gotten an education owning this house, built by a so-called "custom home builder" who was nothing of the sort.

It couldn't have "raised it's ugly head" at a worse time. The Fall is always so busy and daylight time short. Thanksgiving is now a week away!

Onward...through the $%#!

I'll really be celebrating at Thanksgiving! Thankfull my hard work, persistence, skills and resourcefullness were ready tools in my own toolbox!

cheers3.gif
 
Originally Posted By: doitmyself
Good progress. Did you ever pump your tank out?? You can "read" the condition of the tank by measuring the sediment and scum layer.......aka, the septic whisperer.

I appreciate the support! Thank you! I thought of it, but saving +$300 now is quite appealing. Plus it wasn't necessary. Fortunately I installed the access port downstream of the tank so I could see what was going on and insert the "water balloon". My wise neighbor suggested that and I was smart enough to pay attention. Made a HUGE difference this time around.

The scum layer is about an inch thick at most. It's been about 7 years since the tank was last pumped out. That was it's first time in 25 years. The pump-truck-operator said it looked fine for a tank that had gone that long. (Those guys have seen a LOT of $%^#! too...talk about being close to the bottom end! Where everything rolls down hill.)

In the not-too-distant-future, I'll have the tank emptied, hauled out of the ground, a new hole dug further away from the house and trees, either a poly or concrete tank installed (properly), and use the dig-out dirt/rock/clay to fill in the old hole. Then I'll be able to properly landscape up next to the house which is far too shady for grass. Besides, what "custom home builder" would put a septic tank just off your back porch and walkway? What a stupid place to site it! What an idiot he was.....
 
Good work Sled! I feel your pain in regards to septic systems. I've been more intimate with them than I'd care to be.

You mentioned no baffles over the in and out ports? Given that, the floating layer of goodness will eventually make it's way out again, and with no Zaebo filter to capture it, downstream it goes.

Thankfully, they haven't built a (to code) system w/out an effluent filter for a good 25+ yrs, plus they're all multi-chambered tanks to aid in better solid break-down and holding capacity.

I'm currently on a 40yr/old, 1000g concrete tank, leach-field system. Single chamber.
 
Thanks for your support! Fortunately, the tank does have inlet & outlet baffles in the form of large 4" T's. And both are in place. I recently added an outlet filter, which should prevent any further scum-overflows into the drain field. Plus, since this tank is only one compartment, I'd consider an outlet filter a neccessity.
 
Update:
I gave the system the clothes washer test on a medium water level. Might have been 60ga between wash+rinse, just a wild guess. After the cycle ended there was about an inch of water at the inspection port. There should have been zero.

So I slipped the water-balloon in again, used a 25ga pressure regulator to prevent my normal 80psi water pressure from bursting it, and let it go for 15min. Flow rate with this regulator was 3ga/min. With the 50psi regulator, it was about 10ga/min.

A neighbor informed me they had great success with having their drain field(s) water-jetted to remove roots, dirts, debris, etc. They're a family of four with two girls. And their system is eight years newer than mine. We're both surrounded by oak trees. They haven't had any more issues in 3-4 years and they do A LOT of wash...emphasis on A LOT. So this is my next step.

After all, a good flush coupled with a high-pressure rinse solves a lot of problems!
 
This photo shows the hole I cut with a Sawzall in the fiberglass tank just above the outlet T. It was so close to the edge, I needed to cut a notch! An additional 6" here would have really helped. The yellow object is the top of the effulent filter, installed in the T. The white object just above and the the right is the access port downstream of the tank.
SepticCoverampFilter002_zps54583f40.jpg


I decided to get a real top lid as the section of fiberglass I removed needed something to hold it into place, then needed something on top of it to prevent water & dirt from getting into the tank, etc., etc., etc. I'd been through enough of etc! So I bought a 12" riser that's 16" in diameter, scribed it to fit the top and went at it with the Moto-tool & jigsaw.I also wanted the top to be right at ground level, not sticking above where it would be prone to being kicked, hit, etc. "Out of sight is out of mind". I drilled some holes in the riser larger than the screw I was using because I only wanted the threads to catch in the fiberglass. This way the riser would be secured between the screw head and the fiberglass. This fiberglass was tough! That's a good thing.
SepticCoverampFilter004_zpsc540bd1f.jpg

This provided a secure, mechanical connection as I wasn't at all comfortable just relying on the poly-U foam to hold it into place. With that done, I used nearly a whole can of black, waterproof, poly-foam used in outdoor landscaping for ponds & pools. This was specifically recommended because it was for use around water and was thus water-proof....but so is the regular, cheap stuff as well. This black/grey stuff isn't UV-stable either. So in hind-sight the 'regular' foam at $3/can would be fine vs. the 'pond foam' at $14/can.

This worked great for sealing the gaps between the riser and corrugated, curved fiberglass. I foamed all along the interior, then built up a layer outside. Then built up another layer. It dried to the touch within 30min, which was great as rain was expected to fall around 6pm.

This is what I've been waiting for:
SepticCoverampFilter005_zpse5851126.jpg

A PROPER LID! So I no longer have to look at the #$%^! much less smell it! I screened the rocks, grass, roots, out of the dirt I removed so it would pack tighter and poured it back in and packed it down with my foot.

Now I have waterproof, dirtproof REAL LID and a FILTER...done RIGHT I'll add. I just hate shoddy work done by 'builders' who are 'custom' in name only. Really chaps my A. (Can't you tell?)

OK enough ranting. Time for a big dinner and a few beers. BTW, I still have to reassemble that loudspeaker I refinished (details in the photo thread "shellac on cherry veneer" AND reassemble my 140W/ch audio power amplifier presently occupying my test bench. I finally got the regulators working again, so now it's time for a load test! They've been on hold since the $%^! backed-up!
 
Status
Not open for further replies.
Back
Top