Having finally slayed this dragon yesterday, I thought I'd share the experience. Extracting it is just part of the battle. I found this a very frustrating job having never done it before. There are several landmines to avoid.
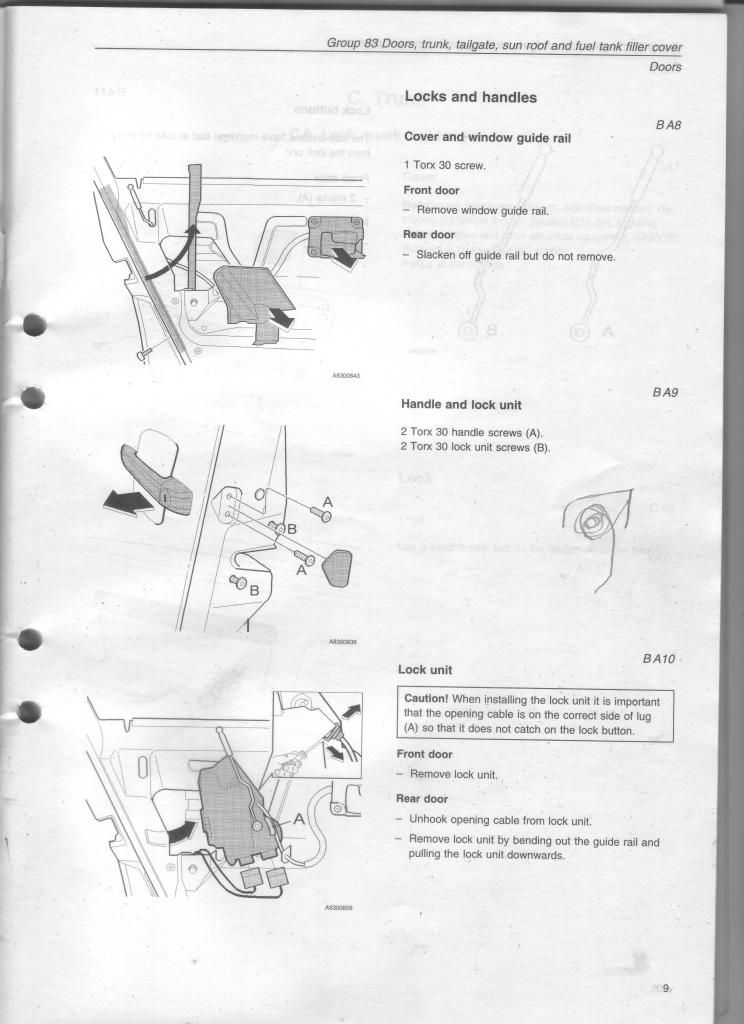
To start, here's the page from the official manual:
Having never done this repair before, I wasn't sure how much needed to be removed to extract the lock unit. I focused on the two large Torx 30 screws (B) shown in BA9, then proceeded to BA10 where it remained stuck. I found a couple of UT videos indicating this was all that was necessary as well. Well...everything on the 'net is true, eh? No joy.
The next day I asked my indy and he said same....only that he'd never actually extracted one himself. "No prob..just pull those two screws and it'll come out." Everything mechanics say is true, eh?
Fortunately, he had a used one and sold it to me for $65. I hesitated, wondering if I could do open up the dragon and find the broken link, then suture. I could tell it did work when I rolled over the door lock, pulled on it, then toggled the outside handle arm that connects to the handle. Mine failed this test.
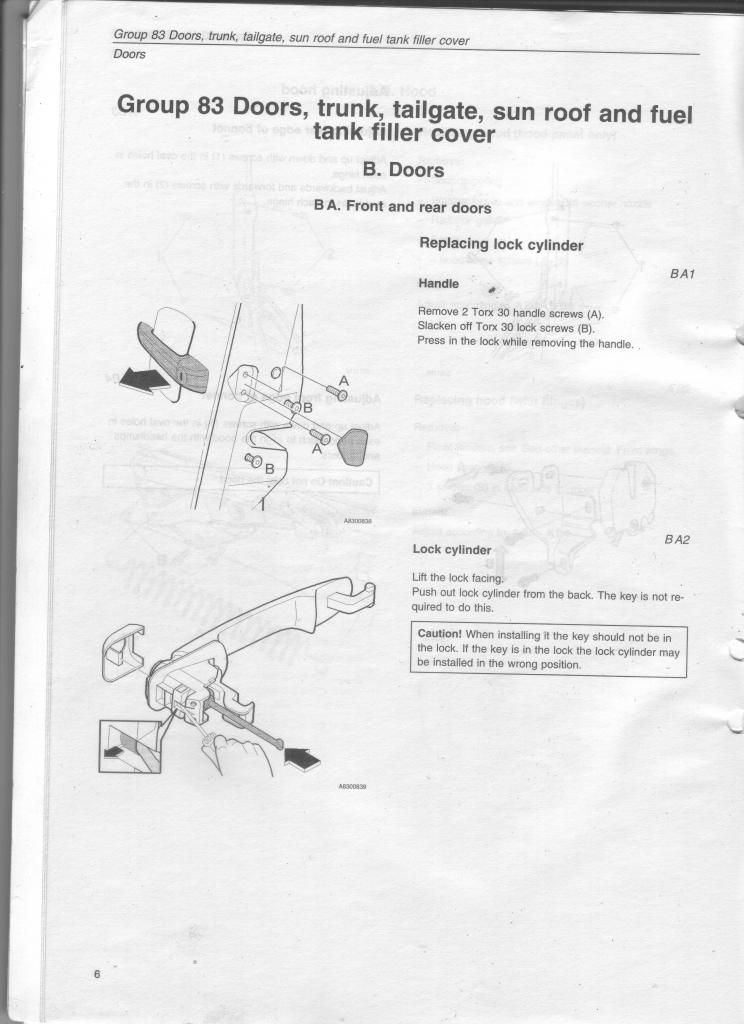
Back home, I looked once again at the manual specifically how to remove the lockset:
See that long rod sticking out of the backside of the lockset? That fits into the door latch, allowing you to open the door with a key and activate the central locking system.
There's no way you can pull the locking mech out with this metal rod stuck into the side of it. Therefore, this must come out first.
The U shaped part just to the right grabs onto a rubber bushing attached to the latch mech, connecting the door handle to it. So this needs to be removed as well. No wonder it was still stuck in place. The tough part is pulling on the door handle with the left hand while reaching around & around and into the small hole in the inner door panel to wrestle with the other side of it.
You need to separate the rubber bushing from it's "U" shaped cradle to remove the lockset/door handle.
However, even with this removed, it's still stuck in place. The window guide rail (BA8) goes right in front. (It's much easier to remove than reinstall).
Finally, both electrical connectors have to be removed before pulling out the latch. Why? Because the wires are so short. A long, large regular screwdriver will do it. You must push in the wire lock on the side, then push down. There is a bit better access for the lower one via the door light hole.
Now it's possible to remove this animal, though you may have to remove the four Torx screws holding the inner door handle in place first. The connecting cable is quite stiff.
With the thing now in my dirty paws, I gave it a look over. Didn't see anything visibly broken. Didn't find any broken pieces down in the bottom of the door either.
The next task is to install the working latch onto the cable with the inner door handle. My used one came with the cable, but no inner door handle. The inner door handle contains a rather large spring under tension which I decided initially not to mess with. Thus I chose to remove the cable at the latch instead.
This was easier said than done and easier removed than reinstalled....PITA. I wound up having to disassemble the inner door handle to take the tension off the spring, install the cable to the new/used unit, then reassemble.
Be very careful when you wind that spring and reinstall before sliding in the pin.
I'd elected to 'spray, clean and flush' the used one with LPS1 to wash & lube, followed by the air gun to dry and flush. Worked rather well actually. I loaded up an inexpensive glue syringe with a tiny tip with white lithium grease and applied a bit to everything I could see that moved. The dragon has many contact switches that roll over plastic cams which need to be greased. I did the same to the door handle lockset.
With the two now happily joined together, it was time to reinstall. The latch mech. goes in first. Followed by the door handle/lock followed by the window guide rail. One landmine to watch for is that it's possible to reinstall the door handle and have it work, but the key won't unlock the door if turn at all. The reason is that it has to fit into the lock AND you have to be sure the white disk in the lock mech is set to 'neutral' or 'open', not LOCKED, nor off to one side. There's nothing to hold this shaft in place and odds are high it'll just go anywhere except where it needs to go. Further, there are only three rather small holes to see through. After several attempts with a small flat blade screw driver to push the shaft 'inside' while pushing in the door handle/lock I was able to get it properly seated so the key would smoothly turn.
This is a perfect job for an octopus. He'd make a great machanic.
You're only half done though. Now you have to reach inside with your right hand, grab the rubber bushing from the lock mech and fit it into the U shaped piece on the door latch...without popping the door handle/lockset out the door and withdrawing the steel shaft previously installed! I set all the retaining screws in lightly which will help prevent this. I found pulling out on the door handle while fiddling with the U piece and the rubber one inside the door with the other hand to help. Eventually it "TUNK" into place.
I checked the operation of the key, the remote, the interior door locks and front window to be sure all was ok.
The last hurdle is to reinstall the window guide rail. Do this with the window up to prevent scratching it. First get it inside the door, then swing the bottom out toward the car, and work the top piece towards the bottom of the upper window guide. You're working inside a very dark corner here and it's hard to see what you're doing + plus you don't have a spare hand to hold a flashlight up there. I used the IKEA long-goose-neck LED lamp mentioned in another thread. I removed the clear/white plastic lower door cover and shoved the goose neck all the way into there. Then twisted it around until it lit the dark corner. My hand in there blocked most of the light, but what's to do?
After messing with it several times, I found the right position and pushed it upwards until I could get the screw through the door and into the nut on the holder. (See BA8)
Don't forget the reinstall the plastic door knock-outs that were removed and the "pop-up" door lock indicator that sticks up through the interior door panel.
To clean the inner door panel, handle, plastic handle insert, etc. I used Tuff-Stuff. Works great for vinyl, metal, carpet, etc. and contains some powerful detergents. It's cheap too.
I'd planned on doing some acoustical treatments to this door, but was too worn out afterwards. Didn't realize it would be such a PITA. I never could figure out how to remove the solid metal plate in the center holding the motor and sliders. Perhaps the window has to be removed first?
I managed to add some Qualofil behind the Dynaudio driver magnet before reinstalling it and a bit more behind the rear of the cone. That was it.
Lesson Learned here is that to do this job, you need to remove the door handle/lockset, the window guide frame, and the interior door handle BEFORE you go after the locking mech. Perhaps the Swede's were trying to tell me that in their pictures all along, I just didn't see it? Oh well....know YOU'LL know!