Timing Cover Removal and Installation Guidance

Joined
Mar 31, 2019
Messages
365
Location
Minnesota
Eventually I'll be changing the timing chain guide tensioner on the Kia 3.5 V6 in a Sedona, and was having trouble finding a good example of the timing cover process which lead me to look at other vehicles that have similarities. Fortunately I have some time and can add to the parts list as necessary, the plan is start disassembly after the garage is cleared but before the parts arrive, and if guessing eBay and Rock Auto, your right, I'm compelled to do everything on the frugal but blessed enough to be able to spend more on timing parts if necessary.

One tip was spray the dowel pins with penetrating oil as they may have corrosion and if the cover is not taken off evenly it may crack. At this point I went and looked but didn't see any I could readily access, so that may wait until disassembly reveals them. I got that from these guys, they have a couple of different video's, this one is a 4 cylinder, the introduction is usually about 2 minutes;


An example here at 33m the timing cover process starts;


The oil guy has a couple of references to use the Permatex Ultra Grey, and that's what I thinking as it worked well on the coolant valley plate Toyota 3.3. I'm thinking the aerosol can would be more convenient for dispensing but the tube works just as well as I'll roll it up with a long handle needle nose pliers if I don't have a tool or go the caulk tube method instead. Also the speed as which the work has to be done is has to be faster with the aerosol can, ad the job cost goes up at $20 - $25 - 9.5 ounce can, betting I go the least expensive route on this one.

Another thing is being steady putting it back in as I am not opting to remove the motor. Done this before on a 2003 Pontiac Vibe where I had to do it twice because it leaked the first time. The second time I put a extra bead of sealant on the lower 3 inches of the block half, and that time I used the Permatex Right Stuff aerosol can, I think $10 for the small can. This time I should look into a device I can slowly lower and control putting the cover into place.

It also looks like the valve covers should removed, first thought I could skip this but as long as time permits I want good access to as much as feasible. I may get the valve covers off yet today and the timing cover tomorrow, no hurry though as it will probably be an event that last over 2 weekends. I don't do this kind work everyday and appreciate any tips or guidance. At first it seemed like it was going to be an easy job, but I might overestimate my ability and underestimated the task. Now I better get to clearing and collecting some last minute supplies.
 
Just be mindful of the gaskets you might need. Does the intake plenum need to come off in order to get the valve covers off? If so, may as well replace the gasket/O-rings. If it has been a while since you did valve cover gaskets, definitely replace them. May as well do spark plugs if you're going to need to pull the plenum to get to the rear valve cover. Etc. etc.
 
Yes, I'll do another inventory as I almost did miss the crankshaft seal set, browsing through the closeouts on Rock Auto I found one and got it on order. The other thing I never got to is the spark plugs and valve cover gaskets because I pulled the front plug and it was good, checked the valve covers and no huge leaks especially over the starter/alternator.

Should have all the gaskets and the exhaust VVT solenoids are under the valve cover and I have a replacement for the rear bank. Going to get a plastic scraper now and make sure I have another supply of Ultra Grey in tube form preferably price-wise, but I'll see what Menard's has first.
 
Got a nice Tool Shop Scraper Adapter at Menard's, fits the 1/4 inch hex screwdriver handles, has the plastic blade and they had the 25 pack of extra plastic blades for $1.99. That builds my confidence and ability to clean that gasket surface. Unfortunately the design of the cover hangs over the end 2 inches of the oil pan, may have to do another oil change or figure out how am I going to cover that or must I take off the pan too...

Must say I was impressed with Menard's Automotive section, they've moved and expanded it since I was last in there, and even had a Shell 5w-40 in stock, that may come in handy soon.
 
The valve covers are off, next question is what are the options of dealing with where the timing cover attaches over the oil pan, I think the pan is about 2 inches exposed when the cover is off.

Obviously taking the oil pan off might be the best option, but if the pan is left on it's going to have to get covered and cleaning the surface may be tedious. Thinking of the pro's and con's, and it might be one of them things you never know until you get there. And should the oil be drained? May be just drain a quart?

Well, more interesting with photos, here's the comparison of banks, the chains seemed to have equivalent tension and nothing at a glance seemed deficient. Bank 1 still has most the valve cover gasket on except the one spark plug tube, I want to vacuum the crumbs out before removing the rest, and luckily on this one there's always tomorrow.
20210725_203332.jpg
 
Car Care Nut has a relevant video from a Toyota timing cover leak repair, starts around 9m for the timing cover and he also removes the oil pan and the 'upper' pan. Seeing that eases my thought burden on removing the pan, though right now I'm leaning on the 'do not remove' side. Near the end of the video the oil pan sections are re-installed.

His comment on the sealant;
"Usually the ones that leak early are due to oil contaminated surfaces. The sealer works very well if the surface is 100% oil free. So cleaning is essential and triple checking the area before installing the cover."
 
No need to remove the Upper oil pan as it doesn't extend past the Timing Cover, But to decrease the chances of a oil leak & distorting the Lower oil pan......Remove the Lower oil pan first.

The better the surfaces are prepped.....The better the RTV will seal. I use a razor blades in a holder & not shy about using 3 or 4 in the process of removing the old/cured RTV, Stay at a fairly flat angle & let the razor do the work, If the razor hangs on something which is usually around the bolt holes.....Don't dig in, Just go around it.
Take some brake cleaner & soak a rag with it.....Wipe the sealing surfaces down REALLY well. I use white terry towels from Sam's so you know when the surface is clean.
 
Oh yes, thanks for that, didn't get that far tonight but really got lucky in that there was plenty of room to get the water pump out, then I jacked up the driver's side to get a little more coolant drained. I'll get the wheel off tomorrow and get a better look at everything down there. From the bottom it looks like the oil pan is more accessible then some of the Toyota transmission pans I have removed. Here's today's progress;
20210726_203856.jpg
 
I didn't opt to remove the oil pan as the exhaust on the driver side is very close to the pan bolts, and one might find they have to get the exhaust loose, though I don't know that for sure. Tomorrow I can start assemble as I just got everything cleaned for sealer, using an old pair of socks to clean it up, works great. And the razor advice was great too, tried the plastic ones first but you could sure tell the difference after cleaning with the steel razor/scraper, got a few nicks getting the hang of it but sure worked best. I had carb cleaner and figure one more time tomorrow with a dry sock should reduce the chances of not adhering to the surfaces.

Tapped at the top with a block of wood as well as using small pry bars on the lower parts to get it out evenly, 2 dowel pins, one was near the bottom and the other half way up the opposite side. I should have drained out more oil, but now I know it takes a littl over 3 quarts to get below the level necessary. I used saran wrap to cover the pan area as I cleaned. Here's after the cover was removed, the tensioner for bank 1 is also removed or why that chain looks loose at the bottom;
20210728_182737.jpg
 
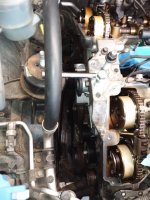
Cover is installed, went really good for the size of it, V6 just waiting that 24 hours to fill with fluids, well, and the valve covers and spark plugs and bank 1 exhaust cam VVT solenoid. I also added some grease to the drive belt idler and tensioner pulleys by picking out the end caps. I put the 6 inch extension across at the water pump to show the generous space Kia left to work on this one, 2012 Sedona 3.5 as a reminder. I did the goof proof across the bottom oil pan and about 3 inches up, should have also done that above the alternator, but I think that it's usually the valve covers that leak on it in this model. My goof proof is put sealant on both sides because I'll bump something and you especially don't want the bottom to leak.

Now I should add not taking the pan off added to the challenge of getting it in place, and I really kept cleaning the corners so there wasn't oil wicking out of the pan, as I never fully drained the oil, going to run it first then do an oil change. Some of the bolts in the cover and from the oil pan were not very tight, and I never did find a torque spec on Kia, so I used the Toyota Camry 4 cylinder Chilton specs as a guide, 75 inch pounds for the 10mm and 95 for the 12mm. I like to use the term Fung Shway for the rest of them, just get them back about to snug as they were when removed, it's just instinct/experience of knowing and stop before you twist it off!

Speaking of, didn't have to remove the alternator, power steering pump, or the ac compressor, got really lucky in that respect. Now I just changed the 1 chain tensioner as I really didn't see a problem with anything else, so I don't know if I was just lazy, or it be one of them times when you think if it works don't fix it, or if I missed something, but my instinct was to do the minimum.

I made a tube wringer out of some small plastic plumbing fittings, worked very well, I'll add that image and another thumb size image showing the 6 inch extension at the top motor mount.
20210731_184117.jpg


20210731_183813.jpg20210731_184031.jpg
 
Back
Top