Unrelated Preface - Skip unless you are a moderator
I'm known for posting in the wrong forum categories. Despite my best efforts, I have been unable, possibly due to utter incompetence, to find an Automotive Electronic subforum, so I beg forgiveness in advance for my probably misplaced post(s). I am now pathologically insecure about posting without any reassurance that I am posting in the correct forum and ask any moderator to please assist by either deleting or moving my posts as necessary. I would also encourage personal messages rather than public questioning about why I have posted in a particular forum. For example, I quit the cat food thread a long time ago and have no intention of ever posting there again even if that's the appropriate forum for my food pictures. Thank you for your patient consideration! I practice this sort of thing with the mustachioed and swollen stubbly-calves HR lady all the time.
Skip, if you are familiar with the Mini Cooper ekey/remote and proceed to Broken Bits.
On to business! My almost 8-year-old second-hand jalopy known as Miss Moneypenny, my Cooper S Roadster, came with two electronic keys/remotes. The e-key/remote fits in Monepenny's ignition slot, sorry about that, and I start her up with push start. The e-key/remote does contain an old-timey key that can be released and it may be used to operate the single conventional lock on the driver-side door but this key cannot start the car because there's no ignition lock and the RFID chip for the starter disabler is in the e-key/remote. Because my car is a roadster convertible it does not have a trunk release inside the vehicle for safety reasons and because my backup camera blocks the external truck release button, I rely on the ekey/remote if I want to open the trunk or the passenger side door. Anyway, the old-timey key is just an emergency feature.
Broken Bits - Bad Rechargeable and Broken SMD Switch
Moneypenny, getting on not only in years but miles, almost 50k of them, is showing middle age, with some of her bits and bobs starting to fall off. First of all, the ekey/remote does not contain a conveniently replaceable coin cell battery. No, BMW cleverly installed a rechargeable VL2020 lithium coin cell that is soldered to the circuit board of the ekey/remote. The rechargeable gets recharged every time the ekey/remote is in the ignition slot. Brilliant plan. I doubt Mini will replace rechargeable batteries that need to be unsoldered and soldered back in. It's probably useless anyway because the three SMD micro switches for locking and opening doors and the trunk have a life expectancy of maybe 100,000 cycles without failure. So the rechargeable has lately been getting weak. And finally, the trunk lock button on the key/remote had a mechanical failure. I could feel the switch not operating properly with a crisp resistance when pressing and Moneypenny's boot would not open. Unacceptable.
Not wanting to pay dealer prices for a new ekey/remote and programming because I used to know my way around electronics
I was an avid electronics tinkerer in my youth but for the past 25 years I have done only minor electronic repairs but nothing much involving SMD parts. I decided to give it a shot anyway. The remote came apart very easily. After pulling out the old-timey key and popping off the circular chrome trim I could carefully pry apart the upper and lower case halves. They were glued together with some type of adhesive but luckily they weren't fused. The trunk button has a crack in the tiny plastic housing and I presume the little springy contact plate or whatever it's called had been displaced. All three switches are, as evidenced by their function, momentary switches. I bought a very fine-tipped soldering iron with temperature control online for a measly $16. After unsoldering the rechargeable I found a replacement online and I also unsoldered the switches and measured them with calipers. I found 10 identical-looking switches (100k cycles service life) with the same measurements on eBay for $10. The Panasonic rechargeable was $5.
Process
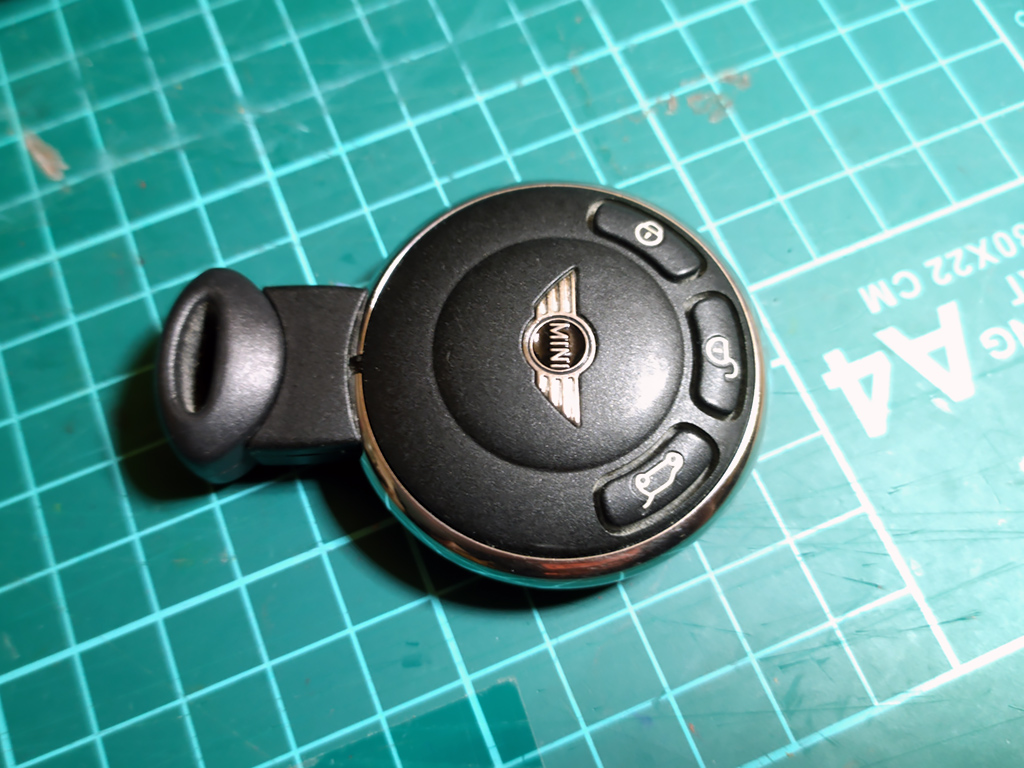
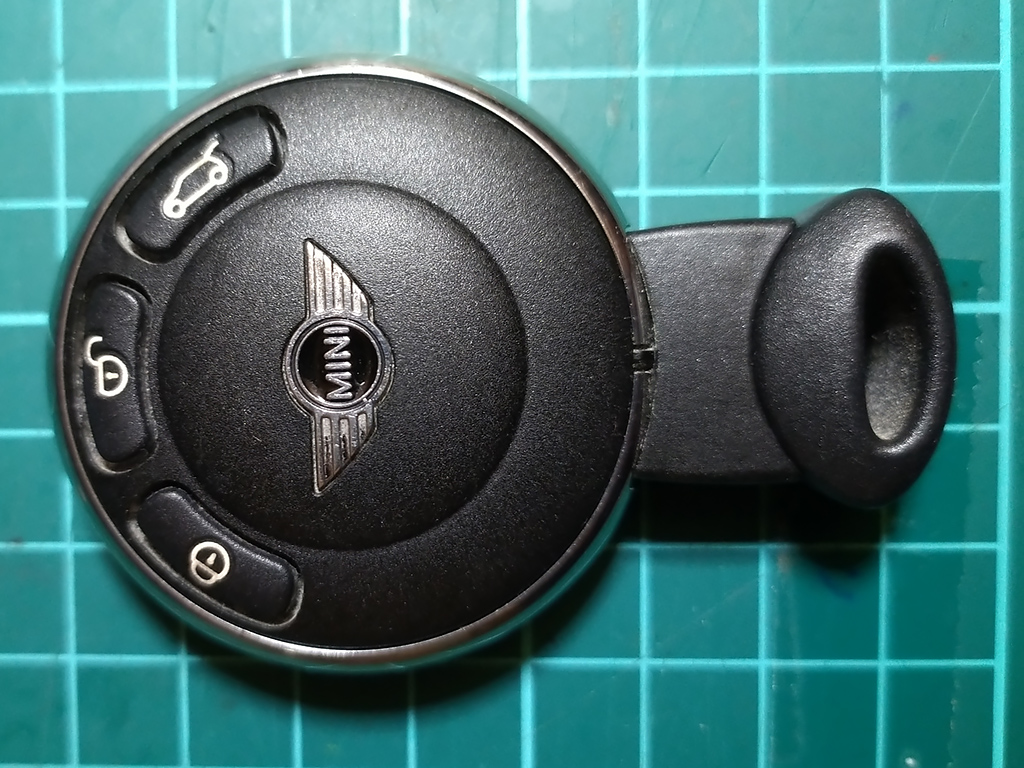
The ekey/remote
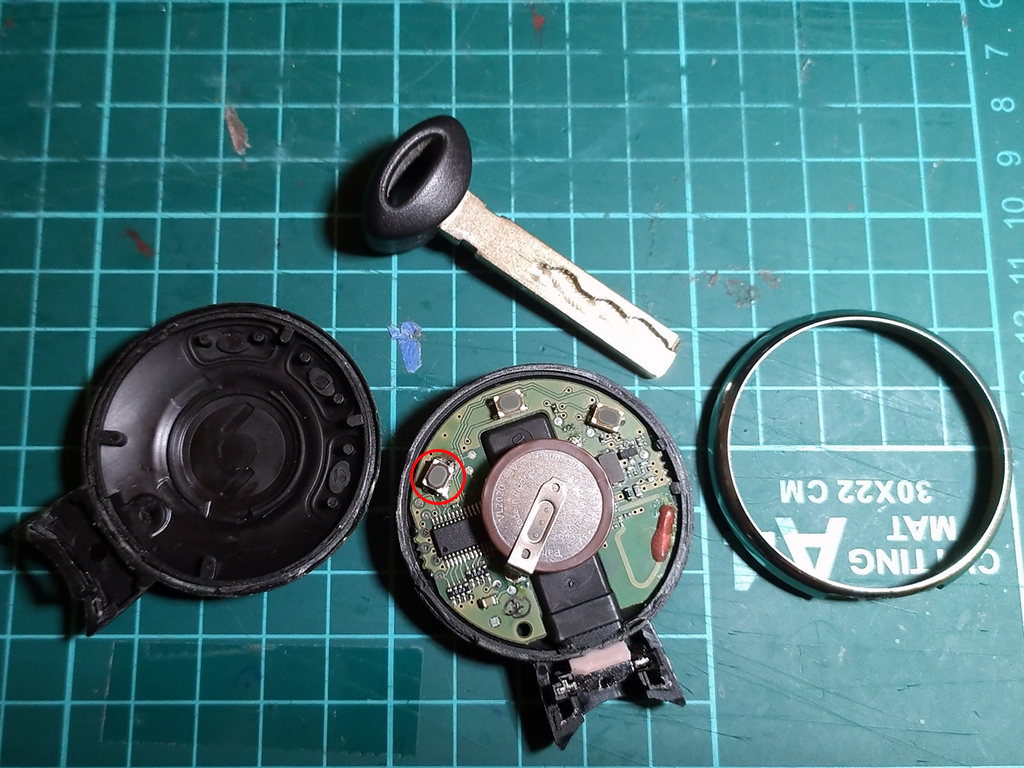
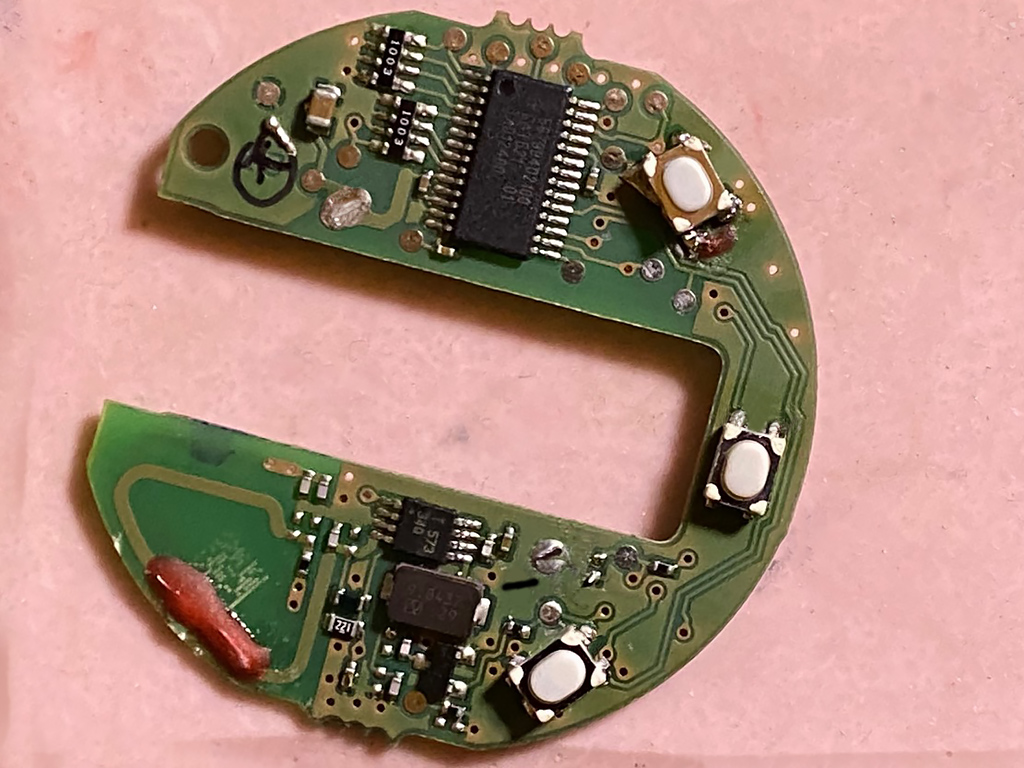
Cracked open
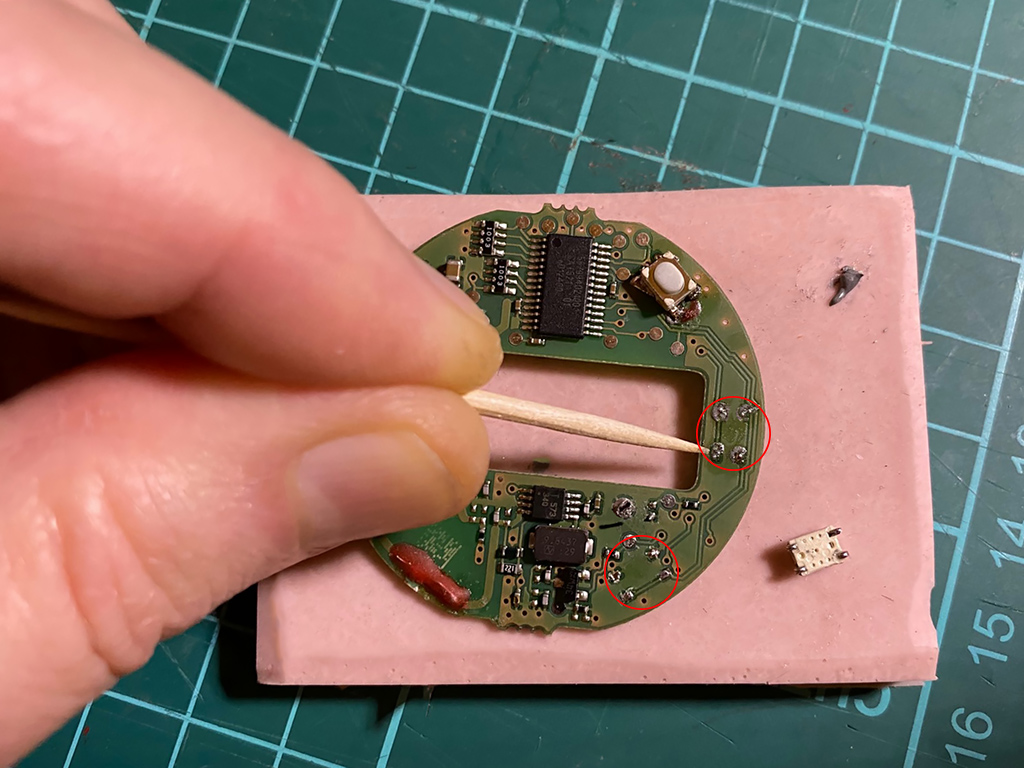
One switch has already been replaced and (Prophylactically, Im also replacing the two switches that are still working) I'm pointing at the location where the middle switch goes. Note how tiny the contact pads are that the SMD switch needs to be soldered to and the tiny contact pads on the switch that's flipped upside down next to the circuit board.
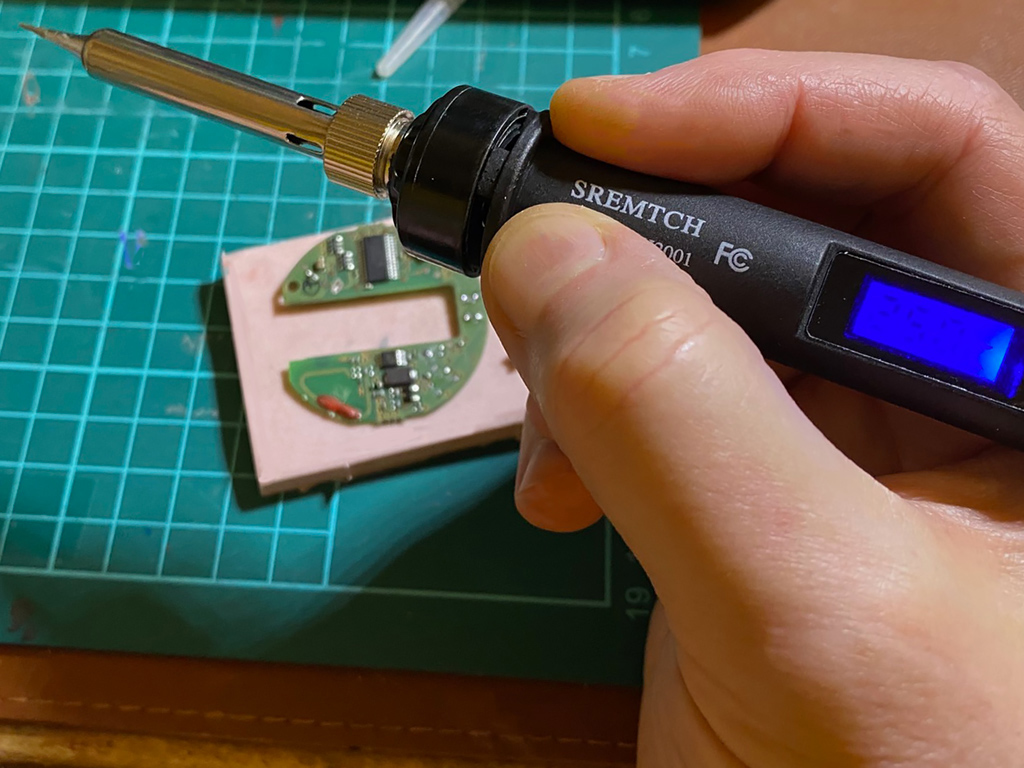
The display isn't legible in the picture but I soldered at 250°C, as low as possible so I wouldn't damage the SMD switch of make the contact pads come off the circuit board. I used solder paste because it is much easier to work with when dealing with tiny components. Don't try this with wire solder.
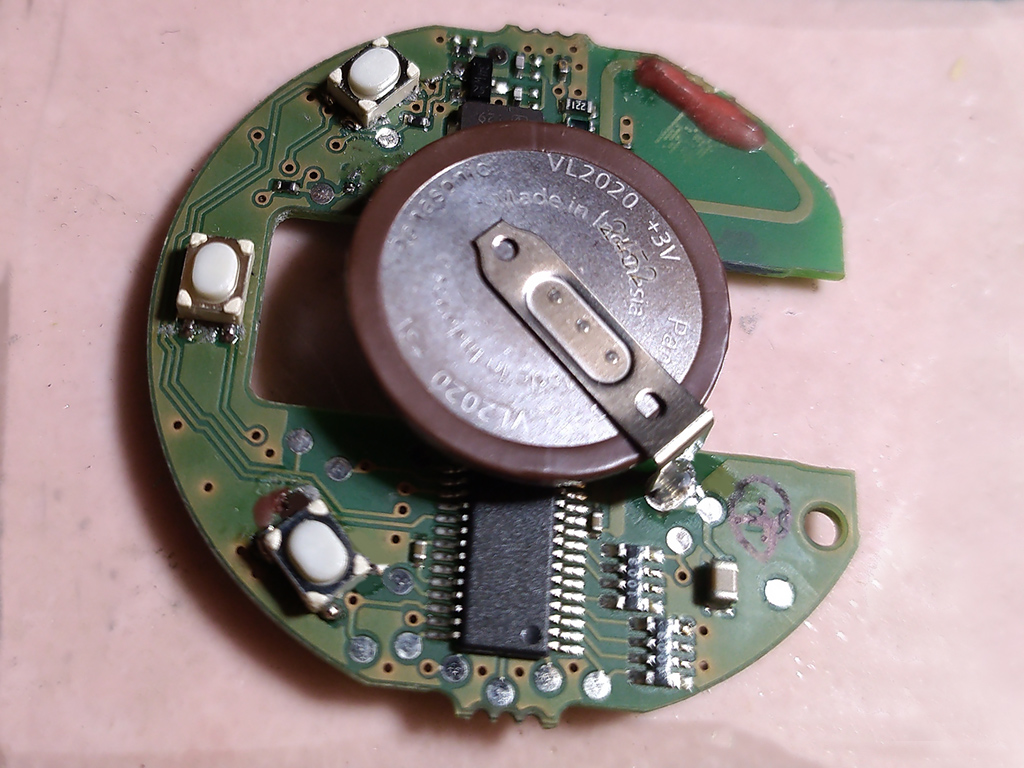
The three switches have been replaced
The rechargeable has been replaced. The new cell comes with leads attached. and you do not have to solder the leads to the cell.
The ekey/remote is back together and works. I used Permatex Ultra Black Sealant when putting the case halves back together - just a tiny bead on the peripheral tongue and groove. I checked the range and it works at slightly over 300 feet.
Money spent
rechargeable - $5 (bought two for $10)
SMD micro switches (10) - $10
a bladed tool to crack open the ekey/remote case
safety glasses - your eyes will probably be 6 inches from the circuit board when soldering. I use safety glasses with tempered glass lenses that are optically better than Lexan lenses. If you have to use magnifiers, I'm not sure what's best. Maybe those telescopic lenses surgeons put on their glasses?
soldering iron - $15
solder paste (leaded) - leaded flows much better, had it
tip cleaner/tinner - had it
tip cleaning sponge - had it
solder wick - had it
desoldering pump - had it
silicone sealant/adhesive so you can seal the case halves and keep them together semi-permanently.
In summary, replacing broken micro switches and soldered-in rechargeables on e/keys/remotes is doable. In addition to the supplies listed above you need perfect closeup vision with great depth perception and rocksteady hands.[
I hope some people may find this post at least in part useful. Your SMD switches will fail.
I'm known for posting in the wrong forum categories. Despite my best efforts, I have been unable, possibly due to utter incompetence, to find an Automotive Electronic subforum, so I beg forgiveness in advance for my probably misplaced post(s). I am now pathologically insecure about posting without any reassurance that I am posting in the correct forum and ask any moderator to please assist by either deleting or moving my posts as necessary. I would also encourage personal messages rather than public questioning about why I have posted in a particular forum. For example, I quit the cat food thread a long time ago and have no intention of ever posting there again even if that's the appropriate forum for my food pictures. Thank you for your patient consideration! I practice this sort of thing with the mustachioed and swollen stubbly-calves HR lady all the time.
Skip, if you are familiar with the Mini Cooper ekey/remote and proceed to Broken Bits.
On to business! My almost 8-year-old second-hand jalopy known as Miss Moneypenny, my Cooper S Roadster, came with two electronic keys/remotes. The e-key/remote fits in Monepenny's ignition slot, sorry about that, and I start her up with push start. The e-key/remote does contain an old-timey key that can be released and it may be used to operate the single conventional lock on the driver-side door but this key cannot start the car because there's no ignition lock and the RFID chip for the starter disabler is in the e-key/remote. Because my car is a roadster convertible it does not have a trunk release inside the vehicle for safety reasons and because my backup camera blocks the external truck release button, I rely on the ekey/remote if I want to open the trunk or the passenger side door. Anyway, the old-timey key is just an emergency feature.
Broken Bits - Bad Rechargeable and Broken SMD Switch
Moneypenny, getting on not only in years but miles, almost 50k of them, is showing middle age, with some of her bits and bobs starting to fall off. First of all, the ekey/remote does not contain a conveniently replaceable coin cell battery. No, BMW cleverly installed a rechargeable VL2020 lithium coin cell that is soldered to the circuit board of the ekey/remote. The rechargeable gets recharged every time the ekey/remote is in the ignition slot. Brilliant plan. I doubt Mini will replace rechargeable batteries that need to be unsoldered and soldered back in. It's probably useless anyway because the three SMD micro switches for locking and opening doors and the trunk have a life expectancy of maybe 100,000 cycles without failure. So the rechargeable has lately been getting weak. And finally, the trunk lock button on the key/remote had a mechanical failure. I could feel the switch not operating properly with a crisp resistance when pressing and Moneypenny's boot would not open. Unacceptable.
Not wanting to pay dealer prices for a new ekey/remote and programming because I used to know my way around electronics
I was an avid electronics tinkerer in my youth but for the past 25 years I have done only minor electronic repairs but nothing much involving SMD parts. I decided to give it a shot anyway. The remote came apart very easily. After pulling out the old-timey key and popping off the circular chrome trim I could carefully pry apart the upper and lower case halves. They were glued together with some type of adhesive but luckily they weren't fused. The trunk button has a crack in the tiny plastic housing and I presume the little springy contact plate or whatever it's called had been displaced. All three switches are, as evidenced by their function, momentary switches. I bought a very fine-tipped soldering iron with temperature control online for a measly $16. After unsoldering the rechargeable I found a replacement online and I also unsoldered the switches and measured them with calipers. I found 10 identical-looking switches (100k cycles service life) with the same measurements on eBay for $10. The Panasonic rechargeable was $5.
Process
The ekey/remote
Cracked open
One switch has already been replaced and (Prophylactically, Im also replacing the two switches that are still working) I'm pointing at the location where the middle switch goes. Note how tiny the contact pads are that the SMD switch needs to be soldered to and the tiny contact pads on the switch that's flipped upside down next to the circuit board.
The display isn't legible in the picture but I soldered at 250°C, as low as possible so I wouldn't damage the SMD switch of make the contact pads come off the circuit board. I used solder paste because it is much easier to work with when dealing with tiny components. Don't try this with wire solder.
The three switches have been replaced
The rechargeable has been replaced. The new cell comes with leads attached. and you do not have to solder the leads to the cell.
The ekey/remote is back together and works. I used Permatex Ultra Black Sealant when putting the case halves back together - just a tiny bead on the peripheral tongue and groove. I checked the range and it works at slightly over 300 feet.
Money spent
rechargeable - $5 (bought two for $10)
SMD micro switches (10) - $10
a bladed tool to crack open the ekey/remote case
safety glasses - your eyes will probably be 6 inches from the circuit board when soldering. I use safety glasses with tempered glass lenses that are optically better than Lexan lenses. If you have to use magnifiers, I'm not sure what's best. Maybe those telescopic lenses surgeons put on their glasses?
soldering iron - $15
solder paste (leaded) - leaded flows much better, had it
tip cleaner/tinner - had it
tip cleaning sponge - had it
solder wick - had it
desoldering pump - had it
silicone sealant/adhesive so you can seal the case halves and keep them together semi-permanently.
In summary, replacing broken micro switches and soldered-in rechargeables on e/keys/remotes is doable. In addition to the supplies listed above you need perfect closeup vision with great depth perception and rocksteady hands.[
I hope some people may find this post at least in part useful. Your SMD switches will fail.
Last edited:
