Nice work. I love following these threads.
- Home
- Forums
- Motorcycles, Boating, Small Engine, Aviation, Powe
- Motorcycles and Motorcycle Lubrication
You are using an out of date browser. It may not display this or other websites correctly.
You should upgrade or use an alternative browser.
You should upgrade or use an alternative browser.
1998 Yamaha PW80
- Thread starter JWC86
- Start date
Next thing I noticed was the top "triple tree clamp" plate has a couple cracks where the handle bar clamps mount.


I thought about replacing the part if it was cheap but they don't make them anymore so we will have to repair it.

I sanded it down smooth after this, it turned out great but forgot to take a pic. I get a pic when I paint it later.
I thought about replacing the part if it was cheap but they don't make them anymore so we will have to repair it.
I sanded it down smooth after this, it turned out great but forgot to take a pic. I get a pic when I paint it later.
Nice work. I love following these threads.
Same here, I read all of these "rebuild" threads whenever I see them and of coarse the famous GON's auction threads.
Looks like a fun time. How fast will those go? Some dirt bikes can get you into trouble real fast.Small update:
The kids(and wife) really wanted to ride the "new" bike yesterday but I wanted to have a quick check over first.
I really wish I would have taken some pictures along the way but I was in a time crunch and enjoying having the kids "help" me.
We pulled the plastic off and the airbox and started by just giving everything a good scrub to get years of neglect off.
View attachment 167369
Opening up the airbox I found a filter that actually didn't look terrible, looks like its no more than 10 years old and wasn't complete plugged with filth. The airbox itself was packed with dirt and dried filter oil.
Got it back together and went out for a ride. Not running great but decent enough for the girls to try it out.
Here is my oldest, she had a blast on it and can't wait to go again.
View attachment 167375
Now that I've done a better inspection here is my updated list:
-Chain and sprockets
-Air Filter
-Throttle Cable
-Grips
-Kick Stand
-Kick Starter is floppy
-New reeds
-Front wheel bearings
-Front brake lever
-Muffler
-Head pipe heat shield
-Chain adjusters need to be replaced
-Check spokes(Back wheel is missing one)
-Clean Carb (possible rebuild)
-Air box attachment brackets are broke
-Seat bolt is buggered up
-Compression check
-Front brakes stick
-Spark plug end
Overall it seems the main components are good, just lots of small things from years of neglect.
I'll be sure to include more pictures moving forward.
Edit: Forgot to mention, I did a oil change when we got back from riding, perhaps that goes without saying since we are BITOG's.
Looks like a fun time. How fast will those go? Some dirt bikes can get you into trouble real fast.
These PW80s are pretty under powered for a 80cc which in my case is good as it's the littles ones first bike. I'm not sure what the top speed is but it's fast enough for a newer young rider to have some thrills for sure.
Onto the the swing arm.

It has some gouges on the left side inside. The chain must have came off at one point.

They shouldn't affect the function but since the welder is already out lets see if this can be cleaned up a bit.

After the flap disc:

After sandblasting, I'm VERY happy with hoe this turned out, cant even tell the gouges were there:

Here is the whole swing arm sand blasted:

It has some gouges on the left side inside. The chain must have came off at one point.
They shouldn't affect the function but since the welder is already out lets see if this can be cleaned up a bit.
After the flap disc:
After sandblasting, I'm VERY happy with hoe this turned out, cant even tell the gouges were there:
Here is the whole swing arm sand blasted:
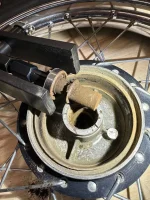
The front wheel bearings have some play so they need to be replaced.
Looks a bit crusty in there...

Every time I use this bridge style puller I love it more. Makes such easy work of these:

Looks like these were the factory bearings or they were replaced with OEM at some point, they have the "Japan" markings on them.
I'm going to say they haven't seen any grease in the 25 years since the bike was built:


Looks a bit crusty in there...
Every time I use this bridge style puller I love it more. Makes such easy work of these:
Looks like these were the factory bearings or they were replaced with OEM at some point, they have the "Japan" markings on them.
I'm going to say they haven't seen any grease in the 25 years since the bike was built:
Attachments
Really nice work and I’m enjoying this thread. Can’t help but marvel at how abused this bike was. I had the original Yamaha Mini-Enduro when it came out so there’s a nostalgia element as well. Looking forward to seeing how this progresses. Your daughters are lucky to have a handy father.
Really nice work and I’m enjoying this thread. Can’t help but marvel at how abused this bike was. I had the original Yamaha Mini-Enduro when it came out so there’s a nostalgia element as well. Looking forward to seeing how this progresses. Your daughters are lucky to have a handy father.
Thanks.
As for the condition of the bike, it's actually pretty typical for a 25 year old mini bike. It seems the type of people to fix something properly are few and far between.
Here's a great example, the threads on this chain adjuster are stripped where they need to engage. A new adjuster assembly with the washers and nuts is on $2.31 from Yamaha yet they choose this route. I'm all about cobbling something together when you have to but I always come back and fix it right when I have the time or when the part arrives.
Next up is getting the engine cleaned up. I hate working on a filthy engine and it just looks bad.


I need to pull the reed cage over later so this area will have to be clean so I don't have debris falling into the crankcase:

I spent about a hour on it and here are the results. The OCD in me wanted to spend more time but I have to remind myself I'm not doing a showroom restoration. This thing will be driving through mud in a couple weeks or less hopefully. Also I didn't bother getting the head all that clean as it will most likely get pulled at some point and will be much easier to clean then.


I need to pull the reed cage over later so this area will have to be clean so I don't have debris falling into the crankcase:
I spent about a hour on it and here are the results. The OCD in me wanted to spend more time but I have to remind myself I'm not doing a showroom restoration. This thing will be driving through mud in a couple weeks or less hopefully. Also I didn't bother getting the head all that clean as it will most likely get pulled at some point and will be much easier to clean then.
The fork dust boots ate torn and the seals are leaking so these will get some attention. Also going to prep and paint the lowers.

No surprises with the forks. They were complete, no mods and all the parts are in good condition. The oil was blacker than my soul(had actually turned to sludge in the bottom) but at least it had oil. The seals were OEM and the bolt heads were pristine so this might have been the first time they were apart.

No surprises with the forks. They were complete, no mods and all the parts are in good condition. The oil was blacker than my soul(had actually turned to sludge in the bottom) but at least it had oil. The seals were OEM and the bolt heads were pristine so this might have been the first time they were apart.
Cleaning and prep work is finally finished, it's time to start painting.
All the parts will get a 2k primer. The black parts will then get a 2k satin black top coat. The silver parts will get a 1k enamel.
Ready for primer:

And primer is on:


All the parts will get a 2k primer. The black parts will then get a 2k satin black top coat. The silver parts will get a 1k enamel.
Ready for primer:
And primer is on:
Love it, my first bike ever was a 1993 PW80 which at that time was not that old of a bike. Nice to see one given some love.
I scuffed the primer with a 3M maroon scuff pad and laid down some paint. I’m very happy with how it turned out.

The black was done with Spraymax 2k “hot rod black” which is a satin black that seems very close to the OEM black.


The sliver parts were done with duplicolor “engine enamel” in “aluminum” shade. Seems to be a close match also with the OEM colour.


It’s true what they say, painting is all in the prep work. I haven’t kept track my I probably have 8 hours or more in cleaning and sand blasting. It only took 30min to paint it.
Next steps will probably be getting the motor ready and carb.
The black was done with Spraymax 2k “hot rod black” which is a satin black that seems very close to the OEM black.
The sliver parts were done with duplicolor “engine enamel” in “aluminum” shade. Seems to be a close match also with the OEM colour.
It’s true what they say, painting is all in the prep work. I haven’t kept track my I probably have 8 hours or more in cleaning and sand blasting. It only took 30min to paint it.
Next steps will probably be getting the motor ready and carb.
Pulled the reeds out. Looks to have the OEM reeds in. Everything looked good but we replaced them with Boyesen “power reeds” anyways.

New OEM gaskets

Replaced the JIS pattern boots for socket cap bolts to make it easy to get into the reeds while the motor is installed in the frame.


We pulled the head off to have a look at the cylinder. It looked perfect so not going to dig any deeper.

The freshly painted shifter got a new OEM boot

New OEM gaskets
Replaced the JIS pattern boots for socket cap bolts to make it easy to get into the reeds while the motor is installed in the frame.
We pulled the head off to have a look at the cylinder. It looked perfect so not going to dig any deeper.
The freshly painted shifter got a new OEM boot
Tore apart the carb. It wasn't very dirty but you could tell its been awhile since any one has been in there.

Into the ultrasonic cleaner

New jets. needle & set, slide needle, gaskets, etc

I also checked the float height, it was right in the middle of the specified range.
I used a rebuild kit from Moose Racing, I was nicely surprised that the new float bowl screws were actually JIS heads.

Into the ultrasonic cleaner
New jets. needle & set, slide needle, gaskets, etc
I also checked the float height, it was right in the middle of the specified range.
I used a rebuild kit from Moose Racing, I was nicely surprised that the new float bowl screws were actually JIS heads.
Next I checked the stroke on the oil injection pump. The specified range at idle is 0.016-0.018". Most will say you want to be on the high end of that range or just a thou or two above it. It was set at 0.025" so defiantly Next I checked the stroke on the oil injection pump. The specified range at idle is 0.016-0.018". Most will say you want to be on the high end of that range or just a thou or two above it. It was set at 0.025" so defiantly on the rich side. I set it to 0.019".

Similar threads
- Replies
- 58
- Views
- 2K
- Replies
- 28
- Views
- 2K
- Replies
- 59
- Views
- 976
- Replies
- 19
- Views
- 801
- Replies
- 14
- Views
- 465