The Civilian Marksmanship Program offers in three day class in which you build (and keep) an M1 Garand. I completed the class this week. The cost was $800 for the class, billed in advance. Lunch is provided. Tools and benches are provided. You paid for the rifle, including AL state sales tax (now required, even if the rifle is shipped) when the class was done. About $1100, including the tax.
What you get: USGI receiver, new Criterion barrel, new stock/hand guards with CMP cartouche, new op rod spring. All other parts are USGI that have been inspected, reparkerized, and the case of the op rod, rebuilt and reparkerized (new piston, welded and remachined tab and bolt camming area).
Day one started with the most awesome tour (no pictures...though I longed to take some, it's US property, and the CMP is now a contractor, so you have to follow the government rules...). We saw where rifles were brought in and unpacked. They found a gas trap in perfect original condition last week. Expect to see that one go up on the auction site. Expect to see it bring high five, or even six, figures. They find a lot of basket case rifles that are stripped for parts. They had laid out a ton of unusual rifles that had been uncrated over the years: complete M1Cs, M1Ds, a gas trap, IHC, WRA, HRA, SA models, a repatriated rifle from a dead Vietcong soldier, a repatriated rifle taken from the Taliban last year, and I wish I could remember all of what we saw.
Rifles are all checked by an armorer. Rifles are put out for sale, or repaired, or rebuilt, or scrapped, depending on what they find before going to test, which is in an automated jig, covered by a guard, in contained booth. They're then graded, and put up for sale.
You choose the receiver. To be honest, the picking are slim on receivers. Most had some pitting. Mine was a 1,067,XXX SA and had a bit of pitting, but the sight teeth were sharp and it was one of the early ones. There were receivers with zero pitting, but much later numbers. All were SA. There was a 56,XXX receiver, but it had a lot of pitting, up and down the receiver legs, on the front by the threads and all around the outside...it was early, but it was ugly...no one chose it.
As you build it, each part is checked. Any parts can be swapped out during the build, to ensure a good fit/function. No swapping to get a specific/correct part. I ended up with an early SA trigger housing, early SA op rod (no relief cut) and early SA bolt, but that was more luck of the parts bin than any real planning on my part. No Winchester receivers, but a few Winchester bolts and other parts were available. The guys teaching the class, all custom shop armorers (and general, salt-of-the Earth, good folks) had nothing good to say about Winchester receivers. They were SA and HRA fans.
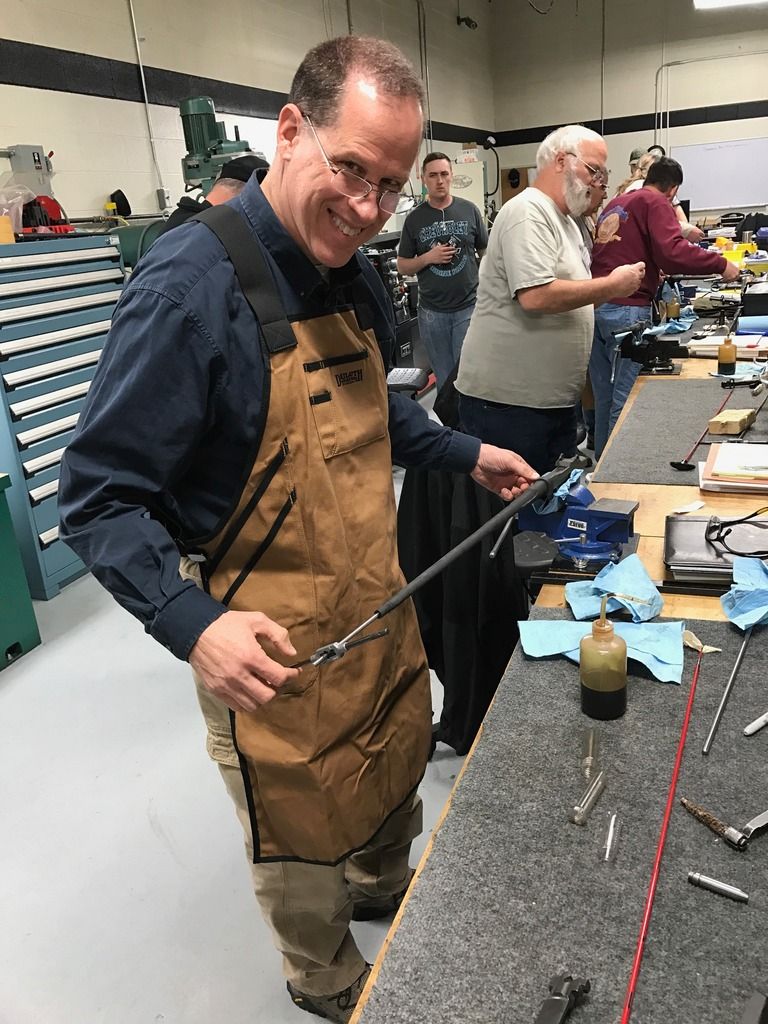
The build starts with lapping the bolt to the receiver. Install and time the barrel (using leveling rods and an eyeball). Ream the chamber to size using the lapped bolt and a pull through reamer. That and the tour took the first day.
Day two: Install the rear sight group. Checking the fit, tension and function. Build the trigger group, check fit and function. Install the magazine parts. Install the gas block. Select an op rod and check for smooth operation with the bolt (gravity test). Fit the new stock. Mine took some filing to fit. Then check timing, particularly, will the op rod catch release with a timing gauge (which simulates a full magazine). Mine didn't. We tried a couple of different bullet guides, none of which timed properly, before we peened the bullet guide bump that engages the op rod catch accelerator. Then it timed perfectly, releasing just as the gauge pushed the follower to the bottom of the magazine well.
On day three, we peened gas block splines, to tighten up gas blocks, and honed the rear hammer hooks to remove creep in the trigger. We had the rifles test fired in the rig I described above. All but one worked on the first try. They swapped gas blocks, with no luck, but a new op rod fixed it. Gas blocks and op rods are in short supply. They all measure out of spec when they are brought in, but no more exist...so, op rods are rebuilt and gas blocks are simply function checked at the end of the build.
I had a great time. My fellow builders were all good guys. Some had upwards of 20 Garands. For some, this was their first. Some were very familiar with gun-smithing, some weren't. All were excited about the class. All were polite, personable guys, who ranged in age from late 20s to early 70s. We all had Garands in common. We had an impromptu class dinner at a local brew-pub.
I learned things about the rifle that I didn't know before, despite being an owner and an avid reader, as well as learned the techniques and procedures for building one.
If you get a chance - You simply have to do this!
Cheers,
Astro
Day one, barrel installed, reaming the chamber to size. Light hand pressure only...
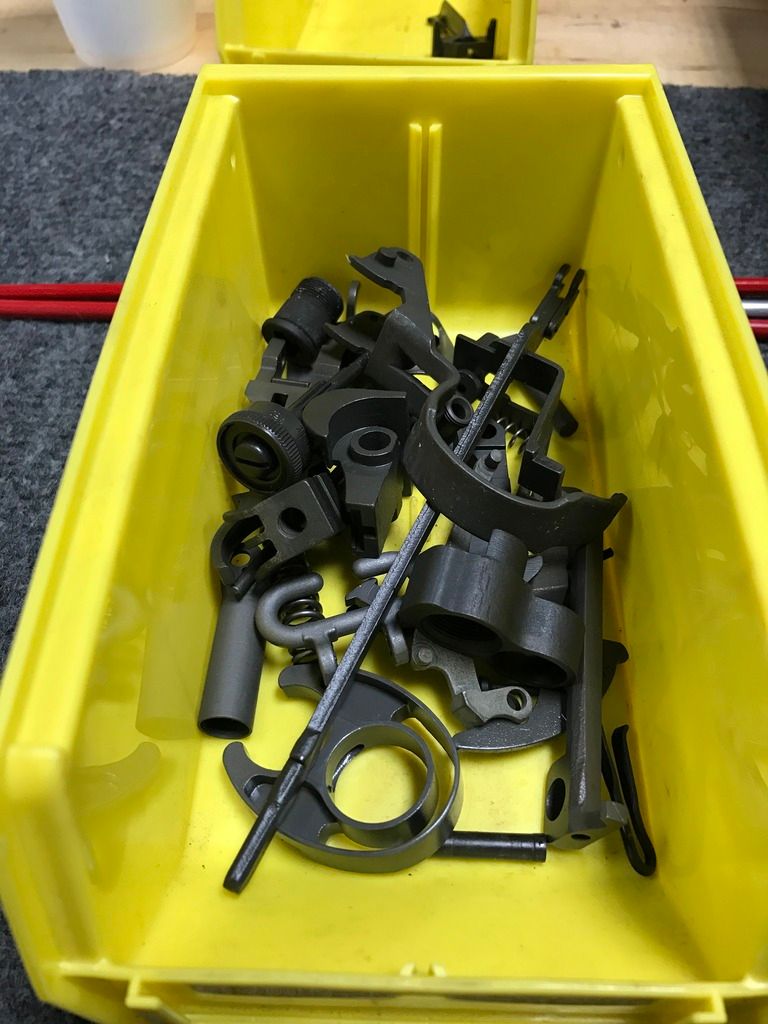
Day two...a bucket o' parts...
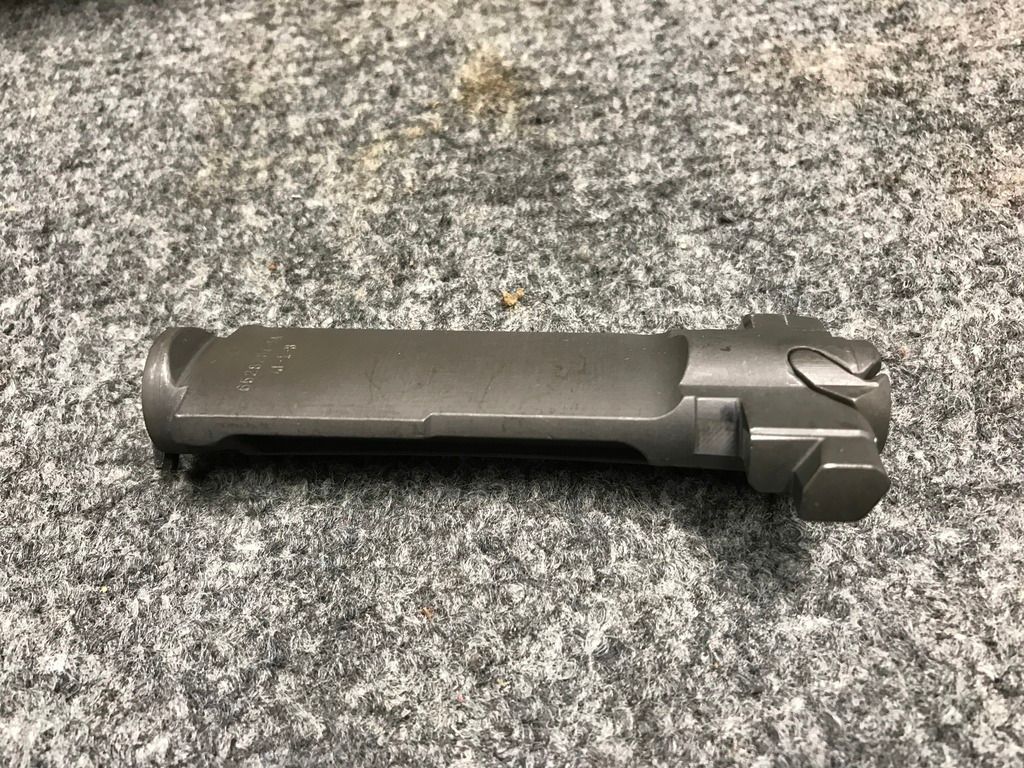
The bolt - you can just see the lapping marks:
Trigger group parts:
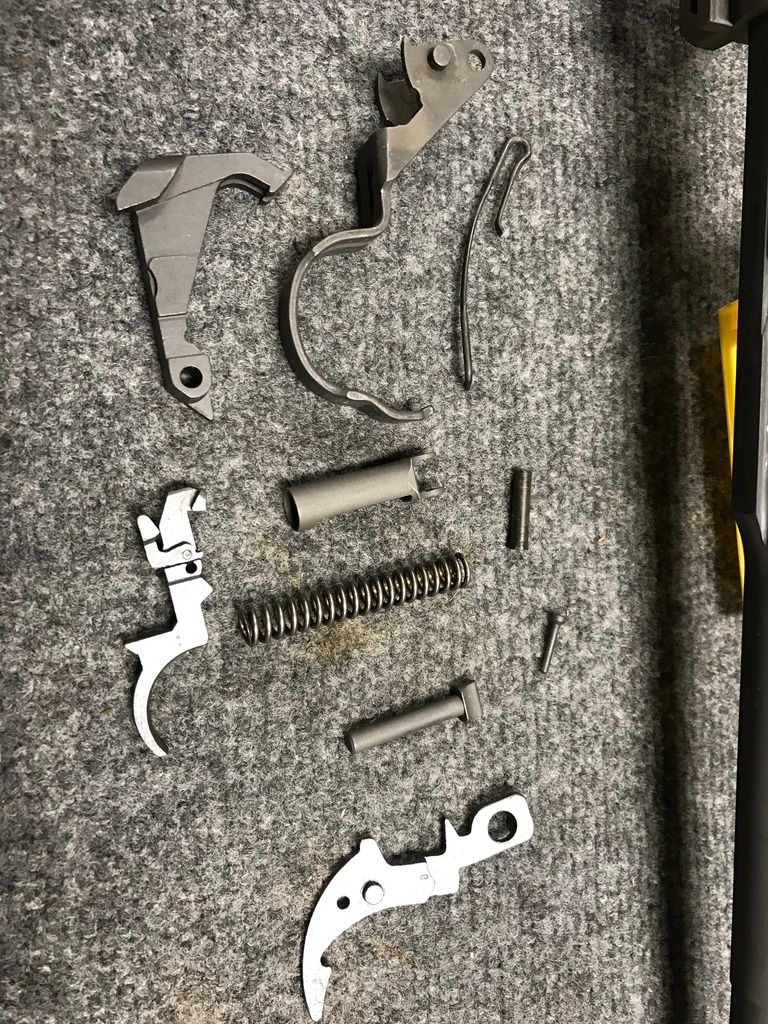
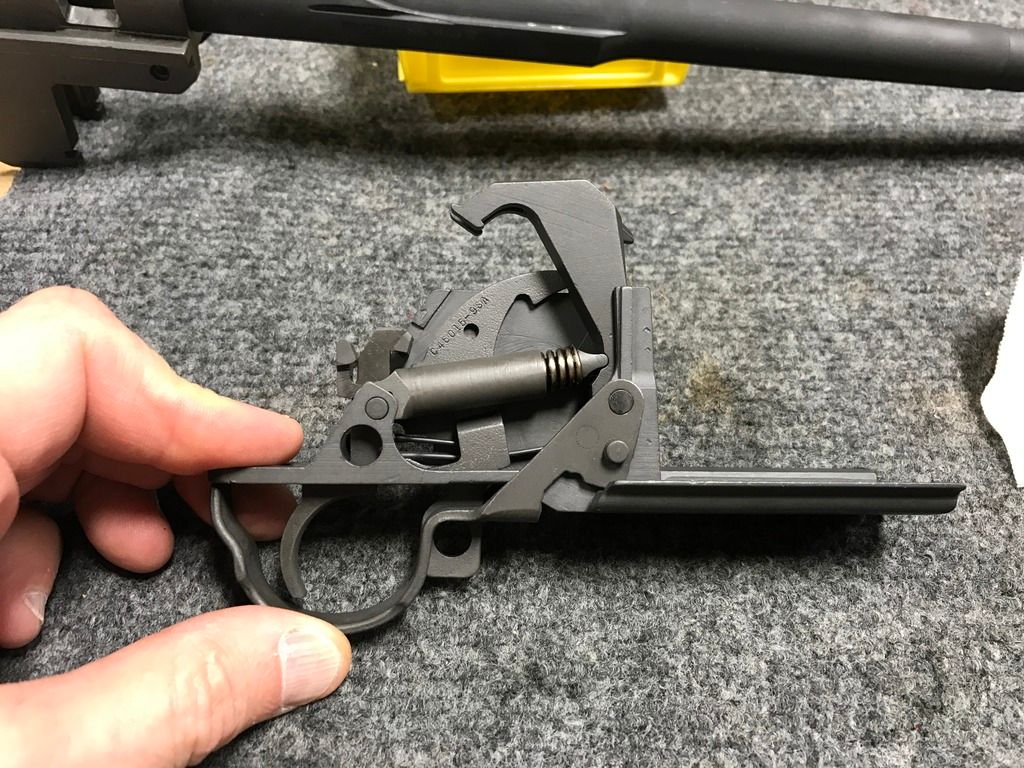
Trigger group:
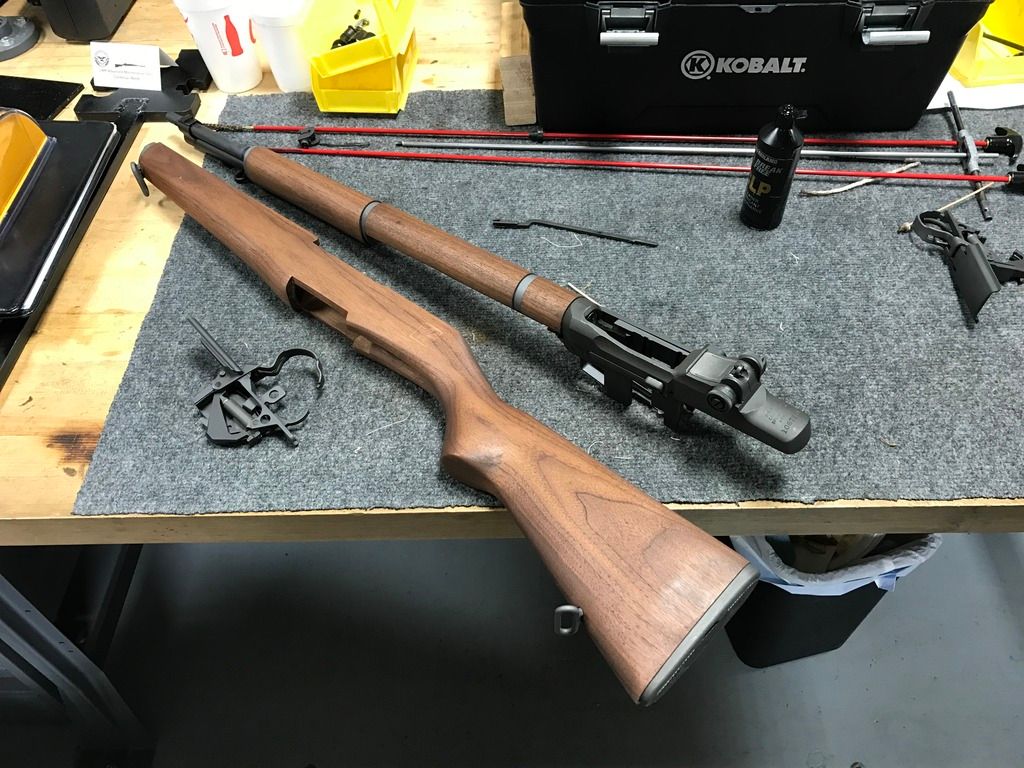
Stock fitted, magazine parts installed, op rod checked.
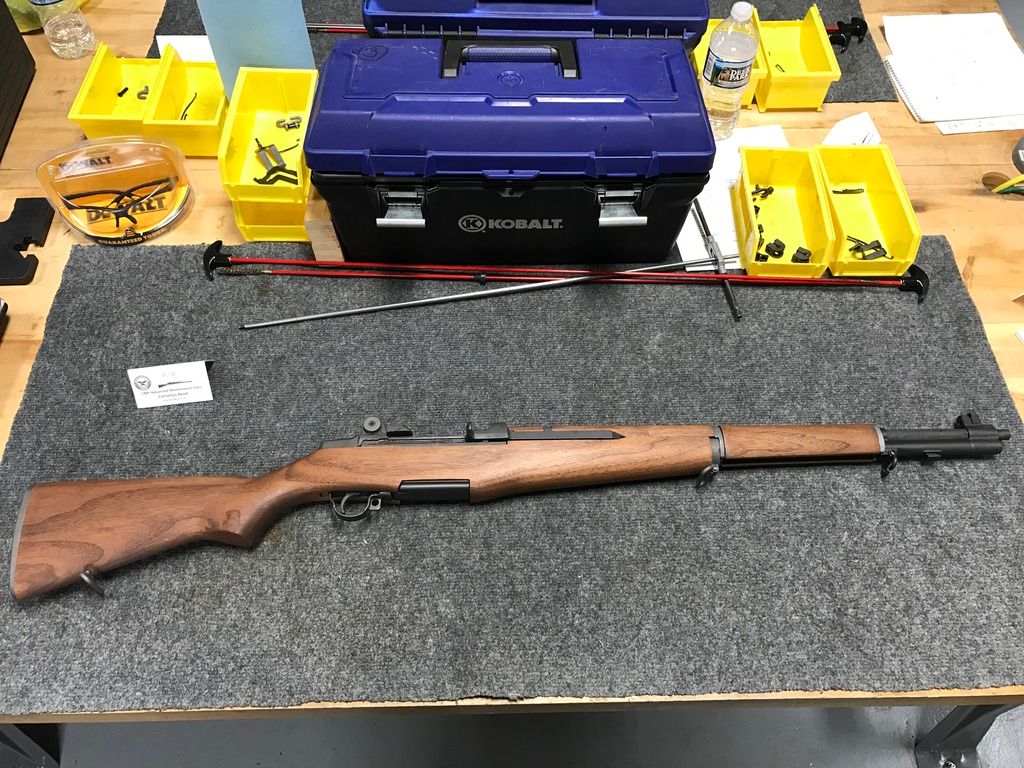
One US Rifle, Cal. 30, M1 - complete and ready to fire.
What you get: USGI receiver, new Criterion barrel, new stock/hand guards with CMP cartouche, new op rod spring. All other parts are USGI that have been inspected, reparkerized, and the case of the op rod, rebuilt and reparkerized (new piston, welded and remachined tab and bolt camming area).
Day one started with the most awesome tour (no pictures...though I longed to take some, it's US property, and the CMP is now a contractor, so you have to follow the government rules...). We saw where rifles were brought in and unpacked. They found a gas trap in perfect original condition last week. Expect to see that one go up on the auction site. Expect to see it bring high five, or even six, figures. They find a lot of basket case rifles that are stripped for parts. They had laid out a ton of unusual rifles that had been uncrated over the years: complete M1Cs, M1Ds, a gas trap, IHC, WRA, HRA, SA models, a repatriated rifle from a dead Vietcong soldier, a repatriated rifle taken from the Taliban last year, and I wish I could remember all of what we saw.
Rifles are all checked by an armorer. Rifles are put out for sale, or repaired, or rebuilt, or scrapped, depending on what they find before going to test, which is in an automated jig, covered by a guard, in contained booth. They're then graded, and put up for sale.
You choose the receiver. To be honest, the picking are slim on receivers. Most had some pitting. Mine was a 1,067,XXX SA and had a bit of pitting, but the sight teeth were sharp and it was one of the early ones. There were receivers with zero pitting, but much later numbers. All were SA. There was a 56,XXX receiver, but it had a lot of pitting, up and down the receiver legs, on the front by the threads and all around the outside...it was early, but it was ugly...no one chose it.
As you build it, each part is checked. Any parts can be swapped out during the build, to ensure a good fit/function. No swapping to get a specific/correct part. I ended up with an early SA trigger housing, early SA op rod (no relief cut) and early SA bolt, but that was more luck of the parts bin than any real planning on my part. No Winchester receivers, but a few Winchester bolts and other parts were available. The guys teaching the class, all custom shop armorers (and general, salt-of-the Earth, good folks) had nothing good to say about Winchester receivers. They were SA and HRA fans.
The build starts with lapping the bolt to the receiver. Install and time the barrel (using leveling rods and an eyeball). Ream the chamber to size using the lapped bolt and a pull through reamer. That and the tour took the first day.
Day two: Install the rear sight group. Checking the fit, tension and function. Build the trigger group, check fit and function. Install the magazine parts. Install the gas block. Select an op rod and check for smooth operation with the bolt (gravity test). Fit the new stock. Mine took some filing to fit. Then check timing, particularly, will the op rod catch release with a timing gauge (which simulates a full magazine). Mine didn't. We tried a couple of different bullet guides, none of which timed properly, before we peened the bullet guide bump that engages the op rod catch accelerator. Then it timed perfectly, releasing just as the gauge pushed the follower to the bottom of the magazine well.
On day three, we peened gas block splines, to tighten up gas blocks, and honed the rear hammer hooks to remove creep in the trigger. We had the rifles test fired in the rig I described above. All but one worked on the first try. They swapped gas blocks, with no luck, but a new op rod fixed it. Gas blocks and op rods are in short supply. They all measure out of spec when they are brought in, but no more exist...so, op rods are rebuilt and gas blocks are simply function checked at the end of the build.
I had a great time. My fellow builders were all good guys. Some had upwards of 20 Garands. For some, this was their first. Some were very familiar with gun-smithing, some weren't. All were excited about the class. All were polite, personable guys, who ranged in age from late 20s to early 70s. We all had Garands in common. We had an impromptu class dinner at a local brew-pub.
I learned things about the rifle that I didn't know before, despite being an owner and an avid reader, as well as learned the techniques and procedures for building one.
If you get a chance - You simply have to do this!
Cheers,
Astro
Day one, barrel installed, reaming the chamber to size. Light hand pressure only...
Day two...a bucket o' parts...
The bolt - you can just see the lapping marks:
Trigger group parts:
Trigger group:
Stock fitted, magazine parts installed, op rod checked.
One US Rifle, Cal. 30, M1 - complete and ready to fire.