The Snake Pit : Stripping a Late 80's Carburettor

Status
Not open for further replies.
Joined
Oct 25, 2012
Messages
4,823
Location
Taiwan


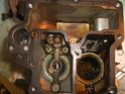
AKA The Tar Pit. Presumably due to blowby, so maybe a compression test and/or catch can are indicated, although it might not have been done for 30 years.

Its had regular squirts of carb cleaner down the intake, but I've never been very convinced by carb cleaner.For this job I've been using brake fluid for cleaning, which (touch wood) seems to be quite a lot more effective.

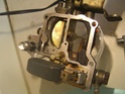
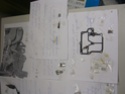
I don't have a manual for this car but I have a scan of the G10 manual. This carb (AISIN Model 87773) seems to be very similar, but the photos are of the "remove tiny black dot from somewhere in the big grey fuzzy mass" school of photo-impressionism.

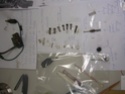
I couldn't remove all the ancilliaries. The cross-heads just cammed-out, and I didn't want to try my hit-it-with-a-hammer impact driver on a carb casting.

Perhaps this would be a job for one of the electric impact drivers Americans are so fond of (in which case I'll have to stop sneering at them)?

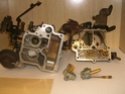
I couldn't (so far) remove all the jets either. The manual says "it is mandatory to employ the special carburetor screw driver set, carburetor adjusting gauge set and wire guage set" which is too bad, but I did tell myself I wouldn't try anything with ill-fitting tools.

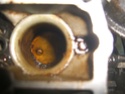
I didn't have the right screwdriver for the needle valve seat, which should be fairly easily addressed, but its a 40K round trip to the nearest half decent tool shop.

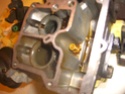
The other 3 jets I can't get off are shown in the photo below. The slow jet (brass thing in the curved recess in the side of the float chamber) looks like it needs a rather slim box spanner or long socket. The primary and secondary jets are in the bottom side of float chamber, and would be accessed by removing two plugs in the opposite side. I couldn't exert enough force on these to shift them.


My options for that seem to be:-

(a) put the carb body in a vice, if I can get access to one. Bit scary, though the base seems quite strong.
(b) bolt it back on the car to anchor it. Also a bit scary, but better.
(c) Boil it, in the hope that the heat will loosen things up.

This would be favorite (and is my standard method with motorcycle carbs) but I don't want to boil the vacuum-pot ancilliaries which I can't get off.

I've done a couple of simple motorcycle ones (Kymco Zing 150cc Honda CG125 clone, and Yamaha RZR 133cc 2-stroke) a few times and had evolved a technique involving boiling with automatic washing powder, and then blasting the passages out with first the detergent, and then alcohol. The latter gets around the lack of compressed air, the former the fact that, in my limited experience, the sludge in motorcycle carbs here was mostly a greyish mineral-looking deposit (maybe a corrosion product?) which carb cleaner didn't remove. Carb cleaner seems to be intended for tarry or gummy organic deposits, which is what this car has.

The jets I can get to so far seem pretty clean though, so while cleaning the tar out is nice, I doubt its fixing anything.
 
If you can get your hands on some Berryman B-12 Chemtool (not sure if it is available in your part of the world), it would definitely remove all of the by-products.
 
I rebuilt my carburetor for the 1985 Corolla 4A-LC engine. It looks very similar to yours.

I didn't use any special tools but I had access to various screwdrivers and some small nut drivers.

For the needle-valve seat, I believe I used a large coin (USD quarter) and pliers to turn it.

For the screws that are stuck, impact drive works. In my case, it was a screw at the flange. Impact drives have very nice driver bits, their handles are also much easier to grip than a screwdriver. You don't necessarily have to hammer it. This is the the one I used:

http://www.amazon.com/GreatNeck-IMD5-Impact-Driver-Bits/dp/B000CMDQSE

Use a carburetor cleaner to clean things. Be careful when you squirt it because it will bounce back into your eye if hits a solid surface. Eye protection is recommended.

... And I just found my instructions with pictures as well as the OEM manual! Here they are:

http://www.corolland.com/forums/index.php?/topic/24351-toyota-corolla-aisan-carburetor-rebuild/

So, see the link above as well as the provided links in that link.

A few notes from the link above:

Get a Great Neck impact drive from Autozone to be able to remove the flange screws without damaging them.
Use a quarter-dollar coin in the needle-valve strainer and turn it with pliers.
A sawed-off flat screwdriver may be useful for removing jets.
You need a very thin-walled 9 mm drive to be able to remove the power piston.
Take a photo at every step so that you can put things back correctly.
Larger jet is the secondary jet, smaller is the primary.
Be very careful not to drill into the idle-mixture screw. Go very slowly. Punch a dot in the exact center of the MAS plug first so that the drill bit will be stable. The screw is only 2 mm under the plug.
Use goggles when you use compressed air with carb cleaner so that you don't get it in your eyes.
You can use short teflon-tubing pieces to replace broken plastic bushings.
Don't damage the cold-mixture heater. They don't make it anymore. It only makes a complete circuit when it's installed and don't incorrectly assume that the heater wire is broken -- it's not.
Get the correct flange gaskets if they don't come with the kit. Chances are that they won't. You can also make your own gasket from FEL-PRO sheet gasket material -- readily available and cheap at auto stores -- probably much higher quality than aftermarket gaskets in the kits.
Don't overtighten any mounting bolt or screw. if you tighten the gaskets too much, they can start leaking in a few years.


One more warning I didn't provide in the original instructions in the link above: Use adhesive silicone on the choke-breaker adjustment screw. Otherwise, it will fall off soon because of vibrations and will cause a huge vacuum leak.
 
there is a manual version of the impact tool .its like a big tool you can hammer on and you just put the bit you need at the end usually you manually exert turning motion in the direction you want while hammering the force you want .its very old school tool very basic but in a bind very handy
 
Get a piece of plate that you can bolt the carb to in the vice.

Then do what Gokhan suggests, I found that Impact (the ones that you hit with a hammer) screw driver tips are usually the best fitting...a little tap helps, and the increased diameter of the handle makes them more controllable.

That "slow" jet, I'd get a ring spanner and bend it...or cut it off really short and do a "tap/wiggle" thing to get it out...the two jest either side, I'd just blow acetone through in both directions, and not get out unless I really needed to.

Just some suggestions/reinforcements.
 
Originally Posted By: yvon_la
there is a manual version of the impact tool .its like a big tool you can hammer on and you just put the bit you need at the end usually you manually exert turning motion in the direction you want while hammering the force you want .its very old school tool very basic but in a bind very handy


I have two of those, a fairly expensive (about 20 quid) Japanese Ko-ken "Attack Driver" (Tora! Tora!, and Banzai!) which does seem to work better than the Thorsen one (about 12 quid) I used before, but neither of them came with many bits, and I havn't found the bits for sale separately.

Snag is (assuming I can get the right bits) that I don't really want to go hitting a bracket that's screwed to a (possibly quite fragile) carb casting with a big hammer. I'm afraid it'll break.

I might try and get one of these:-

http://goods.ruten.com.tw/item/show?21305080186330
 
Originally Posted By: 2015_PSD
If you can get your hands on some Berryman B-12 Chemtool (not sure if it is available in your part of the world), it would definitely remove all of the by-products.


Very unlikely to be available/findable here. Possibly in Japan. That said, the brake fluid seems to be doing a good job, though I should probably have tested it on some aluminium and brass before going "live" with it.

Originally Posted By: KingCake
You need to find someone with an ultrasonic cleaner.


Spectacle shops and jewellers have them. Couldn't dump the whole carb in but maybe jets. The jets I can see look alright though.The tar is from the "air" side.

In the past I've put jets in some carb cleaner in a little glass bottle and rubbed it with another one. Glass-on-glass generates ultrasonics.
 
Originally Posted By: Gokhan
I rebuilt my carburetor for the 1985 Corolla 4A-LC engine. It looks very similar to yours...


Thanks a lot. That looks VERY useful.
 
if you are trying to anchor it, bolt it to thick slab of plywood. then clamp that to your work surface.
 
Originally Posted By: meep
if you are trying to anchor it, bolt it to thick slab of plywood. then clamp that to your work surface.


Good idea. Think there are some railway sleepers (railroad ties) lying around fairly near, and maybe some half ones, which'd be a bit less challenging to move by scooter.
 
Originally Posted By: Ducked
Originally Posted By: Gokhan
I rebuilt my carburetor for the 1985 Corolla 4A-LC engine. It looks very similar to yours...

Thanks a lot. That looks VERY useful.

I think if you follow my tips in that link, you shouldn't have much problem with a complete overhaul.
 
Originally Posted By: nthach
Why not get an JIS screwdriver?

The Phillips bit provided with the Great Neck impact-driver set and probably most other impact drivers is much better than a regular screwdriver tip in grabbing the screws. I don't know if a JIS (Japanese standard) cross tip would work the same or better but it's a good idea and something to try if the impact-driver bit doesn't work.
 
Originally Posted By: nthach
Why not get an JIS screwdriver?


Hard to find. I've looked around a bit, but havn't seen any identified as such.

IF I could ask for such a thing in one of the good tool shops in the next city (or could get someone else to ask for me, or, more practically, write a note) I'd bet money no one would know what I was talking about. I'll try it though.

I'll be in Japan again in the summer. You'd think they ought to have some there.
 
Originally Posted By: Ducked
Originally Posted By: nthach
Why not get an JIS screwdriver?


Hard to find. I've looked around a bit, but havn't seen any identified as such.

IF I could ask for such a thing in one of the good tool shops in the next city (or could get someone else to ask for me, or, more practically, write a note) I'd bet money no one would know what I was talking about. I'll try it though.

I'll be in Japan again in the summer. You'd think they ought to have some there.

I doubt the JIS screwdriver would be better with a stuck or damaged screw. The difference between JIS and Phillips is almost negligible, other than the shape of the apex of the tip. If you really care, perhaps you could find a No. 2 JIS bit that fits into your impact driver. One important advantage of the impact driver over a screwdriver is that the handle is much better and you can apply much higher force than with a screwdriver, even without hammering it.

Moreover, the bit provided in the impact-driver set is really sharp, probably sharper than any JIS screwdriver. If it can't do the job, nothing will. See the pictures below. My Great Neck impact-driver set was made in Taiwan; so, the same thing should be available there likely under a different name.

IMAG8005.jpg


IMAG8007.jpg


IMAG8008.jpg
 
JIS MIGHT actually be the default bit here. I'm not sure I can tell the difference.

No disrespect to your Taiwan impact driver, but, as I said, I've already got two hit-it-with-a-hammer impact drivers, including a nice Japanese one (Koken), so I don't feel like looking for any more.

I could do with some more bits though.

I got the power jet out with a very cheap and nasty toy-gun-metal T-handle nut driver that I bought locally in one of the all-night hardware stores. Wasn't really deep enough but by not fully engaging the socket drive it could be made to work. Fortunately it didn't need much force.

I decided not to bother with the primary and secondary jets for now. They both squirt through with alcohol, and given the apparently OK status of the other jets I can get to, they are probably OK too.

So I'm putting it back together, though I expect it'll still be broken.

Best guess as to why at this time is that NONE of the dash-pots seem to be working. Not really sure what they do, since I havn't tried thinking DEEPLY about it yet because I don't want to get a headache, BUT if a holed diaphragm results in a significant vacuum leak, that might be the problem.

I'll probably try blanking them off. Dashpots aren't made for disassembly but if I cant get replacements I'll have a go at cutting them open and patching.
 
Last edited:
Originally Posted By: Ducked
No disrespect to your Taiwan impact driver, but, as I said, I've already got two hit-it-with-a-hammer impact drivers, including a nice Japanese one (Koken), so I don't feel like looking for any more.

I could do with some more bits though.

I got the power jet out with a very cheap and nasty toy-gun-metal T-handle nut driver that I bought locally in one of the all-night hardware stores. Wasn't really deep enough but by not fully engaging the socket drive it could be made to work. Fortunately it didn't need much force.

I decided not to bother with the primary and secondary jets for now. They both squirt through with alcohol, and given the apparently OK status of the other jets I can get to, they are probably OK too.

So I'm putting it back together, though I expect it'll still be broken.

Best guess as to why at this time is that NONE of the dash-pots seem to be working. Not really sure what they do, since I havn't tried thinking DEEPLY about it yet because I don't want to get a headache, BUT if a holed diaphragm results in a significant vacuum leak, that might be the problem.

I'll probably try blanking them off. Dashpots aren't made for disassembly but if I cant get replacements I'll have a go at cutting them open and patching.

Actually, I realized that it's made in China.

Diaphragms are easy to check. I still need to replace my choke breaker with a broken "Diaphragm A" but I'm procrastinating to do it because I need to remove the air horn and then remove the choke heater above the breaker by drilling the rivets, then put in the new choke breaker and assemble them with screws instead.
 
Bugger! Got a left-over washer.

This dropped free at some point during disassembly and I sort-of-assumed / hoped I'd find where it came from when I was putting it back together.

But no.

Really don't want to take it all apart again and go on an invisible-round-mark-hunt , though of course I should.

Thought it was from the accelerator arm pivot-bolt (which is called something misleading like "set-screw" in the Japlish manual) but the ID is not QUITE big enough.

I'll park it somewhere accessible meantime.
 
Maybe the power-jet has (had) a washer? Can't tell from my blurred photo (borrowed camera with Chinese menu). Think that washer "appeared" before I got the power-valve off though.

I parked it under the model label.
 
Status
Not open for further replies.
Back
Top