what level of difficulty is a brake job?

Status
Not open for further replies.
Joined
Jan 12, 2005
Messages
4,353
Location
FL
Ok, my car has about 40k miles on it with the original pads. Lately I've noticed that it doesn't stop the way it used to. Seems to take more distance although it still stops pretty good, or at least compared to the brakes on my mom's Camry. They've never been looked at so I don't know how much life is left. I want to wait till 50k to do it but I'm not sure they will last until then and I don't want to find out the expensive way. I think they will last until winter break though which should be around 42-43k miles. From some of the posts here, a brake job 'sounds' like an easy diy so I just wanted to make sure that it wouldn't be one of those things where I take the thing off and end up not being able to put it back together. So from a scale of 1-10 with 1 being easy as an oil change and 10 being a timing belt job, where would a brake job fall?

Also I was looking at brake pads on Rockauto and came across Wagner Thermoquiet and Edge pads w/ a $15 rebate per set. So including shipping, the Termoquiet pads are about $40 - $15 rebate = $25 and the Edge pads are about $10 more. Are they any good? Which one is better? I would like the Akebonos but I can't justify the extra cost since the Wagners seem like decent pads that would suit my needs. The car is an 04 Civic btw. I might replace the rotors instead of getting them turned, too much of a hassle to have to take them to a shop. Would the cheapest Beck/Arnley rotors from Rockauto do? With the Thermoquiet and cheap rotor combo and shipping and the $15 rebate, the parts should come out to be around $90. Sound reasonable?

Also, is it possible to check the pads while I'm under the car doing an oil change without taking the wheels off? I want to make sure this isn't just in my head, and maybe my sisters too since she also said something about it the other day.

On the other hand my mom's Camry just got a front and rear brake job with a fluid flush for $363 at an independent shop, and he used Wagner Thermoquiets. Debating whether I'm brave enough to give it a shot. Hmmm...never intended this to turn into the length of a short story. Thanks in advance for opinions.
 
Last edited:
How difficult a job is depends on the person doing it, and their level of comfort with doing such a job.

There's also the safety aspect of it. How comfortable are you with wrenching tight bolts with the wheel off and the vehicle supported from underneath?

Otherwise it's all nuts and bolts, and making sure that everything goes back together just the way you found it. Also you'll need to know how to bleed brakes.
 
Go on You Tube and type in your model and "brake job". You will get dozens of how-to videos on how to do both front and rear brakes. For my Saturn, there are complete videos for front and rear. The video for that car is only 8 minutes long for front and around the same time for rear brakes, so how hard could it really be? The biggest thing I noticed is that the guy says you must properly grease certain parts of the brakes and not to lose or wrongly reinstall the orientation of the springs.
 
Originally Posted By: vranasaurus
Quote:
Also you'll need to know how to bleed brakes.


You don't need to bleed the brakes to replace the pads.


its not required, but its a good thing to do.

also depending on what kind of car you have the breaks can be even easier. my Volvo, has Brembo 4 pot calipers, so i don't have to take the caliper off to change pads.
 
Yes, you're okay with the fluid. But if you should make a noob mistake, like stomp on the brake pedal when the caliper is off (piston pops out), you'll need to know how to bleed the brakes.

Physically, the toughest part of the job is removing the caliper mount bolts and any sliding pins that are bolted. I try to do that (or at least get it started) with the wheel on and car on the ground (for safety) if I can.

If you search hard enough, most model-specific forums have a how-to on brake service. Maybe there's a Honda site with that info.

Generically speaking, a good brake job would include cleaning out the pad mounting slot on the caliper with a wire brush, using Disc-Quiet compound on the backside of the pads (unless it already has anti-squeal shims built into the pads), and relubing the slide pins with a silicone-based grease.
 
More distance meaning more pedal travel or force, or you mean the brakes can't even lock up the tires or activate the ABS on dry pavement anymore?

Pull the wheel off and check the pad thickness before you do anything. There may be lots of life left.

Just pads and rotors: 2
Add in the brake bleed: 4

As long as you have a manual and follow its advice and torque specs, it shouldn't be too difficult.

I've always just bought the cheapest FF rated pads I could find. I've only bought and changed 4 sets in my life so I don't have a lot of experience with different brands.

I don't bother changing the rotors unless they're warped or heavily grooved.
 
I have an '04 civic and I just replaced the front pads at 75K miles for the first time. Most of my mileage is highway.

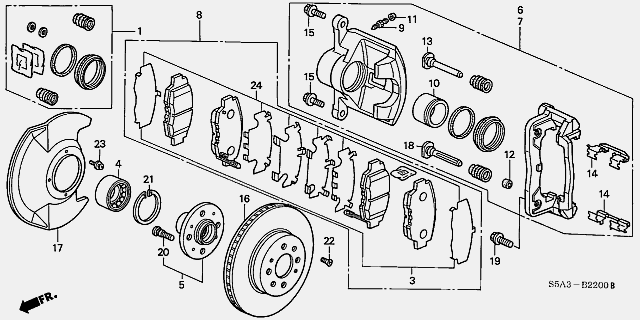
Replacing the pads is very easy. The Civic has a unique design of caliper bolt that I've never seen before. It's a short bolt that screws into the pin assembly. Once the 2 bolts are out the caliper can be removed without removing the pins. As long as the rubber seals aren't damaged and each pin slides easily I recommend leaving them alone.

Also, my rotors were still good. Minimum wear, no scoring, and no warping. I also left them alone. So if you decide just to replace the pads all you have to do is remove ONE caliper bolt and tilt the caliper to access the pads. You'll need a U clamp to depress the caliper piston back into the bore.

Finally, since I got excellent service out the factory pads I used them for the replacements. This place has them for a very reasonable price...

http://www.hondaautomotiveparts.com/
 
Some additional help.

Item 15 are the caliper bolts I was referring too.
The caliper pins (13 and 18) don't have to be removed and can stay in place as long as there is no seal damage and they depress easily and pop back out without hanging up.

14S5P0_B22.gif
 
Since this is the first time you have replaced pads, you ought to have a friend over who has done this job before in case you run into problems or questions. you ought to have a good manual or access on the net to some good sources. Not just You Tube. You ought to buy Honda OEM pads or what ever the Honda sites recommend you use. I have often heard that Hondas are sensitive to what pads are used. Not like most GM cars where you can use any good pad and you will have no problem. You may not have to replace or turn the rotors. Are the brakes pulsing when you come to a stop? If not , just remove the rotor surface glaze with emory cloth. You need to have on hand: High temp lubricant, brake cleaner, and the anti chatter blue goo you put on the back of the pads. Some pads come with the anti chatter/squeal in little plastic bags.
 
I've only done front brakes/rotors. I never had to do my rear drums but I will have to when they need replacement.

It took me 5 or 6 hours, only because I realized I needed stuff I didn't have.....like a 17mm socket. It was my first front brake job, and I did curse a bit trying to get the pads on. I found it to be difficult because whenever I tried putting the caliper back over the rotor, the pads would fall out. I eventually got them installed.

I didn't bleed the brakes. Just make sure you grease the caliper pins, and use lots of brake cleaner. Get everything clean before installing the pads. Don't want to have a bunch of gunk behind them contributing to un-even pad application. Also important you clean the area behind where the rotor attaches to the car. The rotors needs to sit flush against that. Also, clean the rotors with brake cleaner as well since they will be greased from the factory.

Quick tip: Use a coat hanger to suspend the caliper from the struts while you are working on the pads. Don't let it hang by that brake line! Oh yea, and definitely wear latex gloves because you will get filthy.

Cost me $90 - I used Raybestos Rotors and Raybestos Ceramic pads. Would have cost probably something like $300 at an independent shop.

Keep in mind I'm not the most mechanically inclined person....but I'm learning.
grin2.gif
 
Last edited:
I've used Bendix Import Quiet pads on our Civic and they are excellent pads. Lots of bite, little dust and zero noise.

I think the Civic has the most simple and easy design to work on. Changing the pads takes about 30 minutes. With your low mileage on your Civic, I would not replace the rotors.

On a scale of 1 to 10...... the brakes on a Civic = 3
 
I'm going to school at USF in Tampa now but I live in Punta Gorda which is about 100 miles south of Tampa (needed to throw that little detail in there because usually people don't know where that is).
 
The pads may not be worn out, so I would check them first. It might be a good idea to take the car to a chain shop that offers free brake inspections.

Brake jobs aren't difficult if you have the proper tools. For a Civic, you'd need 1/2" drive sockets, a breaker bar, 1/2" drive ratchet, a C-CLAMP, a 1/2" drive torque wrench, 3 pound dead-blow mallet and an impact screwdriver. You can get all of those tools for around $85 at Harbor Freight if you do not already own them. However, without the proper tools, brake jobs can be difficult and frustrating as the bolts are often very tight.

The Wagner ThermoQuiet pads are OK, but I really prefer the Raybestos Advanced Technology Ceramic pads. They cost an extra $25 more, but an extra $25 is worth it for something that you do not replace very often. Anyway, the Wagner EDGE pads may use the same material as the ThermoQuiets (from what I was told), but the pad has more chamfers and also includes new abutment clips. I would just use the ThermoQuiets as the EDGE isn't worth the extra money. Most of those hardware kits fit rather poorly from my limited experience and I think the extra chamfers are a joke.

Don't bother with the cheap Beck/Arnley rotors. Those are probably the same as any low-end Chinese rotor. Your local Advanced Auto store can order the Wagner Premium rotors for your car for $27 each, as I can see from the partsamerica website. That would be much cheaper than ordering rotors online, rotors are very heavy to ship.

Anyway, have the brakes checked first before you go any further. If they do need replacement, the procedure is as follows. Remove the brake fluid reservoir cap and make sure the fluid level is between MIN and MAX before you begin. Turn the steering wheel all the way to the left or right, depending on which side you are working on. Remove the two caliper slide pins, then remove the caliper from the pads. Wipe down the caliper piston and the rubber boot with brake cleaner. If the boot is not torn (if it is, you need to replace the caliper with a rebuilt one), remove one of the old brake pads and place it over the caliper piston. Then take your c-clamp and compress the piston back into the caliper. The piston should compress easily, if it doesn't, the caliper needs to be replaced as well. Use a piece of metal wire to hang the caliper somewhere, DO NOT let it hang on its own. Remove the pads from the caliper bracket. Next, use your breaker bar and remove the two bolts that hold down the caliper bracket. Then use the impact screwdriver to remove the two screws that hold down the rotor to the rotor hat. Grab the rotor with your hand and whack it hard from the backside using the rubber mallet to remove it. It may be "stuck" onto the hub, so several hard whacks may be needed. After the rotor is removed, clean the hub flange very well with sandpaper, steel wool, etc.

Installation is the reverse. Clean the rotor with brake clean before reinstalling. Use a toothbrush and brake cleaner and clean the clips that sit on the mounting bracket very well (both sides). Lubricate the slide pins with the $1 packets of synthetic caliper grease by Permatex. Do not use anti-size on the slide pins. If you decide to use the Wagner pads, DO NOT put ANYTHING on the backs of them. They are to be installed dry as they have the special one-piece shim. Otherwise, the Raybestos pads need a thin coat of synthetic caliper pins on the parts of the shim that are contacted by the caliper and the caliper piston. Do NOT reuse the OE shims for any reason. Torque everything to spec. Test drive and burnish the pads by doing 30 stops from 30 mph with a 30 second cool down in-between.
 
Thanks Mike for the write up. I will certainly read it tomorrow since I'm in no condition for any cognitive processes right now. And I apologize for missing your message on facebook.
 
I was gonna say if you lived closer and didn't feel comfortable doing the brakes yourself , you could pass by and I could do the job on my day off.
 
Status
Not open for further replies.
Back
Top