- Joined
- Aug 4, 2020
- Messages
- 557
If you have a zero turn mower with the Hydro-Gear ZT-2800s, this guide is for you! I am very proud to say that I did this all on my own (the only advice came from this forum prior to starting the job), and I have absolutely ZERO prior experience with small engine parts other than filters and spark plugs. Basically, if I can do this, you can too. This was done on a 2015 Hustler Raptor SD 60", but these hydros are common on countless makes and models. I didn't take the pictures as I went, as I thought of doing this guide afterward, but I'll still be thorough.
Let's start with why I wrote this guide and tackled this job. I wanted to change the oil in the hydros because I know it was the factory fill. The mower is 6 years old with 230 hours on the clock. The fluid looked dark through the clean reservoir plastic even with a light shining into it (I later learned this was misleading. DON'T assume based on appearance through the tank plastic - it WILL look darker than it really is). Within 5 minutes of starting the oil change, the job came to a complete halt when I removed the wheels and discovered this:

I had the idea to take a small soft brush and try to get all the dirt off. 5 minutes later that turned into a firm brush. 5 minutes after that the wire brush came out. There was no end to the dirt. After doing the absolute best I could with the brushes I had and the space available between all the parts, this was what remained:

This was still unacceptable to me, so I caught a bit of clinebarger syndrome and decided to completely remove the hydros and do the job the right way.
So let's get to the guide. First, here's what you'll need to do exactly what I did (YMowerMV):
-Some type of jack that can lift the rear wheels off the ground
-Two jack stands
-A 21mm socket and ratchet to remove the wheel lugs
-Several cans of brake cleaner (I think I used 5?)
-A 3/8" Ratchet with 7/16", 1/2", and 5/8" sockets
-7/16", 1/2", and 5/8" wrenches
-A 1/4" Allen wrench/hex key
-A pair of external snap ring pliers
-Either Hydro-Gear's official Maintenance Kit (expensive), OR 5 quarts of either 20W-50 or 15W-50 motor oil & two hydro filters (WIX WL10102 or NAPA Gold 400102).
-Something to catch about 4 quarts of used oil, preferably a large drain pan that you can set the hydro on to drain.
-A fluid pump to transfer the clean oil into the hydros (this is included with the official maintenance kit) - or do it the hard way like I did and use a funnel (messy and not recommended).
-An air compressor and blow gun are recommended, but NOT required.
First, break all of the lugs nuts loose while the wheels are on the ground. Jack the rear of the mower up and place jack stands under each side. Remove the lugs nuts and then both wheels. Next, flip the seat up and remove these two screws from the reservoir tank:

Next remove these two nuts in red for the hydro linkage. You will also need to remove the 1 nut in pink to get enough room to angle the tank and drop it through the bottom (this part will require some wiggling and prying, but it can be done):

Now go back to the hydros and decide if you want to lower one at a time or both together. I had a floor jack, so I chose both together (if you choose to go the other route, at this point simply remove the brace connecting each hydro). Place the jack underneath the brace holding both hydros together (or under the hydro itself if removing individually). Then remove these bolts (this image is the right side hydro):

Now use the snap ring pliers and remove this snap ring (1 per side):

Next remove the cotter pin for the neutral lockout (left) then slide the arm up over the pin and out through the rear hole. Then remove the final bolt (right). This image is the left side hydro:

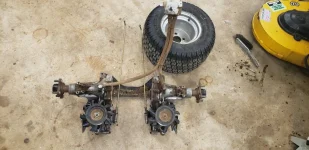
Once this is complete, you can now lower both units (together or individually) to the ground. You'll see something like this:


*This is also a perfect opportunity to change both belts if needed. Specifically, if you have a Hustler, make sure the drive belt doesn't have "teeth." If it does, it's the superseded design, and is probably in TERRIBLE shape. Replace it with the newer "smooth" belt.
Now the fun part. If you don't have the compressor and blow gun, start blasting away the dirt with brake cleaner. If you do have those tools, use that before/during/after the brake cleaner as well. Be sure to get between and especially under the fins, as I missed several spots on the underside even after the third clean blast. Once finished and the brake cleaner is thoroughly dried, you should see a dramatic difference.
Let's start with why I wrote this guide and tackled this job. I wanted to change the oil in the hydros because I know it was the factory fill. The mower is 6 years old with 230 hours on the clock. The fluid looked dark through the clean reservoir plastic even with a light shining into it (I later learned this was misleading. DON'T assume based on appearance through the tank plastic - it WILL look darker than it really is). Within 5 minutes of starting the oil change, the job came to a complete halt when I removed the wheels and discovered this:
I had the idea to take a small soft brush and try to get all the dirt off. 5 minutes later that turned into a firm brush. 5 minutes after that the wire brush came out. There was no end to the dirt. After doing the absolute best I could with the brushes I had and the space available between all the parts, this was what remained:
This was still unacceptable to me, so I caught a bit of clinebarger syndrome and decided to completely remove the hydros and do the job the right way.
So let's get to the guide. First, here's what you'll need to do exactly what I did (YMowerMV):
-Some type of jack that can lift the rear wheels off the ground
-Two jack stands
-A 21mm socket and ratchet to remove the wheel lugs
-Several cans of brake cleaner (I think I used 5?)
-A 3/8" Ratchet with 7/16", 1/2", and 5/8" sockets
-7/16", 1/2", and 5/8" wrenches
-A 1/4" Allen wrench/hex key
-A pair of external snap ring pliers
-Either Hydro-Gear's official Maintenance Kit (expensive), OR 5 quarts of either 20W-50 or 15W-50 motor oil & two hydro filters (WIX WL10102 or NAPA Gold 400102).
-Something to catch about 4 quarts of used oil, preferably a large drain pan that you can set the hydro on to drain.
-A fluid pump to transfer the clean oil into the hydros (this is included with the official maintenance kit) - or do it the hard way like I did and use a funnel (messy and not recommended).
-An air compressor and blow gun are recommended, but NOT required.
First, break all of the lugs nuts loose while the wheels are on the ground. Jack the rear of the mower up and place jack stands under each side. Remove the lugs nuts and then both wheels. Next, flip the seat up and remove these two screws from the reservoir tank:
Next remove these two nuts in red for the hydro linkage. You will also need to remove the 1 nut in pink to get enough room to angle the tank and drop it through the bottom (this part will require some wiggling and prying, but it can be done):
Now go back to the hydros and decide if you want to lower one at a time or both together. I had a floor jack, so I chose both together (if you choose to go the other route, at this point simply remove the brace connecting each hydro). Place the jack underneath the brace holding both hydros together (or under the hydro itself if removing individually). Then remove these bolts (this image is the right side hydro):
Now use the snap ring pliers and remove this snap ring (1 per side):
Next remove the cotter pin for the neutral lockout (left) then slide the arm up over the pin and out through the rear hole. Then remove the final bolt (right). This image is the left side hydro:
Once this is complete, you can now lower both units (together or individually) to the ground. You'll see something like this:
*This is also a perfect opportunity to change both belts if needed. Specifically, if you have a Hustler, make sure the drive belt doesn't have "teeth." If it does, it's the superseded design, and is probably in TERRIBLE shape. Replace it with the newer "smooth" belt.
Now the fun part. If you don't have the compressor and blow gun, start blasting away the dirt with brake cleaner. If you do have those tools, use that before/during/after the brake cleaner as well. Be sure to get between and especially under the fins, as I missed several spots on the underside even after the third clean blast. Once finished and the brake cleaner is thoroughly dried, you should see a dramatic difference.
Attachments
Last edited:

