Today I replaced the hood latch on my Generation 1 Toyota Tundra TRD, that after 16 years of faithful service in the rust belt, gave up the ghost this weekend. The symptom was the hood would not fully close, it would be in the half latched position. This covers the 2000 to 2007 Tundra.
It is not a difficult repair but there are a number of steps and things that must line up. I go through this step-by-step here with photos, for the next person who needs to do it.
First here's the truck and what it looks like with the hood unable to close/latch fully:

On this Tundra the job is made easier because the front grille is actually part of the hood and raises when you life the hood. Therefore it is not necessary to remove the grille to get at the latch mechanism

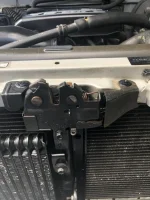
The latch is held in place by three bolts: however only one of the bolts is accessible.
To gain access to the other two you need to remove covers that bolt to

the radiator frame. A Phllips head screwdriver will do it then you pull off the caps. The bracket on the right has two caps

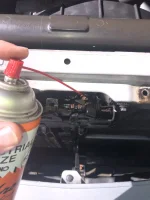
After removing the shields all three bolts are now accessible. Give them a good shot of penetrating oil. I used Kroil.

You will use a 10 millimeter socket to remove the three bolts, or a 10mm box wrench. There is plenty of room so I used a ratchet wrench and a 10mm socket.
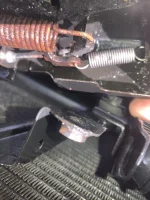
Before removing any bolts scribe the outline of where the existing latch is, before you remove it. This will scratch a fine outline of the old latch, and the new one will line up perfectly. This is a very important step and is not so obvious. Placement of the new latch is critical.

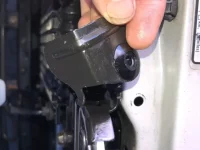
Then remove the bolts. The old latch will come free but is still attached to the hood cable that must be carefully removed from the old part. It is the other end of the "hood release" lever under the dashboard that you pull to open the hood.
Then cable is covered with a nylon sleeve that fits into a slot cut into the hood release. At this point I may upload no more photos.
To be continued in part 2.
It is not a difficult repair but there are a number of steps and things that must line up. I go through this step-by-step here with photos, for the next person who needs to do it.
First here's the truck and what it looks like with the hood unable to close/latch fully:
On this Tundra the job is made easier because the front grille is actually part of the hood and raises when you life the hood. Therefore it is not necessary to remove the grille to get at the latch mechanism
The latch is held in place by three bolts: however only one of the bolts is accessible.
To gain access to the other two you need to remove covers that bolt to
the radiator frame. A Phllips head screwdriver will do it then you pull off the caps. The bracket on the right has two caps
After removing the shields all three bolts are now accessible. Give them a good shot of penetrating oil. I used Kroil.
You will use a 10 millimeter socket to remove the three bolts, or a 10mm box wrench. There is plenty of room so I used a ratchet wrench and a 10mm socket.
Before removing any bolts scribe the outline of where the existing latch is, before you remove it. This will scratch a fine outline of the old latch, and the new one will line up perfectly. This is a very important step and is not so obvious. Placement of the new latch is critical.
Then remove the bolts. The old latch will come free but is still attached to the hood cable that must be carefully removed from the old part. It is the other end of the "hood release" lever under the dashboard that you pull to open the hood.
Then cable is covered with a nylon sleeve that fits into a slot cut into the hood release. At this point I may upload no more photos.
To be continued in part 2.