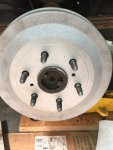
A few shots from my latest drum brake job

Joined
Dec 31, 2017
Messages
15,280
Location
SE British Columbia, Canada
Here are a few shots from a 2011 Silverado. It had a diff oil leak so it’s a bit dirty. In the upper left is that pesky L bracket GM was using. The drums are a store brand from Lordco Auto Parts, who are big in British Columbia. I’ll see how they weather the salt brine. Also, I slathered anti-seize on the inside corner of the hub prior to mounting the drum. You can just make out a ring of it where it attaches to the drum. I pretty much had to pull the shoes all the way in with the star adjuster just to get the drum on. Next time I would order shoes that have a E brake arm already attached to one of the brake shoes. It was a real PITA to pull the C clip to get the arm off the existing shoe and reattach it to the new shoe. Also I would buy new spring hardware. The best tool to do the work? A pair of pointy nose vise grips. Enjoy.
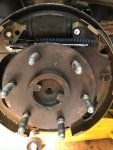
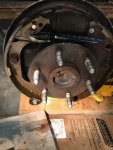
80D3BFD1-FDD7-4B89-83B4-676F22D2705C.jpegD2957F5B-185A-4C00-9BB5-8A2F476DEA9C.jpeg63ADB173-AF50-4E77-BDED-DA51AD3B5567.jpeg
 
Last edited:
The real test is when you need to remove the wheels :sneaky:
Good to have a BFH. I removed the tires to rotate them. Here’s what they look like two years later in the rust belt.

The first photo is the passenger side. The tire came off easily. The 2nd and third photos show the need for Liquid Wrench and a love tap with the sledge hammer.


4C9D126E-83FA-4448-82AB-8ABD9459B774.jpeg
70AB165F-AC36-45FE-B55A-4BC061A73D83.jpeg
8289F54D-3253-4522-B27D-8F6877C54277.jpeg
hammer.
 
L-bracket - the lever for the self-adjuster? I’ve bought a spring tool for Japanese drum brakes to make removing that spring a bit less painful.

I was watching a YouTube of a Land Cruiser guy using a old school set of brake spring pliers for them, he suggested using a piece of stiff plastic to give the point end something to “bite” on. I used a piece of Plexiglass and it worked nicely.
 
Back
Top